Therefore, program motion control codes in C#.
Here, introduce one debugging & diagnosis tool
“RTSys” together for you.
It can
help check motion control effect of C# operation.
After C# coding, Today, let’s learn below content:
[What is RTSys]
[How to Use RTSys to Debug the C# Program]
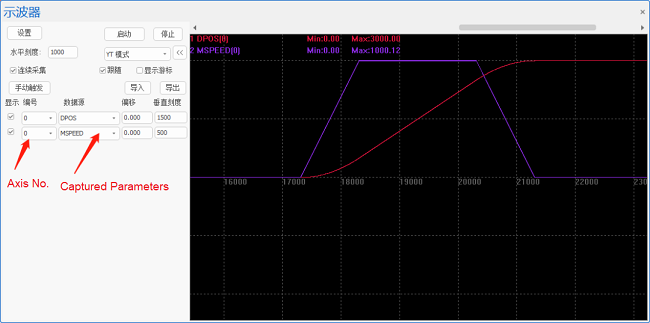
[Scope Debugging Result of C# Program]
Before that, review “
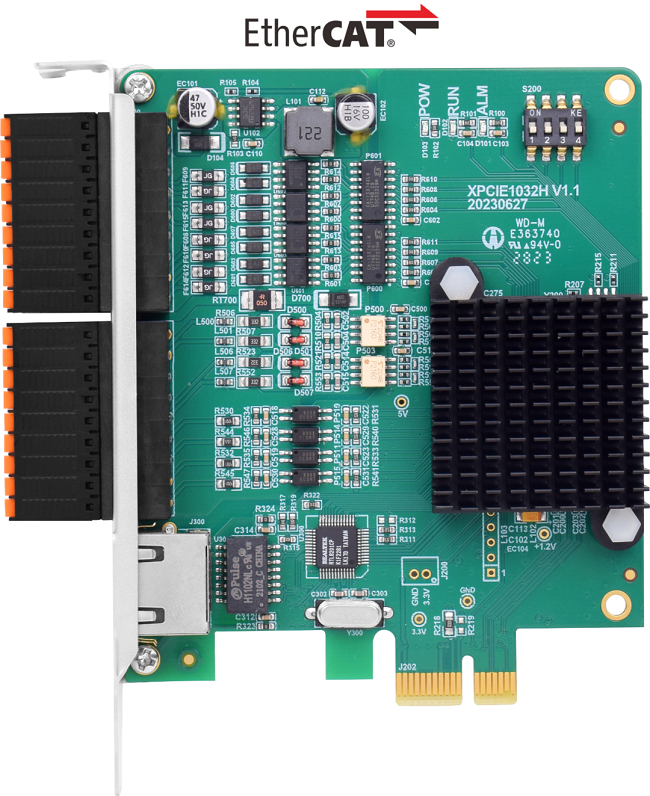
XPCIE1032H card & MotionRT7 soft kernel Advantages”
P
1D/2D/3D PSO (high-speed hardware position comparison output): suit to vision fly-shooting, precise dispensing, laser energy control, etc.
P
EtherCAT & pulse axes: hybrid linkage, and hybrid interpolation.
P
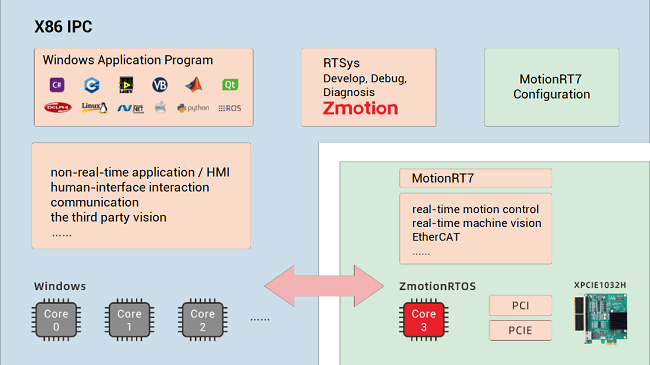
in PC Windows development, it can achieve real-time, and the instruction interaction speed is
faster 10 times than traditional PCI / PCIe.
Average Value |
C++ LOCAL |
C# LOCAL |
Traditional PCI / PCIe |
PLC EtherNET |
Period of one command reading with 1W times |
4.70us |
5.3us |
64us |
500us-10ms |
Period of one command reading with 10W times |
3.90us |
5.7us |
65us |
500us-10ms |
Period of multi-command reading with 1W times |
6.20us |
8.85us |
472us |
500us-10ms |
Period of multi-command reading with 10W times |
5.50us |
8.37us |
471us |
500us-10ms |
Some old friends are familiar with
ZDevelop
. Zmotion updates it, then
RTSys
is made.
RTSys
is one free IDE software that can develop, debug, and diagnose.
To install RTSys in your PC, it should be meet below requirements:
Items |
Minimum Requirements |
Recommended |
CPU |
Pentium level processor, main frequency: 1GHz |
Intel i5 level processor, main frequency: 2.9GHz |
Graphics |
/ |
OpenGL version can’t be less than 1.5 |
Memory |
1GB |
4GB |
Remain Hard Disk |
1GB |
4GB |
Operation System |
Windows7 |
Windows10 |
Display |
1024x768/24-bit true color |
1920x1080/8-bit RGB |
Communication |
RS232 |
RS232/USB/Ethernet (can be converted by HUB) |
A.
Development
Zmotion motion controllers all can be developed by RTBasic language in RTSys except PC languages (
C#/C++/LabVIEW/Python…
), that is, if you don’t use C# to do coding, RTBasic of RTSys is another choice.
RTSys supports
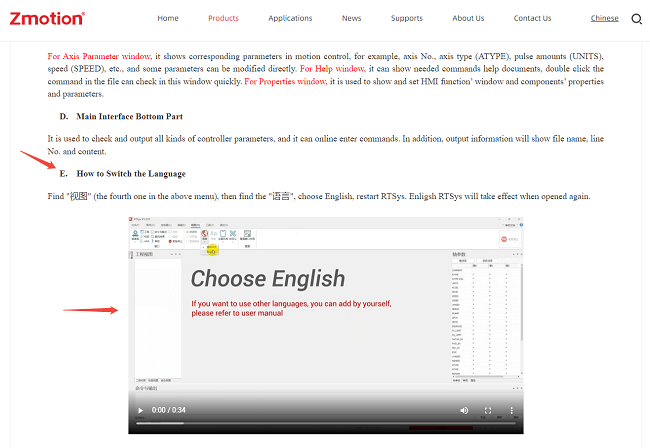
Chinese and English interfaces by default, you can switch them directly, please check RTSys product – System Architecture – E. Also, you could add other languages.
Actually, there are
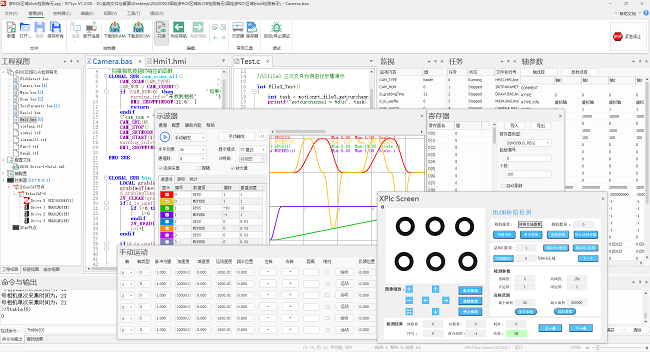
4 languages: RTBasic, RTPlc, RTHmi, C language (RTVision is mainly for machine vision function).
It is really powerful, integrating
motion control and
machine vision functions.
B.
Debugging & Diagnosis
It can debug Basic file directly, and breakpoint can be added.
For diagnosis, there are specialized bus state diagnosis, troubleshooting functions.
After coding, you can know real-time data in axis parameter window, including its waveform could be captured and shown clearly. In this way, easy to get how your motion control is, also, then you can real-time modify it.
And this part is today’s main knowledge.
How to Use RTSys to Debug the C# Program
(1)
C# Development
At first, develop needed motion in C#.
As usual, call Zmotion encapsulated C# library file. And Zmotion provides corresponding PC motion control commands.
Download Add.:
https://www.zmotionglobal.com/download_list_17.html
Contact Us:
https://www.zmotionglobal.com/contactus.html
Here, we take “C# single-axis motion” as the example (it also can be found in above download address).
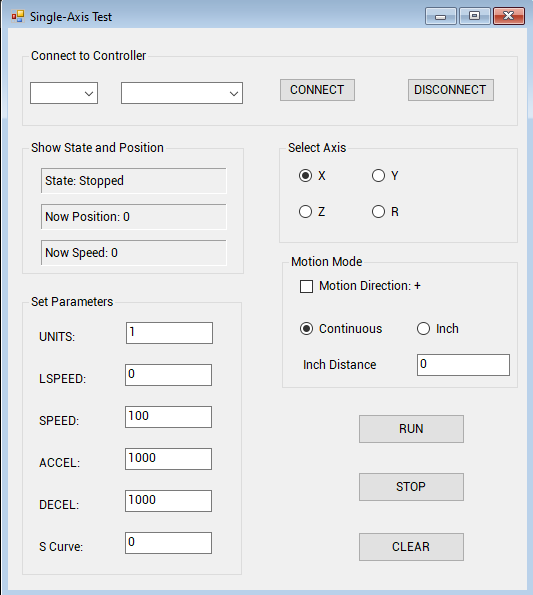
This is the example UI interface.
It can be seen there is one button of LOCAL connection, the corresponding C# function is
ZAux_FastOpen.
Below shows the routine used PC C# function. Details can be learnt from
PC Programming Manual.
ZAux_FastOpen |
Connect to XPCIE1032H by LOCAL |
ZAux_Direct_SetSpeed |
Set speed, the unit is units/s |
ZAux_Direct_MoveTable |
Modify TABLE value in motion buffer |
ZAux_Direct_GetIn |
Read input state |
ZAux_Direct_SetOp |
Open output port |
ZAux_Direct_GetOp |
Read output |
ZAux_Direct_SetVrf |
Read VR data |
ZAux_Direct_Set0x |
Set MODBUS bit register (MODBUS_REG) |
(2) RTSys Debugging
After connection, you can set axis parameters in UI interface directly.
Then, select axis, move it with needed mode.
Next, enter RTSys to debug the program.
The first step is to connect RTSys to your controller.
Find controller, click controller.

Then, connection window appears.
Here, please select LOCAL, same as C#.
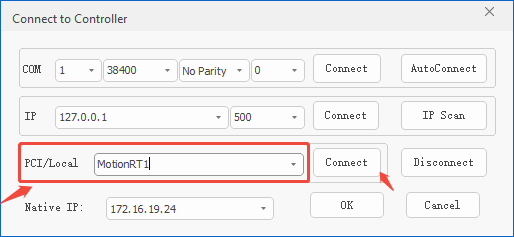
Note: RTSys supports simulation operation:
you could connect to simulator, that is, if you don’t have real controller, simulator is valid to run the program and debug in advance.
B.
Check Controller State
After connection, you can know controller basic state by clicking
“state the controller”.
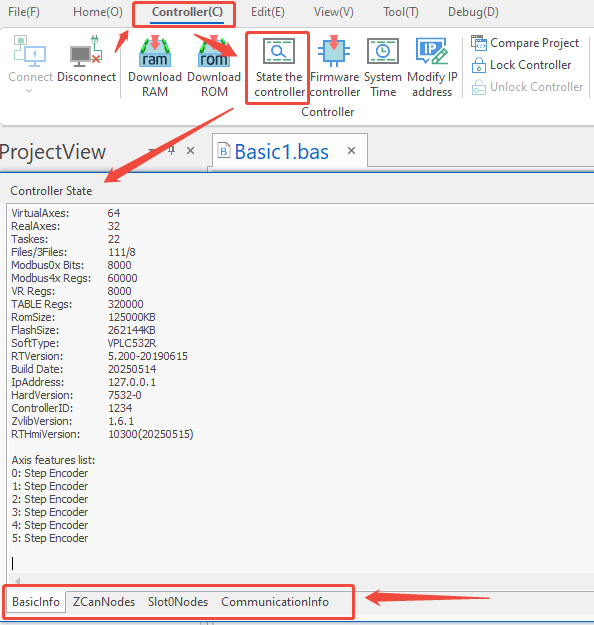
It can be known there are
4 parts.
a.
Basic info: connected controller basic information, like, controller model, max tasks, IP address, version No.
b.
ZCanNode: connected controller’s local resources, including axes, IO, AIO numbers, and expanded resources by CAN.
c.
Slot0Node: all connected EtherCAT devices’ No., device ID, DIP.
d.
Communication Config: CAN information & serial configuration information (RS232, RS485, RS422).
C.
Observe Axis Parameters
In right side, you will see one window, whose name is
axis parameter, all kinds of parameters’ changes can be watched clearly.
After setting parameters in C#, here, RTSys axis parameters will be synchronized.
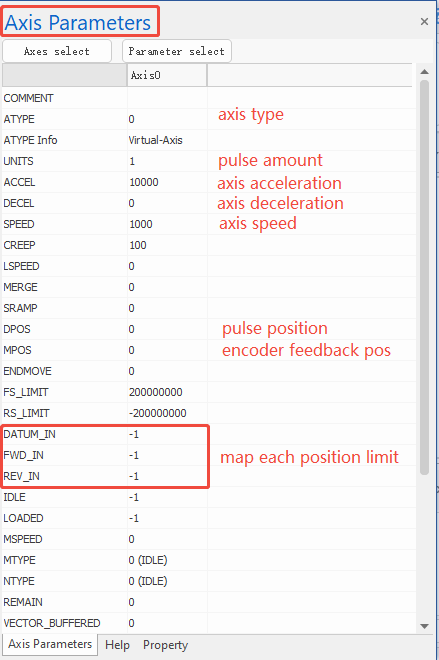
For example
, SPEED means axis speed. When the speed is set in C# through ZAux_Direct_SetSpeed command, in RTSys, view SPEED value, it should be same as you configured value. If they are not consistent, may C# speed value is not set successfully.
In tool menu, there are many tools.
Let’s see the
IN & OP at first. You can select needed IO range.
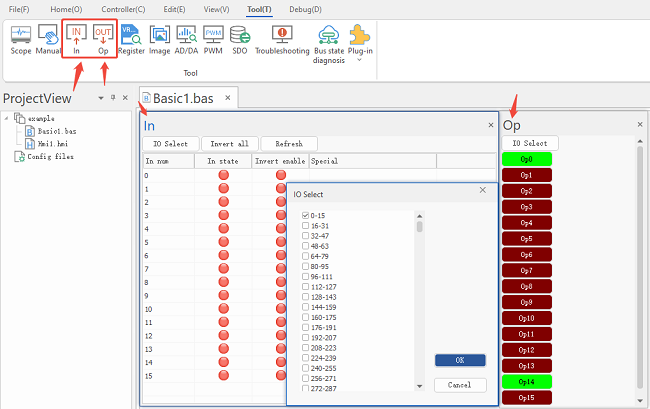
In C# program, use ZAux_Direct_GetIn to read input state, use ZAux_Direct_GetOp to read output state and use ZAux_Direct_SetOp to set output state.
After C#, you can check whether they are operated successfully by these two windows.
E.
Set & View Register Value
Click Tool, find
register, and open it.
You can select register type, set MODBUS / VR / TABLE values, at the same time, view program values.
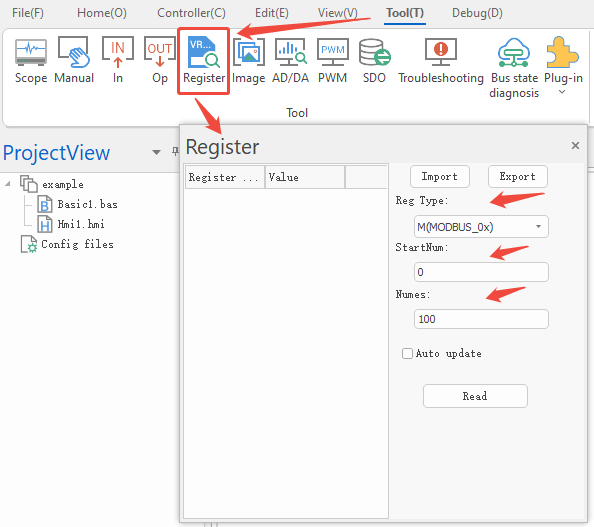
In C# program, use ZAux_Direct_MoveTable to modify TABLE register value of buffer. Correspondingly, VR and MODBUS value also can be read and written.
Click Tool, find
manual, and open it.
It can control the corresponding axis to move required motion,

Click Tool, find
SCOPE, and open it.
It can capture real-time data during moving.
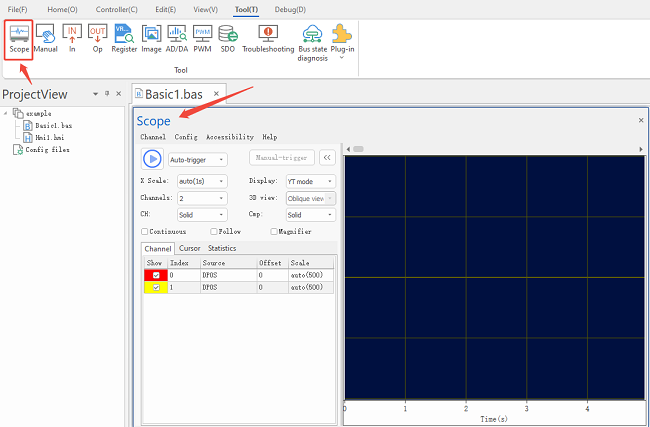
For C# program, you only need to compile directly to run it, then scope will capture automatically.
Please note “
TRIGGER
” command must be added in program. Otherwise, click ON, then click manual trigger, download it into RAM/ROM at last to do sampling.
For Basic program and more SCOPE details, please refer to RTSys manual / RTBasic manual.


