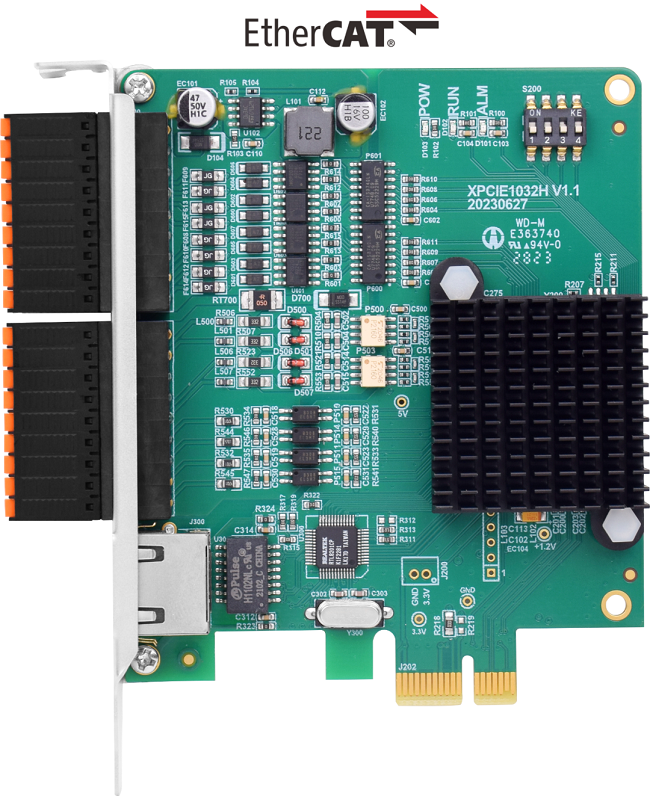
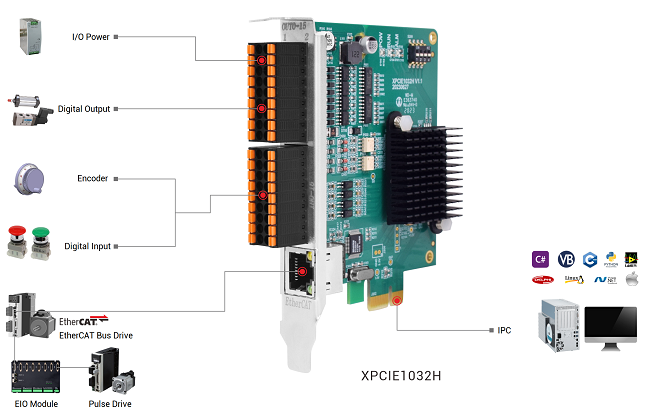
--XPCIE1032H Hardware Info--
Axis Control:
4-64 axes
IO control:
high-speed digital IO for latch, PWM, PSO, encoder IN.
Interface:
EtherCAT (motion control & IO expansion)
Development:
PC programming languages -- C#, C++, Labview, Python, etc.
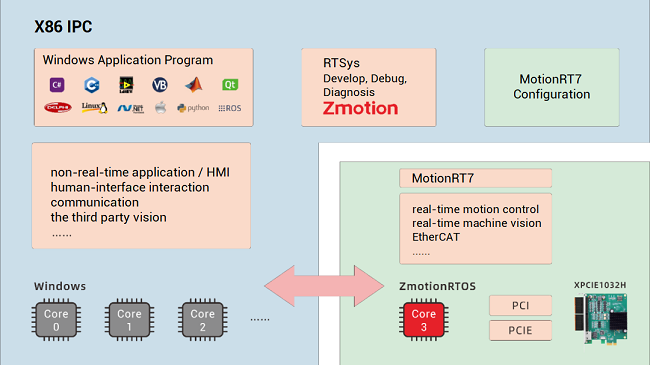
--XPCIE1032H Software “MotionRT7”--
High-speed kernel interaction brings faster command interaction:
one single command & multi-command interaction time (once) can reach about 3-5us (below shows the test result).

--XPCIE1032H Card & MotionRT7 Soft Kernel--
P
1D/2D/3D PSO (high-speed hardware position comparison output): suit to vision fly-shooting, precise dispensing, laser energy control, etc.
P
EtherCAT & pulse axes: hybrid linkage, and hybrid interpolation.
P
in PC Windows development, it can achieve real-time, and the instruction interaction speed is
faster 10 times than traditional PCI / PCIe.
[
Related Zmotion PC Motion Commands
]
Through C# development, Zmotion provides one general PC motion control commands.
Download Add.:
https://www.zmotionglobal.com/download_list_17.html
Contact Us:
https://www.zmotionglobal.com/contactus.html
A.
ZAux_FastOpen:
connect to controller
B. ZAux_Direct_Single_Vmove:
do continuous motion in one direction for one single axis
C. ZAux_Direct_Single_Cancel:
stop one single axis.
D.
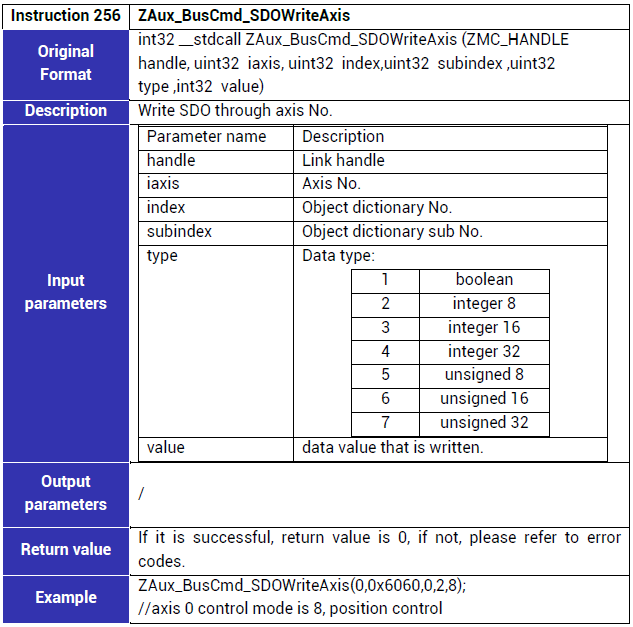
ZAux_BusCmd_SDOWriteAxis:
SDO writing by axis No.
E. ZAux_BusCmd_GetDriveTorque:
read current EtherCAT torque, please set corresponding DRIVE_PROFILE type.
F. ZAux_BusCmd_SetMaxDriveTorque:
set current EtherCAT torque, please set corresponding DRIVE_PROFILE type.
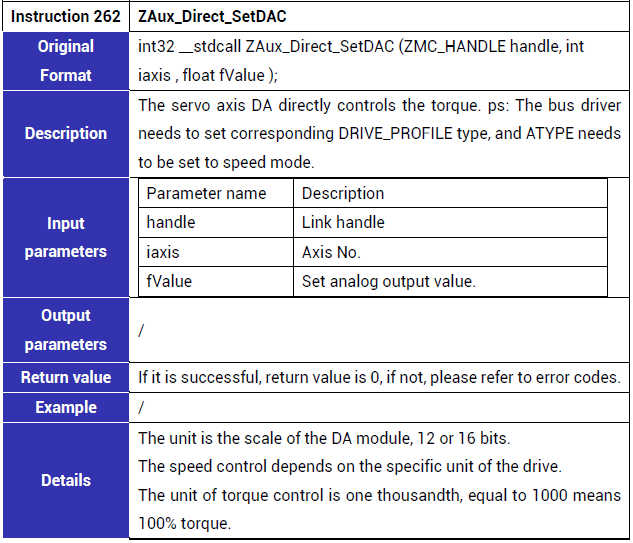
G. ZAux_Direct_SetDAC:
servo axis DA controls control torque.
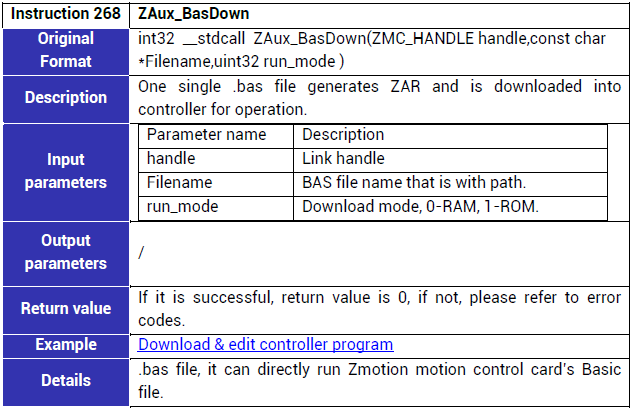
H. ZAux_BasDown:
one single .bas file generates ZAR file, then be downloaded into controller.
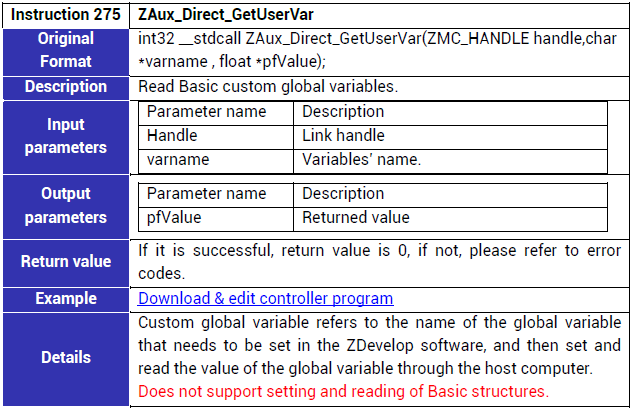
I. ZAux_Direct_GetUserVar:
read Basic self-defined global variables.
--Other Basic Axis Parameter Commands--
ZAux_Direct_SetUnits |
Set pulse amount (units) |
ZAux_Direct_GetUnits |
Read pulse amount (units) |
ZAux_Direct_SetAccel |
Set acceleration, the unit is units/s/s |
ZAux_Direct_GetAccel |
Read acceleration, the unit is units/s/s |
ZAux_Direct_SetDecel |
Set deceleration, the unit is units/s/s |
ZAux_Direct_GetDecel |
Read deceleration, the unit is units/s/s |
ZAux_Direct_SetSpeed |
Set speed, the unit is units/s |
ZAux_Direct_GetSpeed |
Read speed, the unit is units/s |
ZAux_Direct_GetDpos |
Read axis planning position, the unit is units |
ZAux_Direct_GetMpos |
Read axis measurement position, the unit is units |
ZAux_Direct_GetIfIdle |
Read whether the axis motion ends or not |
[
EtherCAT Modes C# Routine Introduction
]
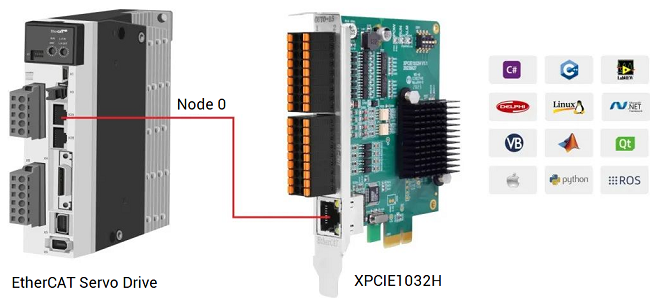
Here, there is one EtherCAT initialization program.
*EtherCAT motion control card: Zmotion XPCIE1032H – master station.
*EtherCAT drive: Panasonic – slave station 1 – node 0.
B.
Program Parts
a.
Full C# EtherCAT Initialization File.
Please contact us:
https://www.zmotionglobal.com/contactus.html
In “Form” design interface, you can find needed control, then drag them to do UI interface design.
EtherCAT routine UI is shown as below:
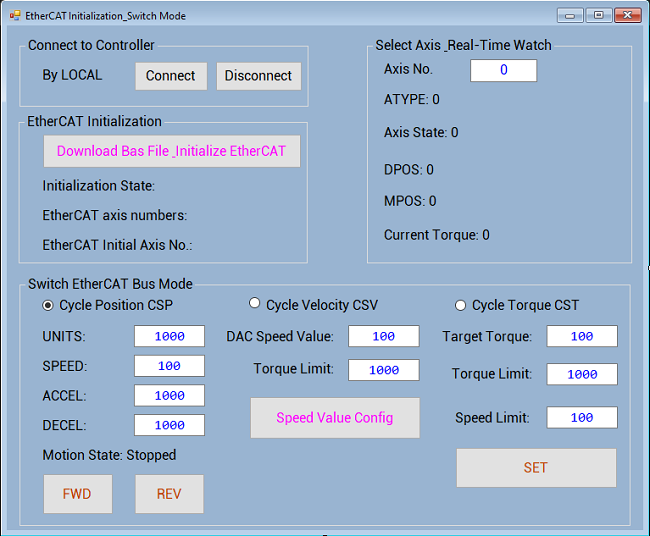
b.
Basic Program: EtherCAT Initialization File
The EtherCAT initialization Basic file can be obtained from Zmotion download page (
https://www.zmotionglobal.com/download_list_15.html
) or contact us.
Then, according to real situation, set corresponding parameters, for example, Ethercat node numbers, drive PDO, etc., in this routine, it configures PDO list 18, this list includes 3 modes data dictionary of 607A-period position, 60FF-period speed, 6071-period torque, that is, while using, you can switch these 3 modes.
As for PDO list configuration, please check
RTBasic Programming Manual
, the command is DRIVE_PROFILE.
[
How to Switch EtherCAT Modes in C#
]
Step 1: Connect to Controller
Connect to XPCIE1032H motion control card through LOCAL, it is triggered by the click event of “connect” button.
private void Connect_Button_Click(object sender, EventArgs e)
{
    if (g_handle == (IntPtr)0)
    {
        DisConnect_Button_Click(sender, e);
    }
    //for MotionRT7, connect to controller through local
    zmcaux.ZAux_FastOpen(5, "local", 1000, out g_handle);
    if (g_handle != (IntPtr)0)
    {
        this.Text = "Connected";
        timer1.Enabled = true;      //after connected, open the timer
        Connect_Button.BackColor = Color.Green;
        MessageBox.Show("Connect Success");
    }
    else
    {
        MessageBox.Show("Connect Failed, Please Choose Correct LOCAL!");
    }
}
Step 2: Download into Card
Download above EtherCAT initialization file of Basic script into controller RAW (will be saved when power down) – trigger it by one click event, that is, press button “download bas file” to browse BASIC file to download it.
Note: it will automatically execute BASIC program to do EtherCAT initialization after downloading.
private void BasDownLoad_Button_Click(object sender, EventArgs e)
{
    if (g_handle == (IntPtr)0)
    {
        MessageBox.Show("No Controller Connected!", "Note");
    }
    else
    {
        int tmpret = 0;
        string strFilePath;
        //show one standard dialog frame, which tells you open needed BAS file
        OpenFileDialog openFileDialog1 = new OpenFileDialog();
        openFileDialog1.InitialDirectory = "\\";
        openFileDialog1.Filter = "Config File(*.bas)|*.bas";
        openFileDialog1.RestoreDirectory = true;
        openFileDialog1.FilterIndex = 1;

        //open configuration file
        if (openFileDialog1.ShowDialog() == DialogResult.OK)
        {
            strFilePath = openFileDialog1.FileName;
            tmpret = zmcaux.ZAux_BasDown(g_handle, strFilePath, 0);
            //download into RAM, after downloaded, it will automatically run one BASIC program, the EtherCAT initialization file.

            if (tmpret != 0)
            {
                MessageBox.Show("File Downalod Failed!", "Note");
            }
            else
            {
                DownLoadFlag = true;    //update file downloading flag
                MessageBox.Show("File Download Succeeded!", "Note");
            }
        }
    }
}
Step 3: Read Customized Variables of Basic Program
After initialized, use
ZAux_Direct_GetUserVar to read Basic customized variables.
In this routine, it will obtain bus initialization mapping axis numbers, bus initialization starting axis No. and bus initialization completion state.
GLOBAL CONST Bus_AxisStart       'EtherCAT starting axis No.
GLOBAL Bus_InitStatus                 'EtherCAT initialization completion state
GLOBAL  Bus_TotalAxisnum      'check scanned total axes numbers
At the same time, we can use timer to update them regularly.
private void Update_EcatInitMessage()
{
    //read Basic program's customized variables -- total axes numbers of EtherCAT initialization
    zmcaux.ZAux_Direct_GetUserVar(g_handle, "Bus_TotalAxisnum", ref EcatAxisNum);
    //read Basic program's customized variables -- EtherCAT starting axis No. of EtherCAT initialization
    zmcaux.ZAux_Direct_GetUserVar(g_handle, "Bus_AxisStart", ref EcatStartAxisNum);
    //read Basic program's customized variables -- initialization state of EtherCAT initialization
    zmcaux.ZAux_Direct_GetUserVar(g_handle, "Bus_InitStatus", ref EcatInitStatus);

    //refresh EtherCAT initialization information
    if (EcatInitStatus == 1 && DownLoadFlag == true)
    {
        BusAxisNum_Label.Text = "EtherCAT axes numbers: " + EcatAxisNum.ToString();
        BusStartAxis_Label.Text = "EtherCAT initial axis No.: " + EcatStartAxisNum.ToString();
        InitState_Label.Text = "Initialization state: Success";
    }
    else if(EcatInitStatus == 0 && DownLoadFlag == true)
    {
        BusAxisNum_Label.Text = "EtherCAT axes numbers: " + EcatAxisNum.ToString();
        BusStartAxis_Label.Text = "EtherCAT initial axis No.: " + EcatStartAxisNum.ToString();
        InitState_Label.Text = "Initialization state: Failure";
    }
    else
    {
        InitState_Label.Text = "Initialization state: Not Finish";
    }
}
Step 4: Real-Time Watch Axis Information & State
In timer configuration, we can add corresponding function to get real-time information.
Functions were shown above.
For example:
Use
ZAux_Direct_GetUnits to watch axis pulse amount changes.
private void Update_AxisPara()
{
    int CurAxisAtype = 0;           //current axis' axis type (ATYPE)
    int CurAxisIdle = 0;            //current axis motion completion flag
    int CurAxisStatus = 0;          //current axis state
    float CurAxisDpos = 0;          //current axis planned position (DPOS)
    float CurAxisMpos = 0;          //current axis feedback position (MPOS)
    float CurAxisUnits = 0;         //current axis pulse amount (UNITS)
    float CurAxisSpeed = 0;         //current axis running speed (SPEED)
    float CurAxisAccel = 0;         //current axis acceleration (ACCEL)
    float CurAxisDecel = 0;         //current axis deceleration (DECEL)

    if (DownLoadFlag == true)
    {
        //update current motion axis
        MoveAxis = Convert.ToInt32(AxisNum_Value.Text);
        //read current axis' pulse amount
        zmcaux.ZAux_Direct_GetUnits(g_handle, MoveAxis, ref CurAxisUnits);
        //read current axis' running speed
        zmcaux.ZAux_Direct_GetSpeed(g_handle, MoveAxis, ref CurAxisSpeed);
        //read current axis' acceleration
        zmcaux.ZAux_Direct_GetAccel(g_handle, MoveAxis, ref CurAxisAccel);
        //read current axis' deceleration
        zmcaux.ZAux_Direct_GetDecel(g_handle, MoveAxis, ref CurAxisDecel);
        //read current axis' axis type
        zmcaux.ZAux_Direct_GetAtype(g_handle, MoveAxis, ref CurAxisAtype);
        //read current axis' demand position
        zmcaux.ZAux_Direct_GetDpos(g_handle, MoveAxis, ref CurAxisDpos);
        //read current axis' feedback position
        zmcaux.ZAux_Direct_GetMpos(g_handle, MoveAxis, ref CurAxisMpos);
        //read whether the current axis completes the motion
        zmcaux.ZAux_Direct_GetIfIdle(g_handle, MoveAxis, ref CurAxisIdle);
        //read current axis' axis state
        zmcaux.ZAux_Direct_GetAxisStatus(g_handle, MoveAxis, ref CurAxisStatus);

        //refresh axis parameters information
        DPOS_Label.Text = "DPOS: " + CurAxisDpos;
        MPOS_Label.Text = "MPOS: " + CurAxisMpos;
        AxisState_Label.Text = "Axis State: " + CurAxisStatus;
        //refresh "motion end" information
        if (CurAxisIdle == 0)
        {
            Idle_Label.Text = "Motion State: Running";
        }
        else
        {
            Idle_Label.Text = "Motion State: Stopped";
        }
        //refresh "axis type" information
        if (CurAxisAtype == 65)
        {
            AxisAtype_Label.Text = "Axis Type: 65(CSP)";
        }
        else if (CurAxisAtype == 66)
        {
            AxisAtype_Label.Text = "Axis Type: 66(CSV)";
        }
        else if (CurAxisAtype == 67)
        {
            AxisAtype_Label.Text = "Axis Type: 67(CST)";
        }
        else
        {
            AxisAtype_Label.Text = "Axis Type: " + CurAxisAtype;
        }
    }
}
Step 5: CSP, EtherCAT Cycle Position Mode
When the PDO includes
607A, set ATYPE as
65. Now, the mode is cycle position, use motion command to control the motor directly.
Before that, set axis basic parameters (UNITS, SPEED, ACCEL, DECEL) through “text” control (text of property).
//pulse amount changes
private void Units_Value_TextChanged(object sender, EventArgs e)
{
    //set axis' pulse amount
    zmcaux.ZAux_Direct_SetUnits(g_handle, MoveAxis, Convert.ToSingle(Units_Value.Text));
}
//motion speed changes
private void Speed_Value_TextChanged(object sender, EventArgs e)
{
    //set axis running speed
    zmcaux.ZAux_Direct_SetSpeed(g_handle, MoveAxis, Convert.ToSingle(Speed_Value.Text));
}
//acceleration speed
private void Accel_Value_TextChanged(object sender, EventArgs e)
{
    //set axis acceleration
    zmcaux.ZAux_Direct_SetAccel(g_handle, MoveAxis, Convert.ToSingle(Accel_Value.Text));
}
//deceleration changes
private void Decel_Value_TextChanged(object sender, EventArgs e)
{
    //set axis deceleration
    zmcaux.ZAux_Direct_SetDecel(g_handle, MoveAxis, Convert.ToSingle(Decel_Value.Text));
}
//stop inverse motion
private void NegaTive_Button_MouseUp(object sender, MouseEventArgs e)
{
    //single-axis motion stops
    zmcaux.ZAux_Direct_Single_Cancel(g_handle, MoveAxis, 2);
}
Then, under CSP position mode, press FWD / REV button all the time, it will call ZAux_Direct_Single_Vmove command to do continuous motion for one single axis. Press down Cancel to stop it by ZAux_Direct_Single_Cancel function.
FWD:
it moves forward because of parameter 3 of the function, it was set as 1.
REV:
it moves reversely because of parameter 3 of the function, it was set as -1.


