


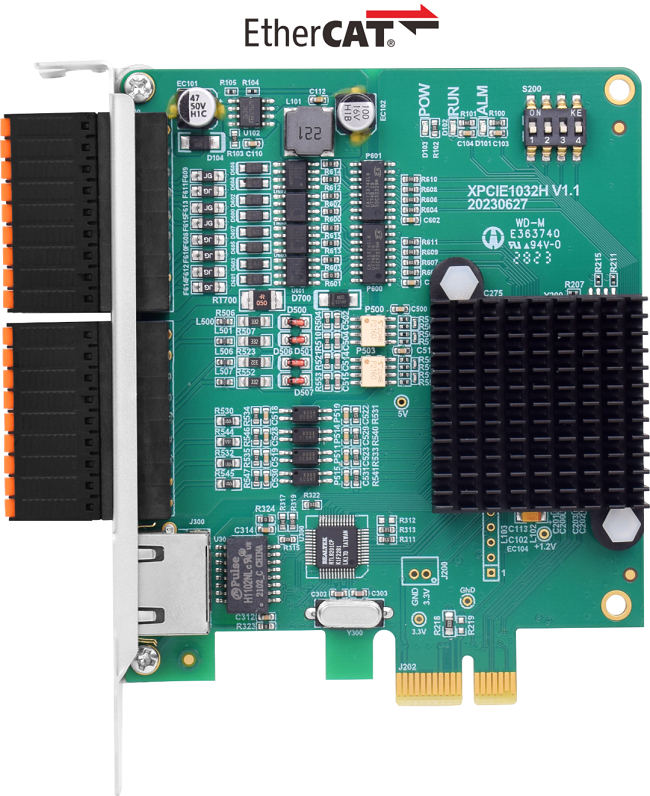
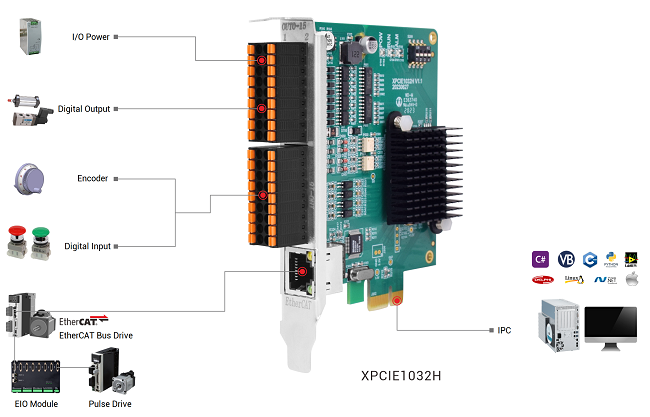
XPCIE1032H is one EtherCAT PCI Express motion control card developed by Zmotion Technology.
And one software kernel is built.
Lesson 1: we have learnt how to install MotionRT7 software drive.
Lesson 2: we have learnt how to build controller connection in C#
Today, lesson 3 is coming.
It mainly talks about EtherCAT initialization in C#
[C# Related PC Motion Control Commands]
[C# EtherCAT Initialization Program Introduction]
[How to Initialize EtherCAT in C#]
XPCIE1032H Video Introduction:https://youtu.be/B1ktSxIRa44
XPCIE1032H Drive Install Video Help:https://youtu.be/0C96S5_hVf0
XPCIE1032H C# Routine Speed Test: https://youtu.be/MYc8r18zh5U
XPCIE1032H C# EtherCAT Initialization: https://youtu.be/uxnFbc3YoGQ
--XPCIE1032H Hardware Info--
Axis Control: 4-64 axes
IO control: high-speed digital IO for latch, PWM, PSO, encoder IN.
Interface: EtherCAT (motion control & IO expansion)
Development: PC programming languages -- C#, C++, Labview, Python, etc.
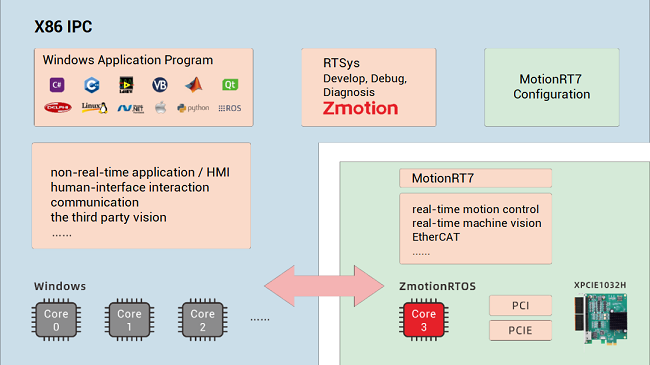
--XPCIE1032H Software “MotionRT7”--
High-speed kernel interaction brings faster command interaction: one single command & multi-command interaction time (once) can reach about 3-5us (below shows the test result).

--XPCIE1032H Card & MotionRT7 Soft Kernel--
* 1D/2D/3D PSO (high-speed hardware position comparison output): suit to vision fly-shooting, precise dispensing, laser energy control, etc.
* EtherCAT & pulse axes: hybrid linkage, and hybrid interpolation.
* in PC Windows development, it can achieve real-time, and the instruction interaction speed is faster 10 times than traditional PCI / PCIe.
[ Related Zmotion PC Motion Commands ]
Through C# development, Zmotion provides one general PC motion control commands.
Download Add.: https://www.zmotionglobal.com/download_list_17.html
Contact Us: https://www.zmotionglobal.com/contactus.html
A. ZAux_FastOpen: connect to controller
B. ZAux_Direct_SetAxisEnable: set axis enable
C. ZAux_Direct_Single_Move: do single-axis relative motion
D. ZAux_Direct_Single_MoveAbs: do single-axis absolute motion
3 parameters to be entered:
*handle: connection handle
*iaxis: axis No.
*fdistance: relative distance / absolute distance
E. ZAux_Direct_Single_Vmove: do continuous motion in one direction for one single axis
F. ZAux_Direct_Rapidstop:stop all axes immediately, even the axis is in interpolation, the interpolation also will stop.
G. ZAux_Direct_Single_Cancel:stop one single axis.
parameters to be entered:
*handle: connection handle
*imode: there are 4 modes: mode 0 / mode 1 / mode 2 / mode 3, for details, please refer to command description.
*iaxis: axis No. – this is only needed for single-axis stop.
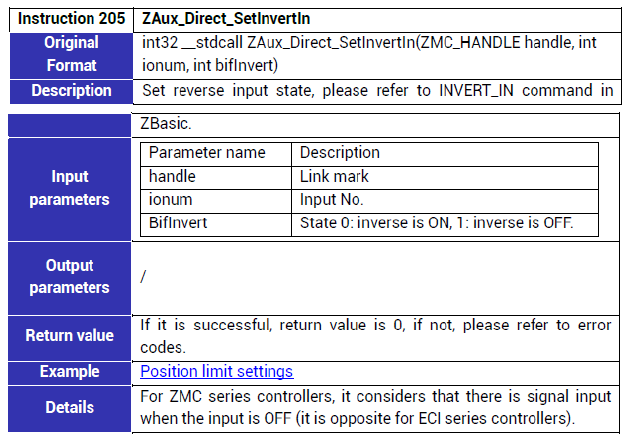
H. ZAux_Direct_SetInvertIn: set IN invert state, please refer to INVERT_IN command.
I. ZAux_Direct_SetFsLimit: set axis forward soft limit, set one bigger value to cancel it.
J. ZAux_Direct_SetRsLimit: set axis reverse soft limit, set one bigger value to cancel it.
K. ZAux_Direct_SetFwIn: set forward position limit signal, set as -1 to cancel it. please refer to FWD_IN command.
L. ZAux_Direct_SetRevIn: set reverse position limit signal, set as -1 to cancel it. please refer to REW_IN command.
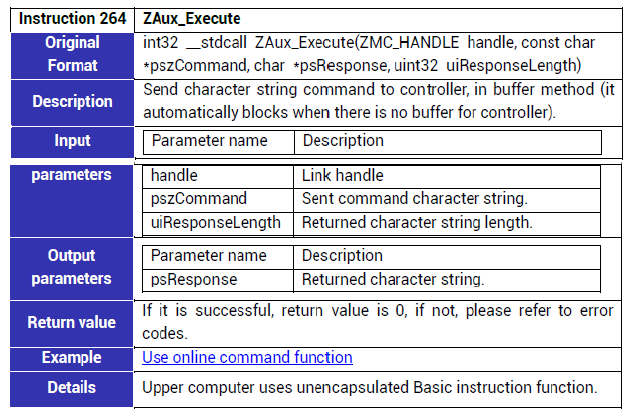
M. ZAux_Execute: send character string command to controller, in way of buffer (when the controller has no buffer, it will be automatically blocked).
--Other Basic Axis Parameter Commands--
ZAux_Direct_SetUnits | Set pulse amount (units) |
ZAux_Direct_GetUnits | Read pulse amount (units) |
ZAux_Direct_SetAccel | Set acceleration, the unit is units/s/s |
ZAux_Direct_GetAccel | Read acceleration, the unit is units/s/s |
ZAux_Direct_SetDecel | Set deceleration, the unit is units/s/s |
ZAux_Direct_GetDecel | Read deceleration, the unit is units/s/s |
ZAux_Direct_SetSpeed | Set speed, the unit is units/s |
ZAux_Direct_GetSpeed | Read speed, the unit is units/s |
ZAux_Direct_SetDpos | Set axis planning position, the unit is units |
ZAux_Direct_GetDpos | Read axis planning position, the unit is units |
ZAux_Direct_SetMpos | Set axis measurement position, the unit is units |
ZAux_Direct_GetMpos | Read axis measurement position, the unit is units |
[ C# EtherCAT Initialization Introduction ]
Here, there is one EtherCAT initialization program.
A. Hardware Parts
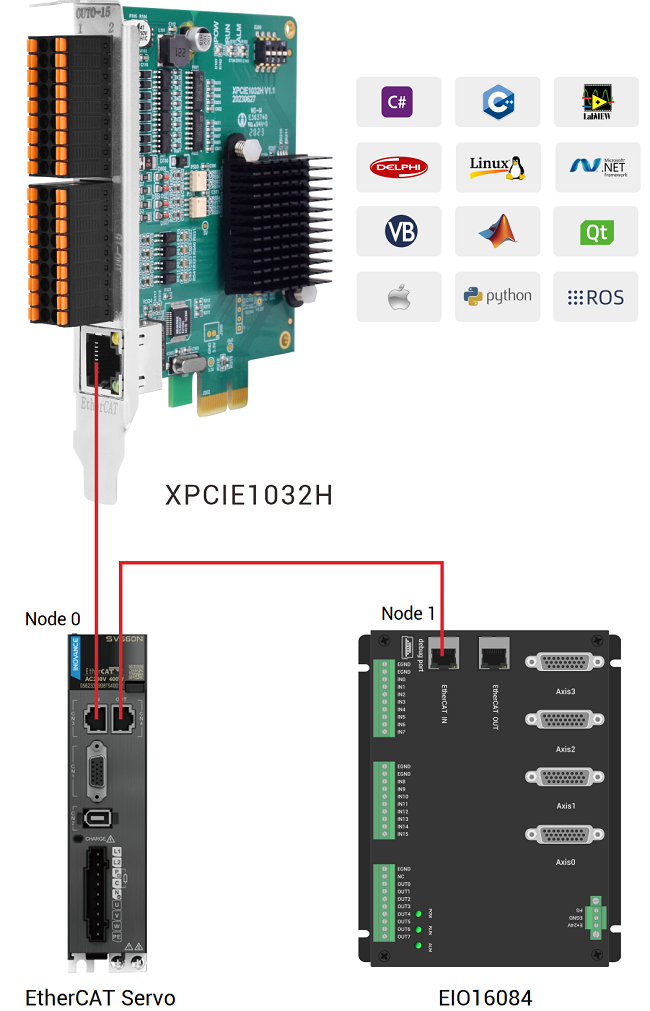
*EtherCAT motion control card: Zmotion XPCIE1032H – master station.
*EtherCAT drive: Inovance SV660N – slave station 1 – node 1.
*EtherCAT IO Expansion Module: Zmotion EIO16084 – slave station 2 – node 2
Therefore, here takes node 0 (drive – axis 0), and axis 1-4 of node 1 EIO16084 (axis mapping) as example. Connect them by EtherCAT:
B. Program Parts
a. Full C# EtherCAT Initialization File.
Please contact us:https://www.zmotionglobal.com/contactus.html
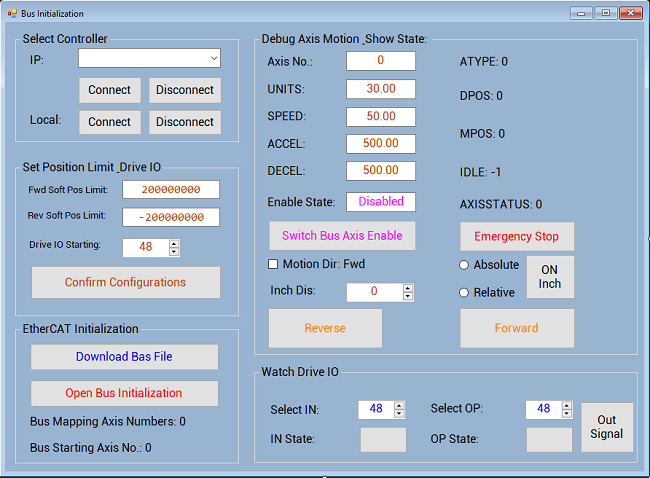
In “Form” design interface, you can find needed control, then drag them to do UI interface design.
EtherCAT routine UI is shown as below:
b. Basic Program: EtherCAT Initialization File
Please get EtherCAT initialization Basic file through download page (https://www.zmotionglobal.com/download_list_15.html) or contact us.
Then, according to real situation, set corresponding parameters, for example, drive numbers, axis mapping, node IO.
Based on above hardware parts, basic codes of EtherCAT initialization will be like this: (red are commands, the usage, please check RTBasic Programming Manual).
[ C# EtherCAT Initialization Program ]
Step 1: Connect
Connect to XPCIE1032H motion control card through LOCAL, it is triggered by the click event of “connect” button.
private void Local_Connect_Button_Click(object sender, EventArgs e)
{
    if (g_handle == (IntPtr)0)
    {
        Local_DisConnect_Button_Click(sender, e);
    }
    zmcaux.ZAux_FastOpen(5, "local", 1000, out g_handle);
    if (g_handle != (IntPtr)0)
    {
        this.Text = "Connected";
        timer1.Enabled = true;
        Local_Connect_Button.BackColor = Color.Green;
        MessageBox.Show("Connect Succeeded");
    }
    else
    {
        MessageBox.Show("Connect Failed, Please Select Correct LOCAL!");
    }
}
Step 2: Download EtherCAT Initialization File into Card
Download above EtherCAT initialization file of Basic script into controller ROW (be saved when power down) – trigger it by one click event, that is, press button “download bas file” to browse BASIC file to download it.
private void BasFileDownLoad_Btn_Click(object sender, EventArgs e)
{
    if (g_handle == (IntPtr)0)
    {
        MessageBox.Show("No Controller Connected!", "Note");
    }
    else
    {
        int tmpret = 0;
        string strFilePath;
        OpenFileDialog openFileDialog1 = new OpenFileDialog();
        openFileDialog1.InitialDirectory = "\\";
        openFileDialog1.Filter = "Config File(*.bas)|*.bas";
        openFileDialog1.RestoreDirectory = true;
        openFileDialog1.FilterIndex = 1;

        if (openFileDialog1.ShowDialog() == DialogResult.OK)               //open configuration file
        {
            strFilePath = openFileDialog1.FileName;
            tmpret = zmcaux.ZAux_BasDown(g_handle, strFilePath, 1);        //download to ROM (be saved when power down)
            if (tmpret != 0)
            {
                MessageBox.Show("File Download Failed!", "Note");
            }
            else
            {
                EcatInitFlag = true;
                MessageBox.Show("File Download Succeeded!", "Note");
            }
        }
    }
}
Step 3: Do EtherCAT Initialization
Trigger initialization by one click event, that is, press button “initialize EtherCAT” to call function “ZAux_Execute”, then it will call Ecat_Init() command in Basic file.
private void EcatInitStart_Btn_Click(object sender, EventArgs e)
{
    if (g_handle == (IntPtr)0)
    {
        MessageBox.Show("No Controller Connected!", "Note");
    }
    else
    {
        int tmpret;
        /*if ((BasFlag == true) && (InitStatus != -1))                       //-1: maybe it is executing initialization
        {*/
            InitStatus = -1;
            StringBuilder buffer = new StringBuilder(10240);
            tmpret = zmcaux.ZAux_Execute(g_handle, "RUNTASK 1,Ecat_Init", buffer, 0);               //run task 1 to run initialization function of Basic file again
            if (tmpret != 0)
            {
                MessageBox.Show("Bus Initialize Failed!", "Note");
                return;
            }
            else
            {
                MessageBox.Show("Bus Initialize Succeeded!", "Note");
            }

        /*}
        else
        {
            MessageBox.Show("Bas File Not Loaded");
            return;
        }*/
    }
}
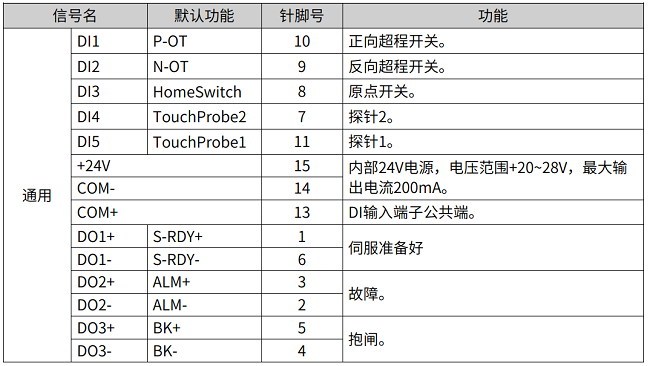
Step 4: Configure Axis Position Limit & Drive IO Mapping
Take Inovance drive as the example:
Drive IO mapping starting address is DI1, which is the hard forward position limit switch. If you want to set reverse position limit, please starting address + 1.
It can set axis soft & hard position limit, origin.
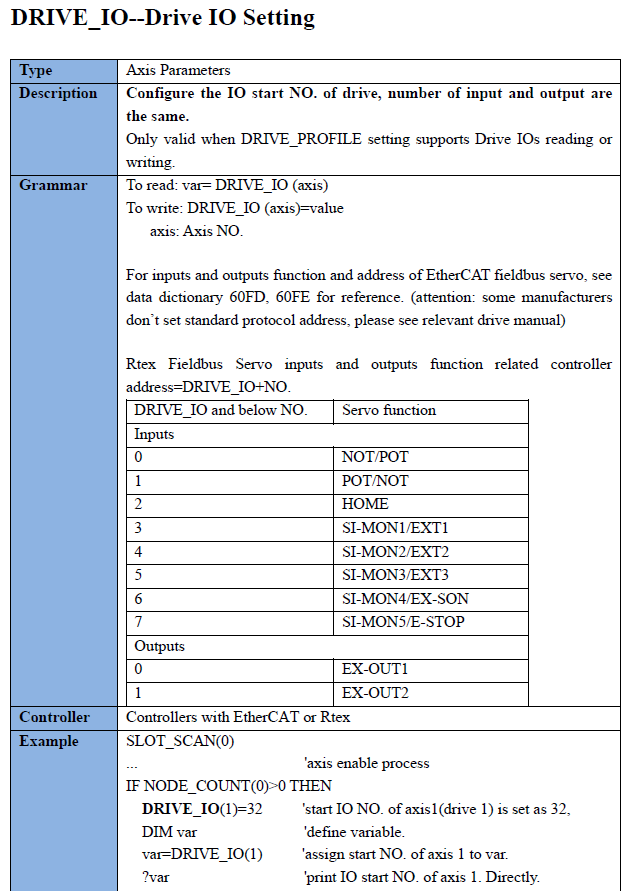
For drive IO mapping, use Basic command “Drive_IO”.
Call corresponding PC function to map drive IO.
private void Configure_OK_Button_Click(object sender, EventArgs e)
 {
     StringBuilder buffer = new StringBuilder(10240);
     //set forward soft position limit
     zmcaux.ZAux_Direct_SetFsLimit(g_handle, MoveAxis, Convert.ToSingle(FSLimit_Value.Text));
     //set reverse soft position limit
     zmcaux.ZAux_Direct_SetRsLimit(g_handle, MoveAxis, Convert.ToSingle(RSLimit_Value.Text));
     //drive IO starting address
     zmcaux.ZAux_Execute(g_handle, "DRIVE_IO(" + MoveAxis.ToString() + ") = " +DriveStart_IO_Value.Value.ToString(), buffer, 0);
     //set forward hard position limit
     zmcaux.ZAux_Direct_SetFwdIn(g_handle, MoveAxis, DRIVE_Start_IO);
     zmcaux.ZAux_Direct_SetInvertIn(g_handle, DRIVE_Start_IO, 1);
     //set reverse hard position limit
     zmcaux.ZAux_Direct_SetRevIn(g_handle, MoveAxis, DRIVE_Start_IO + 1);
     zmcaux.ZAux_Direct_SetInvertIn(g_handle, DRIVE_Start_IO + 1, 1);
     MessageBox.Show("Axis Config Succeeded!", "Note");
 }
Step 5: Do Continuous Motion for Single-Axis & Cancel Motion
Press down the button (MouseDown) to trigger single-axis continuous motion.
Press up (MouseUp) to trigger cancel, stop the single-axis motion.
//Forward
private void Fwd_Button_MouseDown(object sender, MouseEventArgs e)
{
    zmcaux.ZAux_Direct_Single_Vmove(g_handle, MoveAxis, 1);
}

private void Fwd_Button_MouseUp(object sender, MouseEventArgs e)
{
    zmcaux.ZAux_Direct_Single_Cancel(g_handle, MoveAxis, 2);
}


//Reverse
private void Rev_Button_MouseDown(object sender, MouseEventArgs e)
{
    zmcaux.ZAux_Direct_Single_Vmove(g_handle, MoveAxis, -1);
}

private void Rev_Button_MouseUp(object sender, MouseEventArgs e)
{
    zmcaux.ZAux_Direct_Single_Cancel(g_handle, MoveAxis, 2);
}
Step 6: Modify Axis Basic Parameters in Motion
Directly write the corresponding text (value) to modify, the timer will accept.
//pulse amount (UNITS) changes
private void Units_Value_TextChanged(object sender, EventArgs e)
{
    zmcaux.ZAux_Direct_SetUnits(g_handle, MoveAxis, Convert.ToSingle(Units_Value.Text));
}


//axis speed changes
private void Speed_Value_TextChanged(object sender, EventArgs e)
{
    zmcaux.ZAux_Direct_SetSpeed(g_handle, MoveAxis, Convert.ToSingle(Speed_Value.Text));
}


//acceleration changes
private void Accel_Value_TextChanged(object sender, EventArgs e)
{
    zmcaux.ZAux_Direct_SetAccel(g_handle, MoveAxis, Convert.ToSingle(Accel_Value.Text));
}


//deceleration changes
private void Decel_Value_TextChanged(object sender, EventArgs e)
{
    zmcaux.ZAux_Direct_SetDecel(g_handle, MoveAxis, Convert.ToSingle(Decel_Value.Text));
}
Step 7: Enable Axis
Press button to trigger enable / disable.
private void Enable_Button_Click(object sender, EventArgs e)
{
    if (g_handle == (IntPtr)0)
    {
        MessageBox.Show("No Controller Connected!", "Note");
        return;
    }
    int ret = 0;

    if (Enable_Value.Text == "Enabled")
    {
        ret = zmcaux.ZAux_Direct_SetAxisEnable(g_handle, MoveAxis, 0);
    }
    else
    {
        ret = zmcaux.ZAux_Direct_SetAxisEnable(g_handle, MoveAxis, 1);
    }
}
Step 8: Inch Motion
Press corresponding button to achieve inch motion in forward / reverse.
//Select inch direction
private void MoveDirection_CheckedChanged(object sender, EventArgs e)
{
    if (MoveDirection.Checked == false)
    {
        MoveDirection.Text = "Motion Direction: Forward";
        dir = 1;
    }
    else
    {
        MoveDirection.Text = "Motion Direction: Reverse";
        dir = -1;
    }
}


//open inch motion
private void InchStart_Button_Click(object sender, EventArgs e)
{
    if (g_handle == (IntPtr)0)
    {
        MessageBox.Show("No Controller Connected!", "Note");
    }
    else
    {

        if (MoveAbs_RadBtn.Checked == true)        //absolute motion
        {
            zmcaux.ZAux_Direct_Single_MoveAbs(g_handle, MoveAxis, dir * Convert.ToSingle(InchDistance_Value.Text));
        }
        if (MoveOpp_RadBtn.Checked == true)        //relative motion
        {
            zmcaux.ZAux_Direct_Single_Move(g_handle, MoveAxis, dir * Convert.ToSingle(InchDistance_Value.Text));
        }
    }
}
Step 9: Watch Information in Real-Time
It can get axis parameters, initialization information, IO messages in real-time through updating the timer.
//update axis parameters
private void Update_AxisPara()
{
    int CurAxisAtype = 0;
    int CurAxisIdle = 0;
    int CurAxisStatus = 0;

    double CurAxisFSLimit = 0;
    double CurAxisRSLimit = 0;
    double CurAxisDpos = 0;
    double CurAxisMpos = 0;

    Axis_Para[0] = Convert.ToSingle(Units_Value.Text);
    Axis_Para[1] = Convert.ToSingle(Speed_Value.Text);
    Axis_Para[2] = Convert.ToSingle(Accel_Value.Text);
    Axis_Para[3] = Convert.ToSingle(Decel_Value.Text);
    MoveAxis = Convert.ToInt32(AxisNum_Value.Text);

    zmcaux.ZAux_Direct_GetAtype(g_handle, MoveAxis, ref CurAxisAtype);
    zmcaux.ZAux_Direct_GetDpos(g_handle, MoveAxis, ref CurAxisDpos);
    zmcaux.ZAux_Direct_GetMpos(g_