


Handheld Teach Pendant is one portable operating device, generally it consists of shell, inner circuit board, control panel (like, button, displayer, etc.), and connecting cable. Then used to achieve specified control or operation functions.
In mechanical equipment , handheld teach pendant is for remote control and operation, which can promote your process efficiency and safety level.
In industrial control system , it is used as HMI (human machine interface) to achieve complex control commands IN and FEEDBACK.
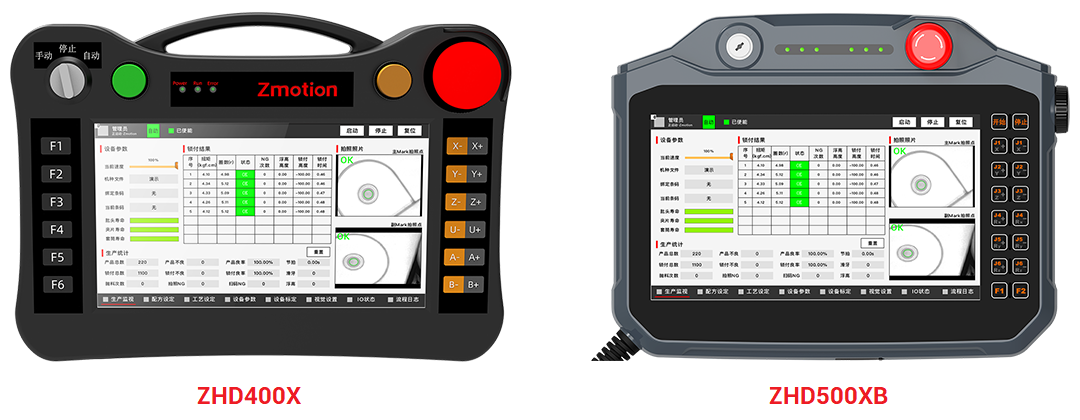
Above are Zmotion researched handheld teach pendant ZHD400X and ZHDX500XB
Later, let’s see related hardware interfaces and usage, the most, matched with our EtherCAT motion controller to achieve your application.
Video 1: How to Quick Start Your Robot Motion Control by Teach Pendant with Your Motion Controller (1)
Video 1: How to Quick Start Your Robot Motion Control by Teach Pendant with Your Motion Controller (1)
(1) Handheld Teach Pendant Brief Introduction
ZHD400X and ZHD500XB are touch screen teach pendant with network displaying. And they must be used together with the motion controller that supports ZHMI function.
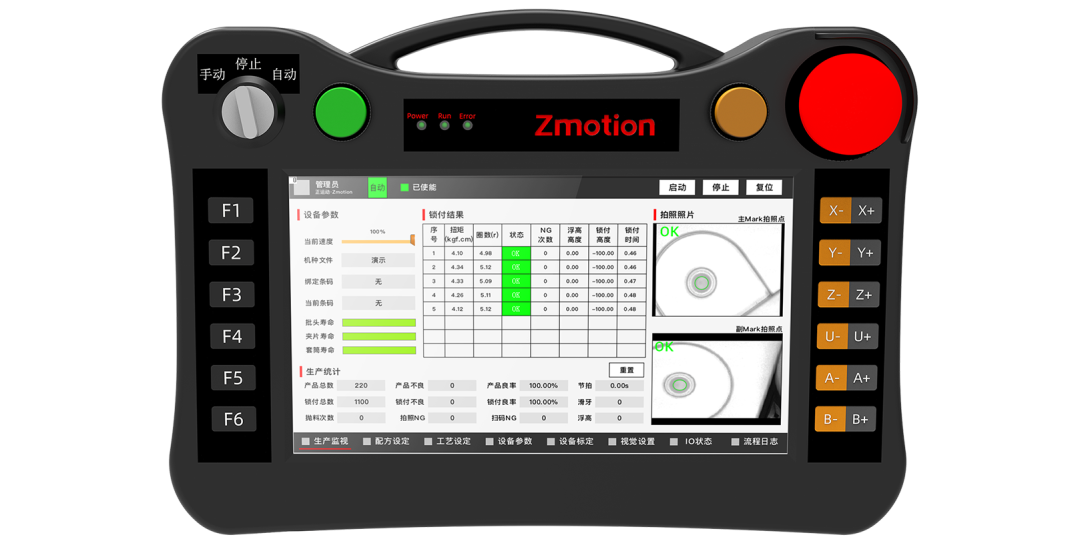
ZHD400X handheld teach pendant has 24V power supply, and the screen is true color with a resolution of 800*480. There are 18 buttons, one emergency stop switch.
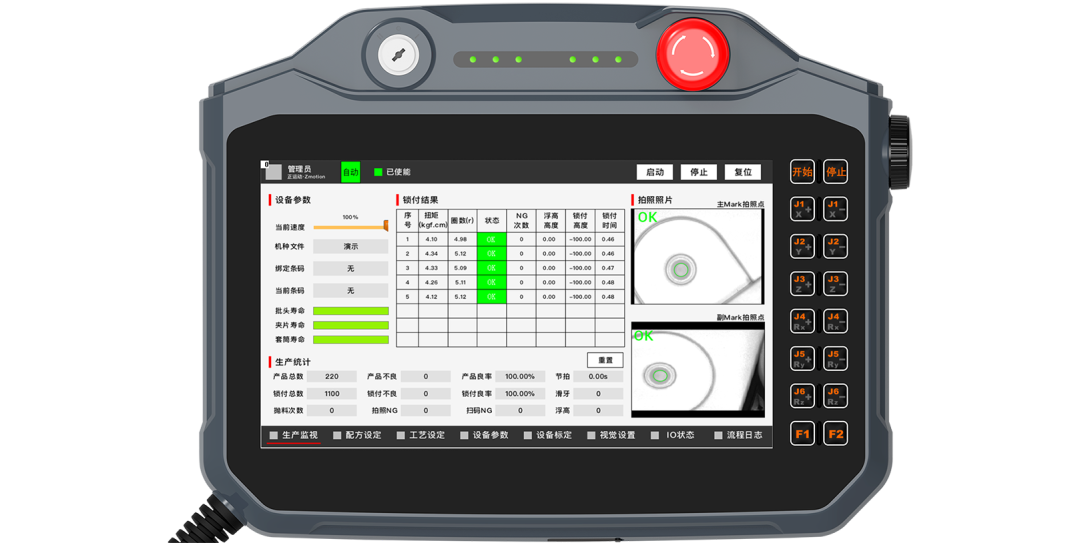
ZHD500XB handheld teach pendant has one DC24V power supply, also supports the true color, the resolution is 1024*600. There are 16 buttons, one emergency stop switch, key selection switch, and one handwheel (can be pressed).
* ZHD400X Handheld Teach Pendant Properties*
Programmable teach pendant, it can show all kinds of interfaces through script programs.
Support drawing: Chinese & English characters, line, arc, image.
With emergency stop button.
There are 18 key buttons, key functions can be customized.
Support RJ45 crystal head (for standard model, it has 3m connecting line), U disk interface.
Support HMI configuration protocol.
It can control all kinds of manipulator control
Support touch screen, key buttons are used together with touch screen.
Resolution: 800*480
* ZHD500XB Handheld Teach Pendant Properties*
Programmable teach pendant, it can show all kinds of interfaces through script programs.
Support drawing: Chinese & English characters, line, arc, image.
With emergency stop button, key selection switch, handwheel.
There are 16 key buttons, key functions can be customized.
Support RJ45 crystal head, U disk interface.
Support HMI configuration protocol.
It can control all kinds of manipulator control
Support touch screen, which can be used together with buttons, including, the stylus.
Resolution: 1024*600
Good looking and more comfortable operation.
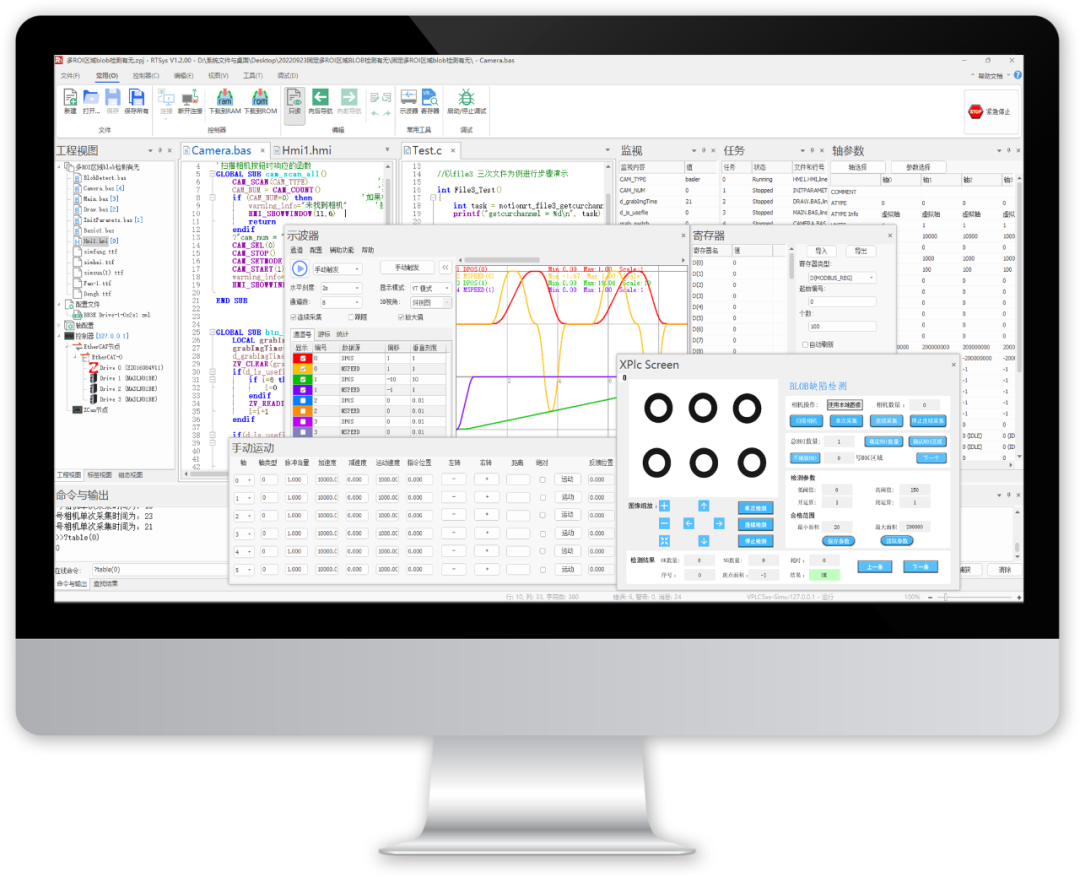
ZHD400X and ZHD500XB are open programmable teach pendant, which can develop the interface program through RTBasic and RTHmi in our free IDE software RTSys. You can directly complete development and debugging in RTSys. After that, operator can check the robot running state, alarm information in the teach pendant screen, then at the same time, interacting with robot by the button / touch screen, that is, you can online track and debug, it can be seen easy to use.
For RTSys, you can download and simulate at first. Please read the user manual at first!
(2) Handheld Teach Pendant System Configuration
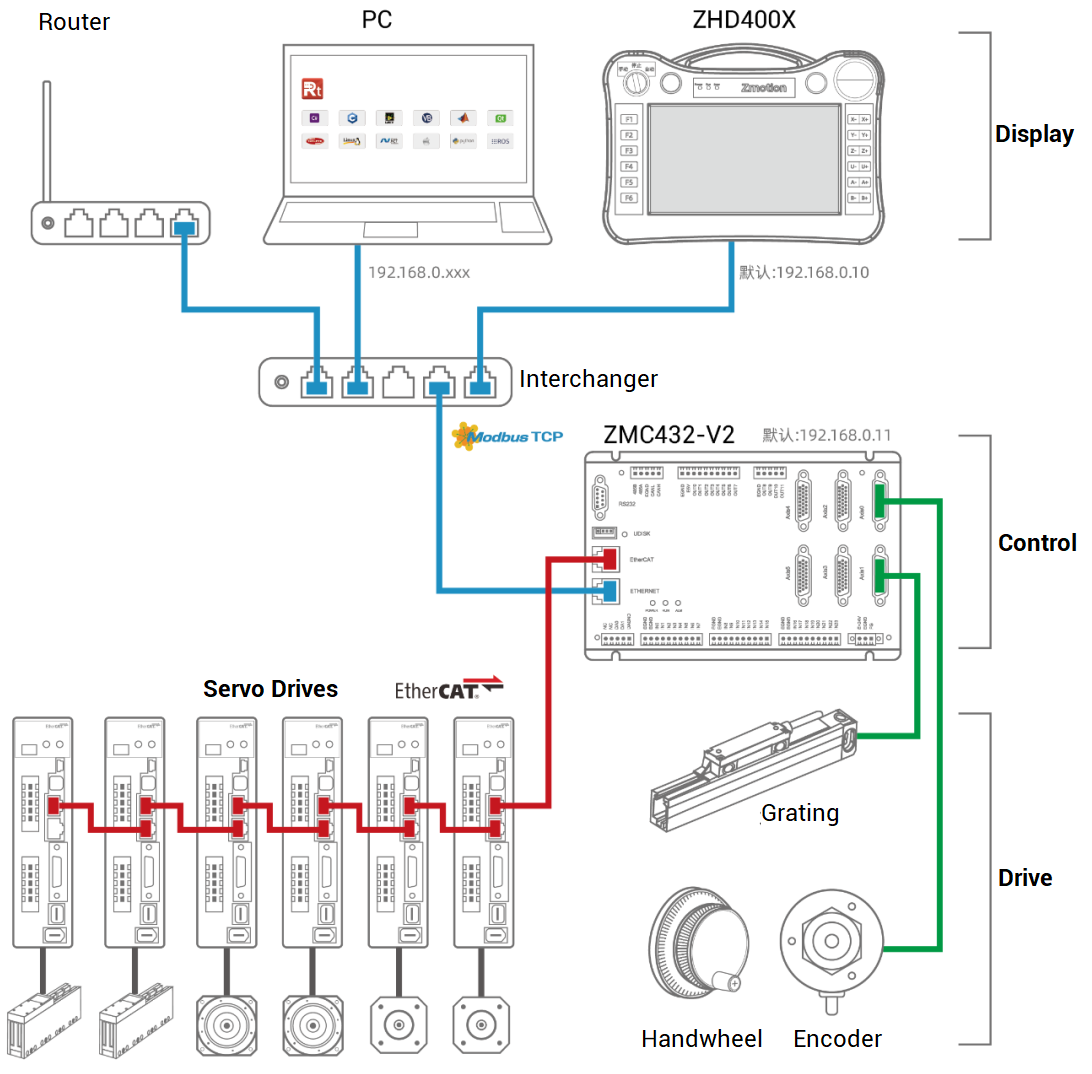
--Example of How System Configure ZHD400X--
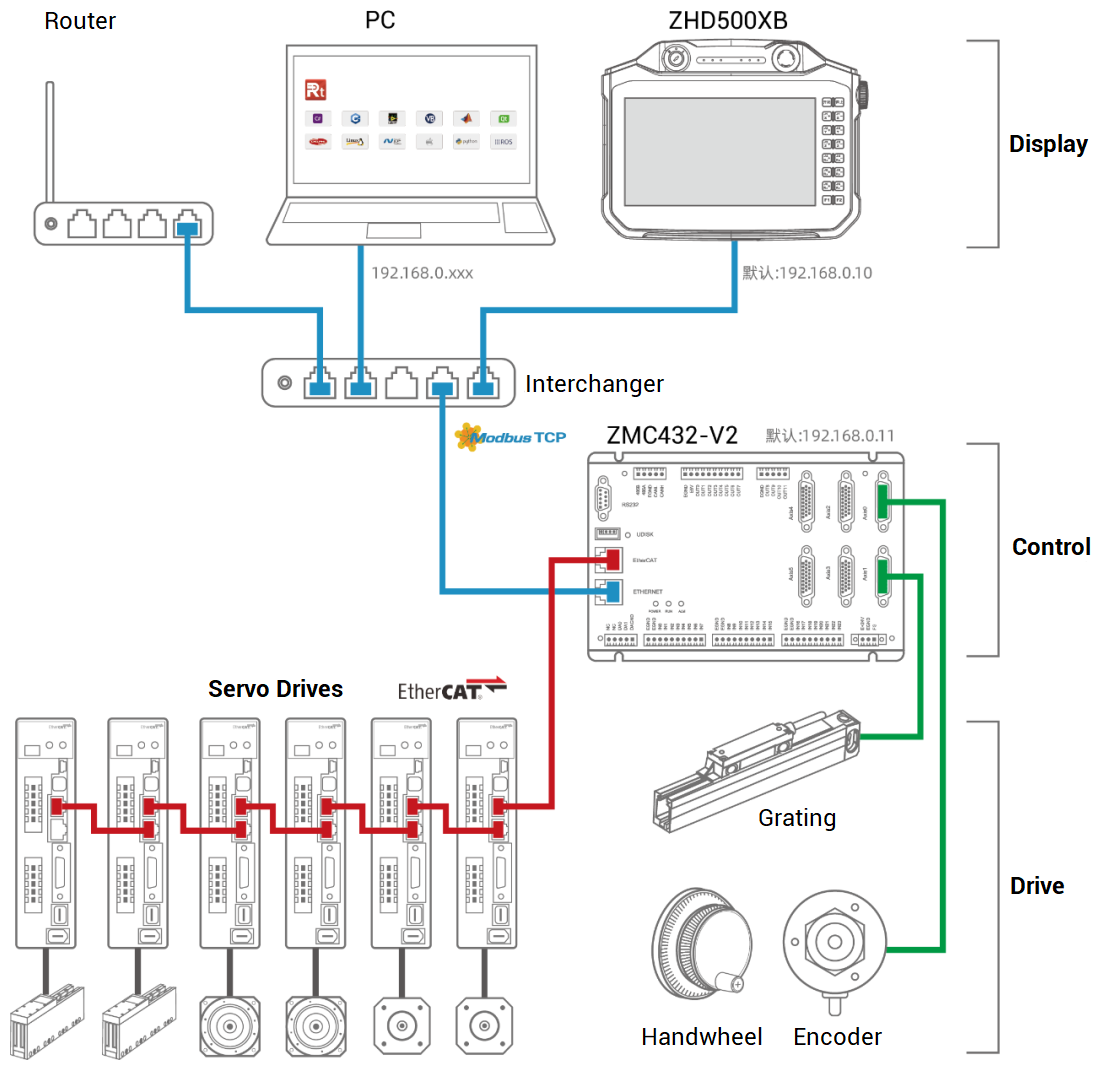
--Example of How System Configure ZHD500XB--
(3) Handheld Teach Pendant Hardware Interfaces
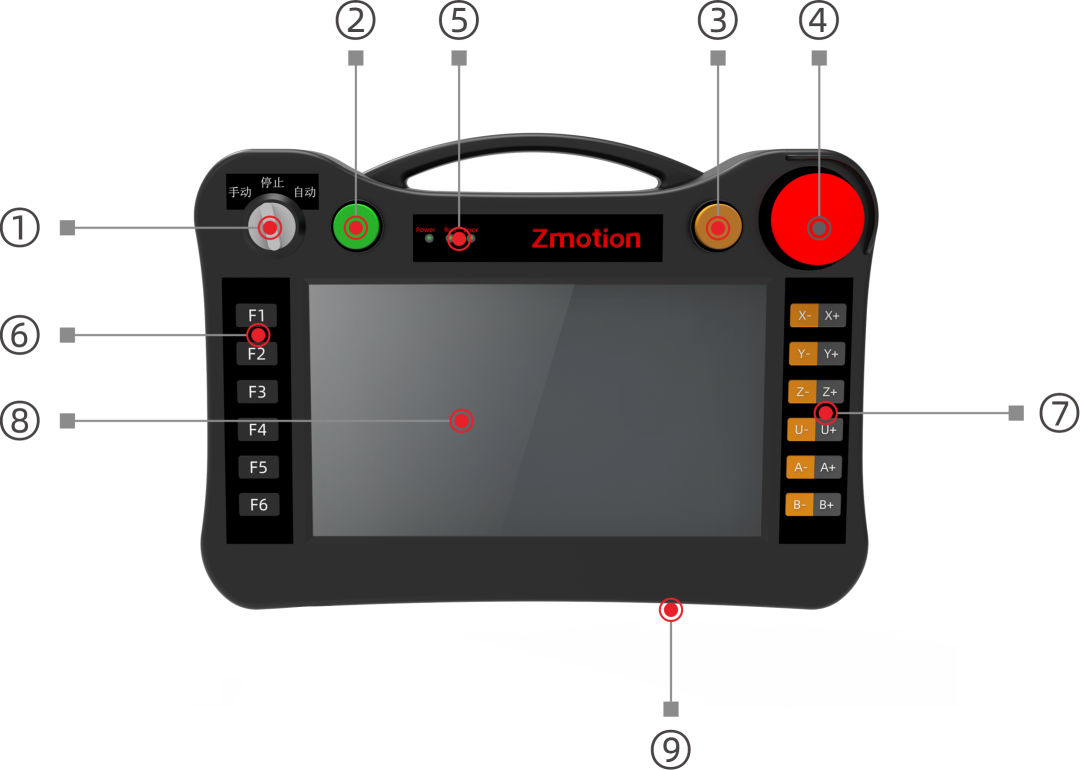
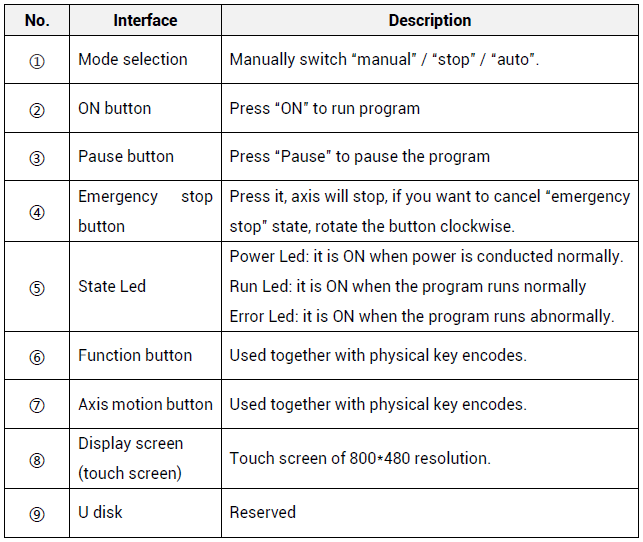
-- ZHD400X Hardware Interfaces--
-- ZHD500XB Hardware Interfaces --
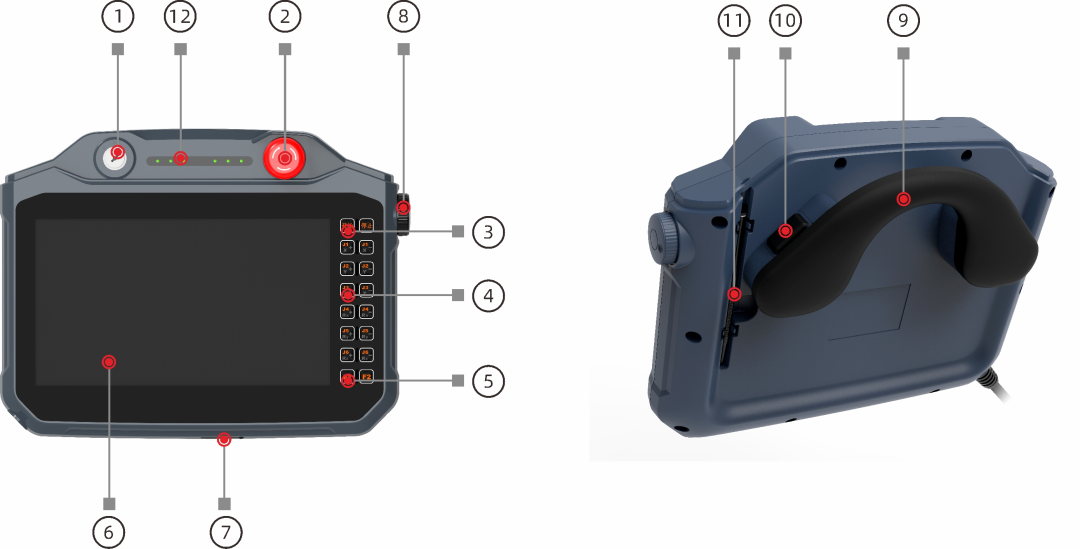
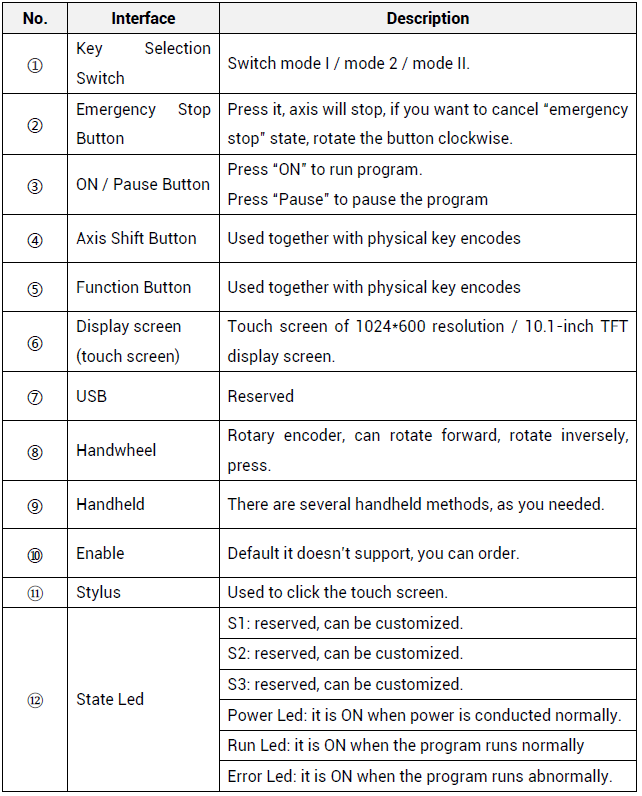
(4) Physical Keys
Above said ZHD400X has 18 buttons, ZHD500XB has 16 buttons, they need to match with physical keys, and key functions can be customized. Key encoding is made according to column and row.
When the button is pressed, teach pendant will automatically send the physical key to the controller, then the controller will detect it. If you also need the virtual key, please use the key transformation form in HMI. For details, refer to this manual “RTHmi Manual”.
A. Mode Selection Switch
ZHD400X | ZHD500XB | Button Encode |
Manual | Mode I | 1 |
Stop | Mode 0 | No fixed encode |
Auto | Mode II | 2 |
B. ON / PAUSE / Emergency Stop
ZHD400X | ZHD500XB | Button Encode |
ON | ON | 3 |
Pause | STOP | 4 |
Emergency Stop | Emergency Stop | 5 |
C. Handwheel
ZHD500XB supports handwheel. When using the handwheel, set ATYPE as 24 (remote encoder axis type). For this, the hardware controller must be 5XX and firmware above 20180404.
ZHD500XB | Button Encode |
Handwheel | 8 |
D. Enable Key (ZHD500XB Optional Order)
Key | Function | Switch Action | Switch Contact | Button Encode |
1 | Zero | No | OFF | No |
2 | Enable | Press | ON | 6 |
3 | Disable (No Enable) | Full Press | OFF | 7 |
E. Panel Key
ZHD400X | ZHD500XB | Button Encode |
F1-F6 | F1-F2 | Global Const key_f1 = 11 'functional key F1 Global Const key_f2 = 12 'functional key F2 Global Const key_f3 = 13 'functional key F3 Global Const key_f4 = 14 'functional key F4 Global Const key_f5 = 15 'functional key F5 Global Const key_f6 = 16 'functional key F6 |
X- X+ | X- X+ | Global Const key_X-- = 24 'axis shift key Global Const key_X+ = 25 'axis shift key |
Y- Y+ | Y- Y+ | Global Const key_Y-- = 34 'axis shift key Global Const key_Y+ = 35 'axis shift key |
Z- Z+ | Z- Z+ | Global Const key_Z-- = 44 'axis shift key Global Const key_Z+ = 45 'axis shift key |
U- U+ | Rx- Rx+ | Global Const key_U-- (Rx--)= 54 'axis shift key Global Const key_U+ (Rx+)= 55 'axis shift key |
A- A+ | Ry- Ry+ | Global Const key_A-- (Ry--) = 64 'axis shift key Global Const key_A+ (Ry+) = 65 'axis shift key |
B- B+ | Rz- Rz+ | Global Const key_B-- (Rz--)= 74 'axis shift key Global Const key_B+ (Rz+) = 75 'axis shift key |
(1) Usage Steps
Step 1: Conduct the Power Supply
There is one crystal head of ZHD400X / ZHD500XB connecting cable side, connect the red cable to DC24V positive pole, connect the black cable to DC24V negative.
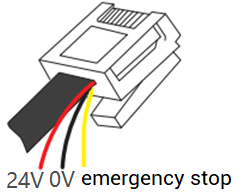
Step 2: Touch Correction
--Method 1--
Click continuously in a "Z-shaped" manner (upper left, upper right, lower left, lower right, upper left, upper right, lower left, lower right) until the settings window pops up to wake up the screen. You can perform touch calibration (Touch Adjust), controller IP modification, speaker (Speaker On) operations, etc.

--Method 2--
After connected RTSys/ ZDevelop, trigger correction by TOUCH_ADJUST command.
--Method 3--
When RTSys / ZDevelop is not connected, press 16 (F6) key, and then press 11 (F11) button at the same time.
Follow the English instructions on the display (Touch crosshair to calibrate), trace the "cross" icon on the screen and click on it one by one.
Step 3: Connect to Controller / Simulator
Method 1: Connect Your Controller to Teach Pendant Directly
That is, teach pendant refreshes and checks the controller IP. See below steps.
1) Connect controller and PC by serial / ethernet. And connect controller to RTSys / ZDevelop, then download the program into ROM. After that, disconnect controller and PC.
2) Use the cable to connect teach pendant and controller. When communicating by ethernet, please make sure HMI IP and controller IP are in same network segment. If not, you need to modify controller IP (controller default is 192.168.0.11, HMI default IP is 192.168.0.10)
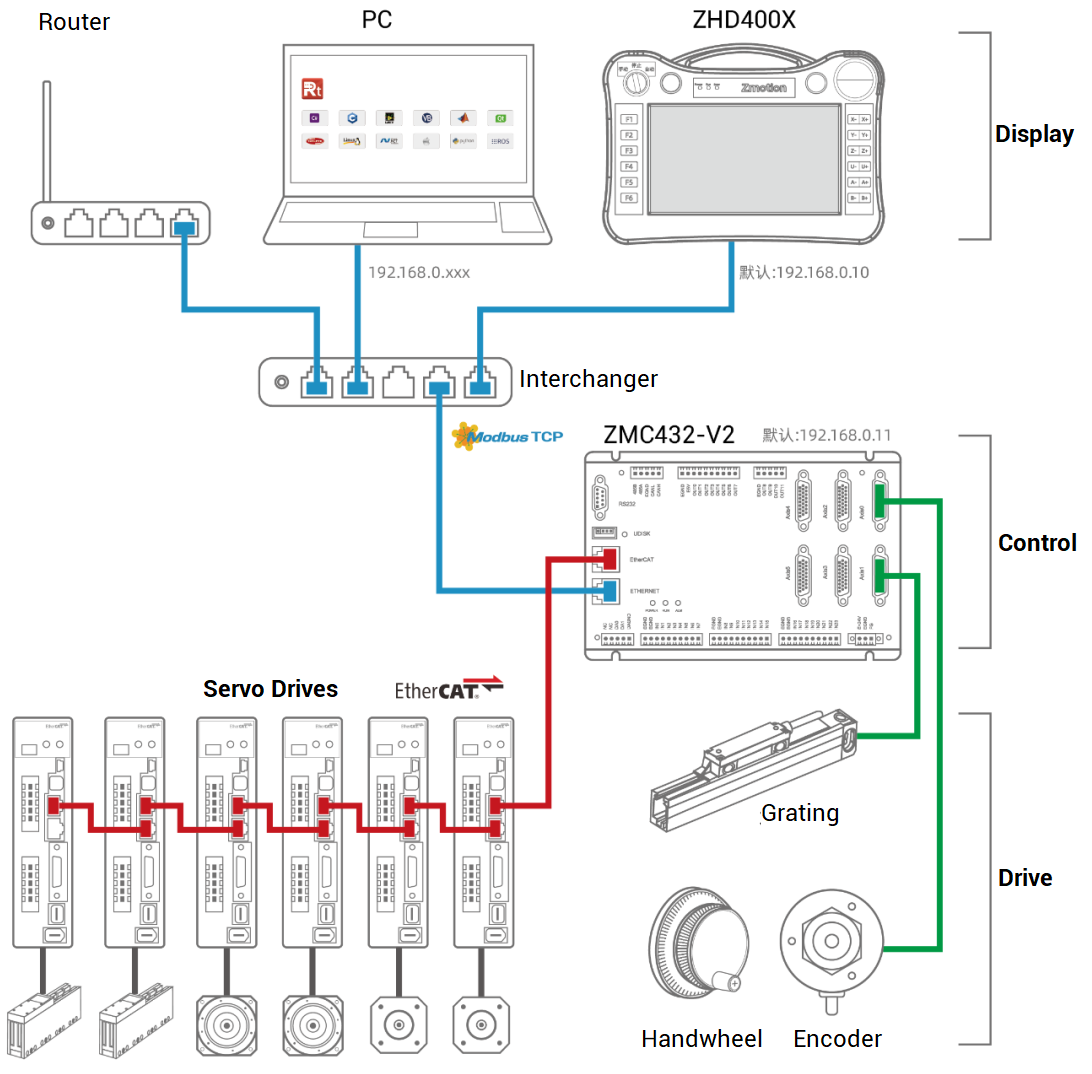
ZHD400X Connection Method
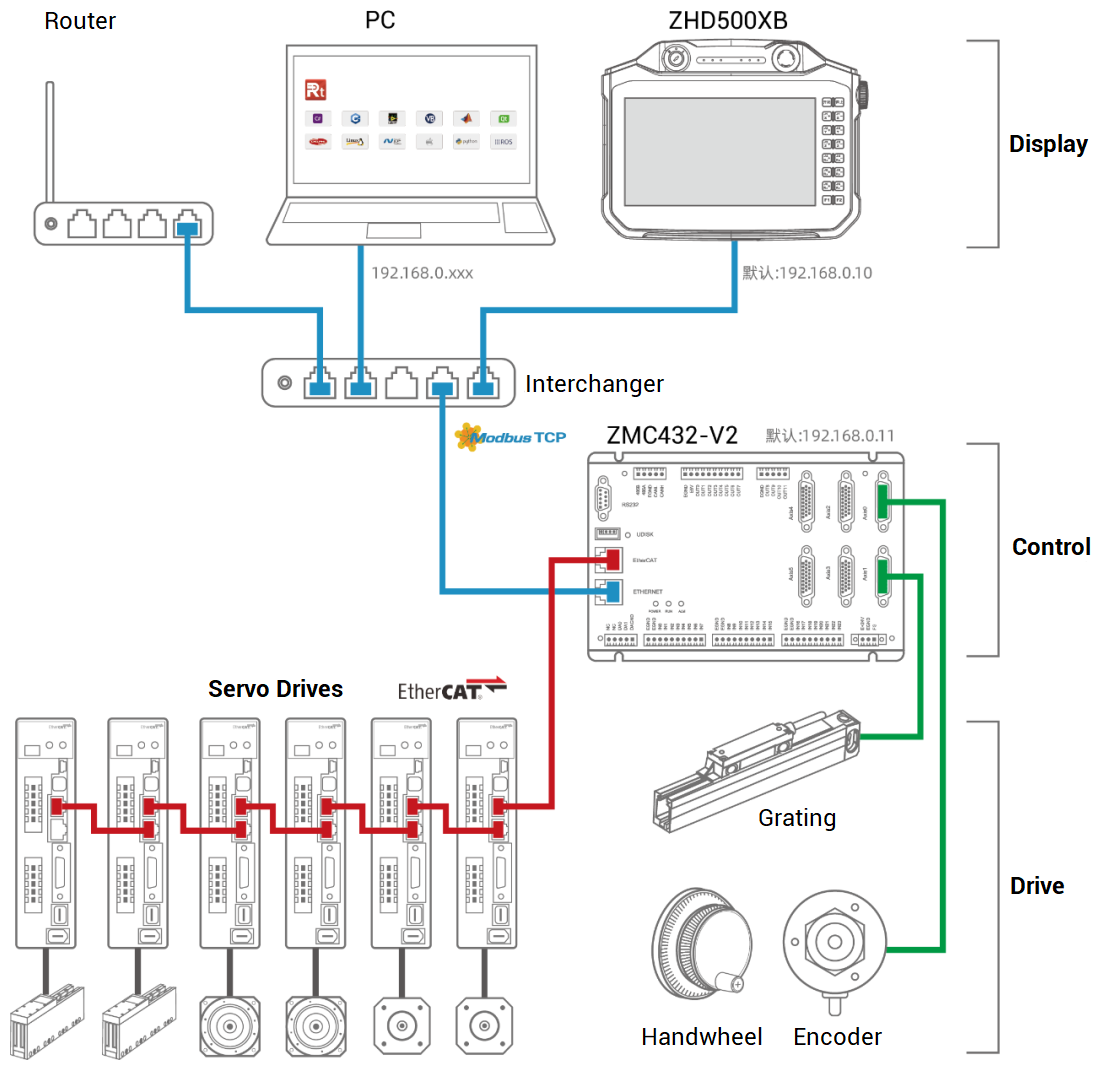
ZHD500XB Connection Method
3) Do touch calibration: after powering on, you can click the four corners of the screen of the teaching box in a Z-shaped order twice in a row to wake up the screen and pop up the setting window.
4) In popped window, it will automatically obtain connected controller IP address, select needed correct IP, then click“ Connect” .
Note: if HMI doesn' t scan controller IP by method 1, please refer to method 2.
Method 2: connect teach pendant to PC at first, then do connection of HMI and controller.
1) Use interchanger to connect HMI, controller, and PC (you can view“ system configuration” , make sure their IP addresses are in same segment.
2) Connect controller to RTSys / ZDevelop, then download the program into ROM. After that, disconnect.
3) Do touch calibration: after powering on, you can click the four corners of the screen of the teaching box in a Z-shaped order twice in a row to wake up the screen and pop up the setting window.
4) Connect HMI and RTSys / ZDevelop (HMI IP and PC IP are in same network segment).
5) In RTSys / ZDevelop“ output” window, send IP_CONNECT = controller IP command. Then, HMI will show HMI interface content, which means HMI and controller are connected successfully.
6) If you want HMI program to update in real-time. After step 5, disconnect HMI with RTSys / ZDevelop, then connect controller to RTSys / ZDevelop, at this time, connect them (controller & PC & HMI)