


Let’s Continue “How to Develop EtherCAT Motion Controller by Python & Qt". Whole related information will be shown, from beginning connection, simple motion, to complex motion.
Part 1:
Python + Qt Develops EtherCAT Motion Controller (1): Drive Configuration
Part 2:
Python + Qt Develops EtherCAT Motion Controller (2): Homing
Today, Part Three
--How to do PDO Configuration--
--How to do SDO Reading & Writing--
--How to do EtherCAT Bus Initialization--
What We Need:
A. Motion Controller
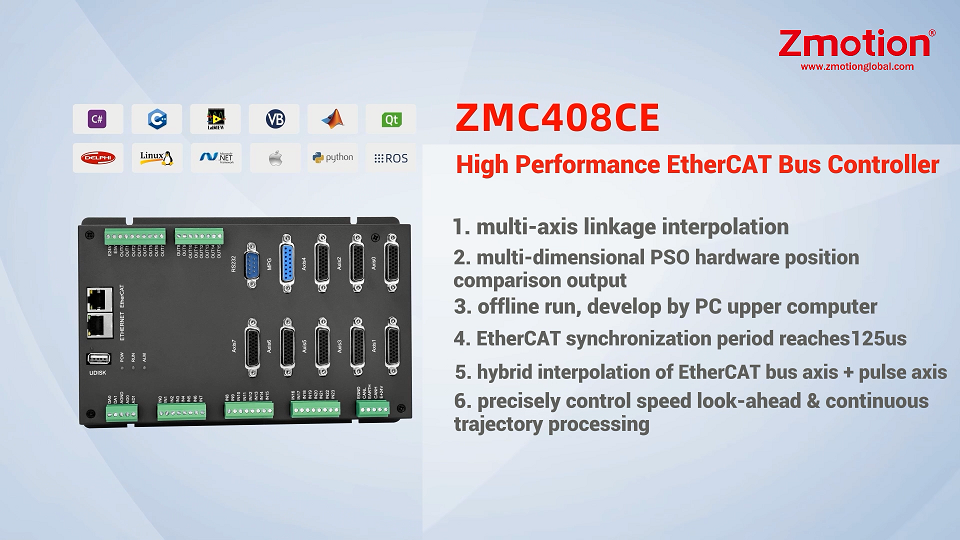
One EtherCAT Motion Controller (Here, we use ZMC408CE EtherCAT Motion Controller)
B. Operation System Environment
Win10_64 Bit
C. Development Environment:
Python & Qt:
[Python: python-3.10.10-amd64.exe]
[Pycharm: pycharm-community-2024.1.3.exe]
--for “how to do develop on python” “motion control development step”, please refer to PART ONE--
Then, here shows corresponding needed PC commands here, for details, please go to “PC Programming Manual” or contact us directly.
--connect to controller--
“ZAux_OpenEth”: connect to controller through ethernet
It only needs filling in IN parameter “Ipaddr” (IP address) to do connection, then when connected, it will output one parameter “Phandle”, the value should be 0, which means success, if it is not 0, please refer to error code. More details, please go to PC manual.
*Example of Connection*
#connect to controller, controller default IP is 192.168.0.11, here uses IP that is input in comboBox
def on_btn_open_clicked(self):
strtemp = self.ui.comboBox.currentText()
print("now ip: ", strtemp)
if self.Zmc.handle.value is not None:
self.Zmc.ZAux_Close()
self.time1.stop()
self.ui.setWindowTitle("Single-Axis Motion")
iresult = self.Zmc.ZAux_OpenEth(strtemp)#connect to controller
if 0 != iresult:
QMessageBox.warning(self.ui, "hint", "Connect Failed")
else:
QMessageBox.warning(self.ui, "hint", "Connect Succeeded")
str_title = self.ui.windowTitle() + strtemp
self.ui.setWindowTitle(str_title)
self.Up_State() #refresh function
self.time1.start(100)#open timer
--download bas file into controller--
“ZAux_BasDown”: generate one single .bas file as ZAR and download it into controller, then run.
It needs filling in 3 IN parameters “handle” (connection handle), “Filename” (zar file name with the path), and “run_mode” (downloading mode, 0-RAM, 1-ROM).
Note: .bas file is Zmotion Basic program file generated in RTSys (ZDevelop), which can run directly.
*Example of Downloading Basic File*
#download BAS file into controller
def on_btn_down_bas_clicked(self): #download BAS file into controller
if self.Zmc.handle.value is None:
QMessageBox.warning(self.ui, "Hint", "No Connected")
return
file_Date = QFileDialog.getOpenFileName(self.ui, "Select BAS File", "..", "Files(*.bas)")
self.file_Name = file_Date[0].replace("/", "\\")
print(self.file_Name)
self.ui.textEdit_file_path.insertPlainText(self.file_Name + "\n")
#read variables of BAS file to check whether BAS file is loaded or not
temp = self.Zmc.ZAux_Direct_GetUserVar("BUS_TYPE")[1].value
self.Bus_type = float(temp)
#download BAS file into ROM
ret = self.Zmc.ZAux_BasDown(self.file_Name, 1)
if ret != 0:
QMessageBox.warning(self.ui, "Hint", "Fail to Download File!" + "Error Code: %1 ".format(ret))
--download zar file into controller--
“ZAux_ZarDown”: download ZAR program into controller, then run.
IN parameters are same as ZAux_BasDown. ZAR file is the encryption file of BASIC file.
*Example of Downloading ZAR File*
#Download ZAR File into Controller
def on_btn_down_zar_clicked(self): #download zar file into controller
if self.Zmc.handle.value is None:
QMessageBox.warning(self.ui, "Hint", "No Connected")
return
file_Date = QFileDialog.getOpenFileName(self.ui, "Select zar File", "..", "Files(*.zar)")
self.file_Name = file_Date[0].replace("/", "\\")
print(self.file_Name)
self.ui.textEdit_file_path.insertPlainText(self.file_Name + "\n")
#read variables of zar file to check whether zar file is loaded or not
temp = self.Zmc.ZAux_Direct_GetUserVar("BUS_TYPE")[1].value
self.Bus_type = float(temp)
#downalod zar file into ROM
ret = self.Zmc.ZAux_ZarDown(self.file_Name, 1)
if ret != 0:
QMessageBox.warning(self.ui, "Hint", " Fail to Download ZAR File ! " + "Error Code: %1 ".format(ret))
--SDO Writing--
“ZAux_BusCmd_SDOWrite”: SDO writing through device No. and slot No.
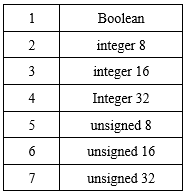
There are 7 IN parameters need filling, they are “handle” (connection handle), “slot” (slot No.), “node” (node No.), “index” (object dictionary No.), “subindex” (object dictionary sub No.), “type” (data type, there are 8 types, please see below), and the last one “value” (data value to be written).
*Example of SDO Writing*
#SDO Write Data
def on_btn_Ecat_write_clicked(self): # ETHERCAT Writing
if self.Zmc.handle.value is None:
QMessageBox.warning(self.ui, "Hint", "No Connected")
return
#Node No.
m_sdo_node1 = int(self.ui.edit_node_1.text())
#Data Dictionary No.
m_sdo_index1 = int(self.ui.edit_dir_1.text())
#Data Dictionary Sub No.
m_sdo_sub1 = int(self.ui.edit_sub_node_1.text())
#Data Type
m_sdo_type1 = self.ui.comboBox_type_1.currentIndex() + 1
#data value that is written to data dictionary value
m_sdo_data1 = int(self.ui.edit_date_1.text())
if self.Bus_type == 0:
#SDO Write
ret = self.Zmc.ZAux_BusCmd_SDOWrite(0, m_sdo_node1, m_sdo_index1, m_sdo_sub1, m_sdo_type1, m_sdo_data1)
if ret != 0:
QMessageBox.warning(self.ui, "Hint", "Fail to Write")
return
else:
QMessageBox.warning(self.ui, "Hint", "Non-ETHERCAT Module")
return
--SDO Reading--
“ZAux_BusCmd_SDORead_”: SDO reading through device No. and slot No.
For this command’s IN parameters, it only needs 6 parameters, and which are former 6 of SDO writing. Then, read value from OUT parameter “value”. Please note it only can be executed after connecting device and scanning the bus.
*Example of SDO Reading*
#SDO Reads Data
def on_btn_Ecat_read_clicked(self): # ETHERCAT Reading
if self.Zmc.handle.value is None:
QMessageBox.warning(self.ui, "Hint", "No Connected")
return
#Node No.
m_sdo_node2 = int(self.ui.edit_node_2.text())
#Object Dictionary No.
m_sdo_index2 = int(self.ui.edit_dir_2.text())
#Object Dictionary Sub No.
m_sdo_sub2 = int(self.ui.edit_sub_node_2.text())
#Data type
m_sdo_type2 = self.ui.comboBox_type_2.currentIndex() + 1
m_sdo_data2 = ctypes.c_int(0)
print(self.Bus_type)
if self.Bus_type == 0:
#SDO reading by device No. and slot No.
ret = self.Zmc.ZAux_BusCmd_SDORead(0, m_sdo_node2, m_sdo_index2, m_sdo_sub2, m_sdo_type2)
#data value that is read
m_sdo_data2 = int(ret[1].value)
if ret != 0:
QMessageBox.warning(self.ui, "Hint", "Fail to Read")
return
self.ui.edit_date_2.setText(str(m_sdo_data2))
else:
QMessageBox.warning(self.ui, "Hint", "Non-ETHERCAT Module")
return
--read axis type--
“ZAux_Direct_GetAtype”: read the assigned axis’s axis type
2 IN parameters (“handle” (connection handle) & “iaxis” (axis No.)) should be filled, then read the type from the OUT parameter “piValue”, 0 means virtual axis, 1 means pulse directional stepper / servo.
--set axis enable--
“ZAux_Direct_SetAxisEnable”: set axis enable
2 IN parameters (“handle” (connection handle) & “iaxis” (slot No.)) should be filled, then read the type from the OUT parameter “iValue”, 0 means OFF, 1 means ON.
--set pulse amount--
“ZAux_Direct_SetUnits”: set pulse amount
When it is 1, which means the unit is 1 pulse. There are 3 IN parameters need filling, “handle” (connection handle), “iaxis” (axis No.), and “fValue” (the pulse amount that is set). More details and examples, please go to PC manual.
--single-axis continuous motion--
“ZAux_Direct_Single_Vmove”: make single-axis move in one directly continuously.
3 IN parameters “handle” (connection handle), “iaxis” (axis No.), and “idir” (the direction, -1 means negative, 1 means positive). Please note when former VMOVE doesn’t finish, now VMOVE will replace former one directly, that is, no need to CANCEL it.
Let’srun the python program, then watch the situation in RTSys software at the same time.
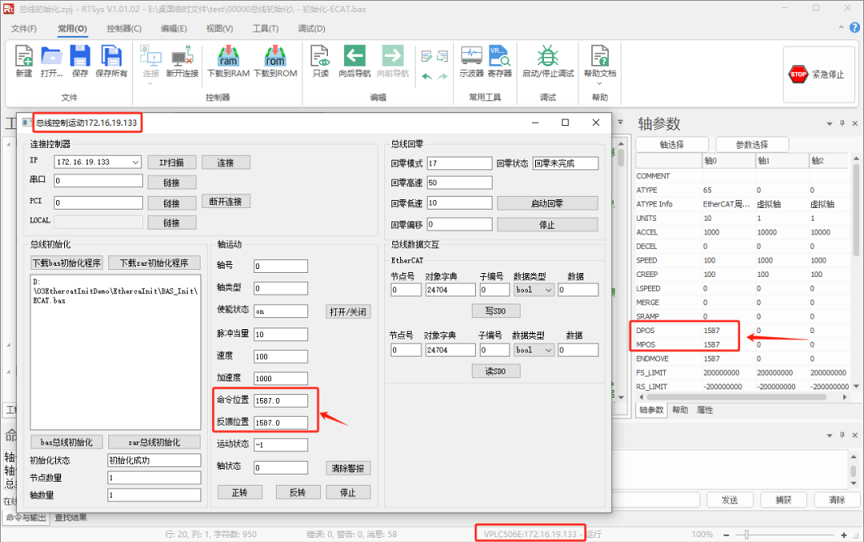
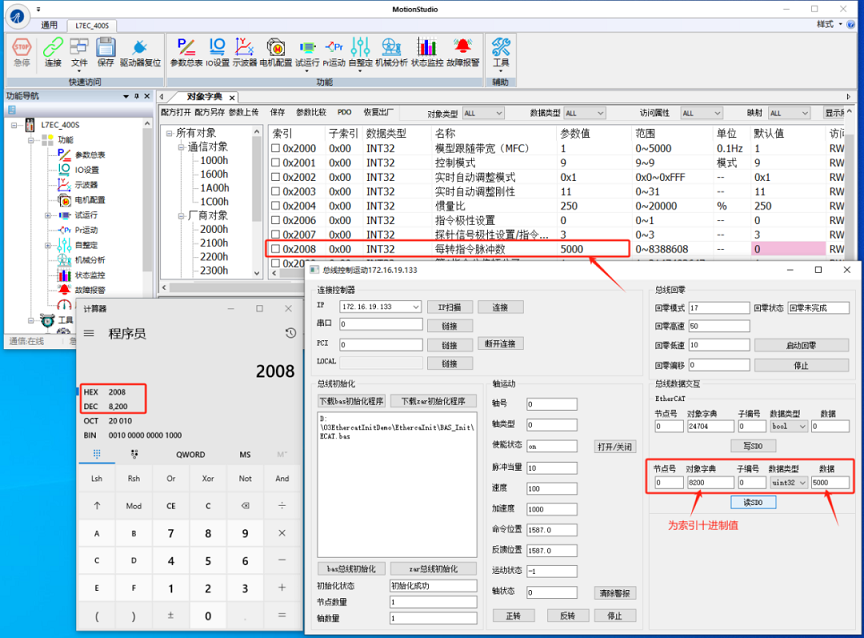
Then, check SDO writing and reading situation by drive software (the object dictionary is decimal system data). Here, we take leadshine drive as the example to read and write SDO.
--SDO_READ--
use SDO_READ to read drive SDO parameters, for example, set pulse per circle as 5000 in the drive software, then use SDO_READ to read the value.
--SDO_WRITE--
Use SDO_WRITE command to write drive parameters. For example, use it to write 5000 for pulse per circle, then check it from drive software.
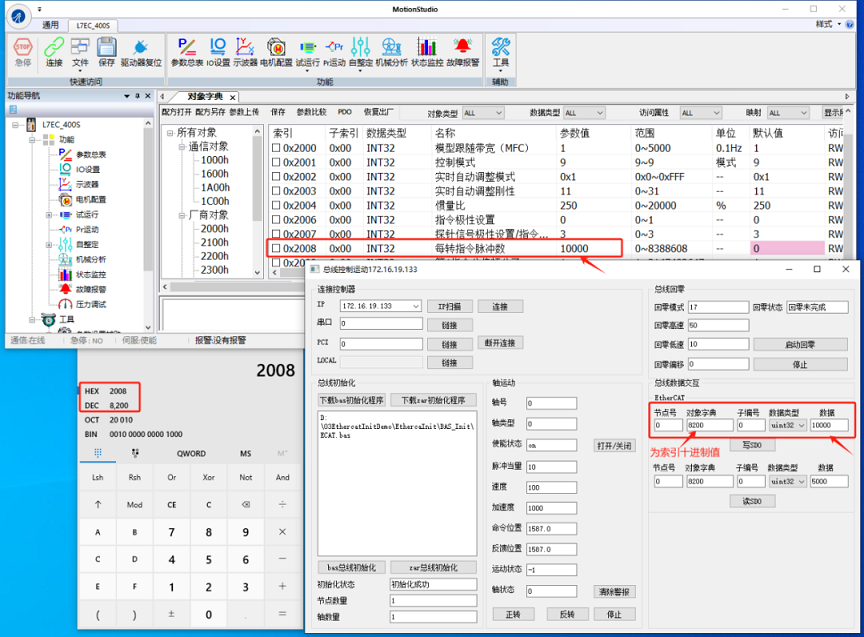
The most,please do EtherCAT bus initialization at first.
And for EtherCAT motion controller, we Zmotion provides one standard EtherCAT bus initialization. Below will show codes and video description. However, before that, let’s learn 3 concepts.
Slot: slot No., controller bus No., for EtherCAT, it is 0.
Node: device No., automatically number all devices connected on the controller bus, starting from 0, and how many devices connected to bus in total can be checked by NODE_COUNT (slot) command.
Drive No.: same as “node”, but it is only for drives connected on the controller.
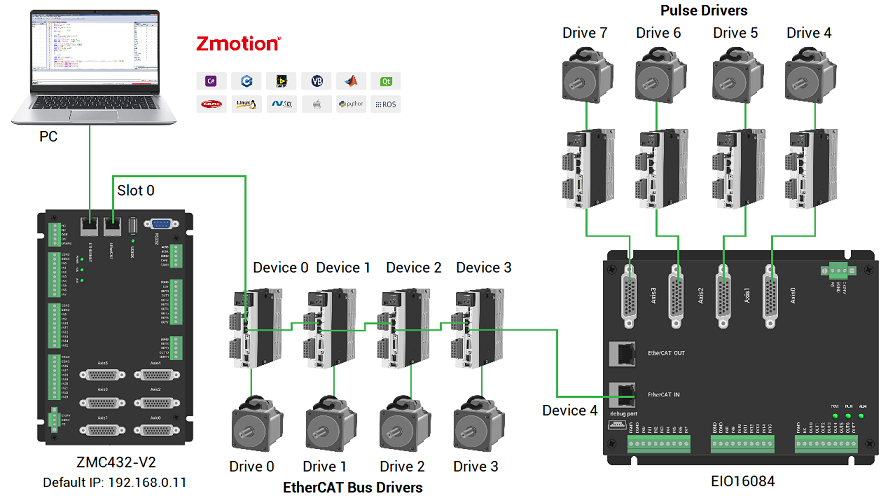
If you connect IO expansion module to the controller, module should do IO mapping or axis mapping. More details, please refer to user manual chapter IV Expansion Module, or the video as shown below.
--EtherCAT Bus Initialization Bas Program--
'*******************************************************ECAT Bus Initialization
global CONST BUS_TYPE = 0 'bus type. (can be used to distinguish the current bus type for host computer)
global CONST MAX_AXISNUM = 16 'max axes
global CONST Bus_Slot = 0 'slot No.: 0 (for single bus controller, default is 0)
global CONST PUL_AxisStart = 0 'local pulse-axis starting axis No.
global CONST PUL_AxisNum = 0 'the number of local pulse axes
global CONST Bus_AxisStart = 0 'bus axis starting axis No.
global CONST Bus_NodeNum = 1 'configure the number of nodes to see whether it is consistent with real detected number of slave station
global Bus_InitStatus 'bus initialization completion state
Bus_InitStatus = -1
global Bus_TotalAxisnum 'check how many axes in total scanned
delay(3000) 'delay 3s, wait for the drive to be powered on. (Adjust the delay according to the drive).
?"Bus Communication Period:",SERVO_PERIOD,"us"
Ecat_Init() 'initialize ECAT bus
while (Bus_InitStatus = 0)
Ecat_Init()
wend
end
'***************************************************ECAT Bus Initialization****************************************
'how to initialize: slot_scan (scan the bus) -> slave station node map the axis I/O -> SLOT_START (open bus) -> success to initialize
'******************************************************************************************************
global sub Ecat_Init()
local Node_Num,Temp_Axis,Drive_Vender,Drive_Device,Drive_Alias
RAPIDSTOP(2)
for i=0 to MAX_AXISNUM - 1 'restore axis type
AXIS_ENABLE(i) = 0
atype(i)=0
AXIS_ADDRESS(i) =0
DELAY(10) 'prevent all drivers from being switched to enable at the same time, causing excessive instantaneous current.
next
more... please refer to here or contact us to download

Video: One Module Usage & How to do EtherCAT Bus Initialization