


Let’s Continue “How to Develop EtherCAT Motion Controller by Python & Qt" . Whole related information will be shown, from beginning connection, simple motion, to complex motion.
Today, Part Two
--How to Achieve Homing Motion--
What We Need:
A. Motion Controller
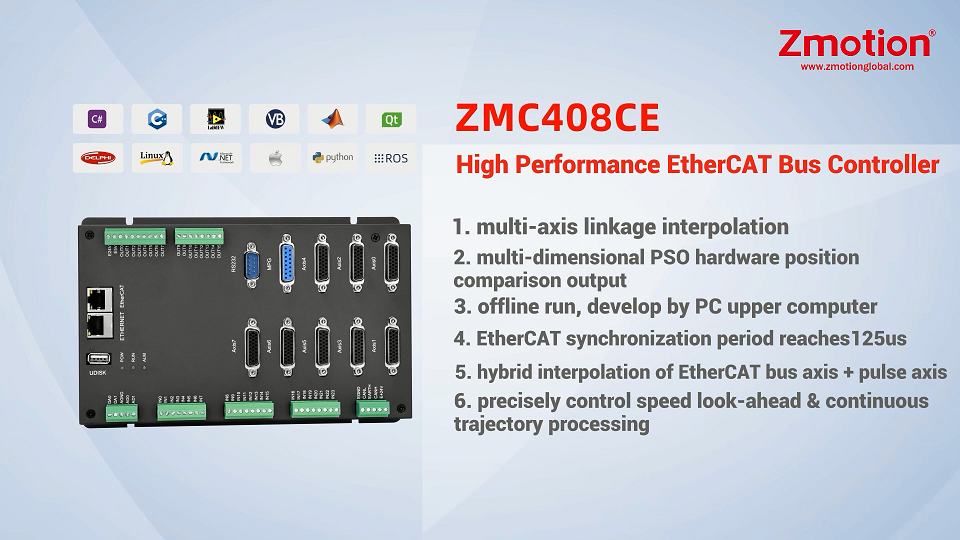
One EtherCAT Motion Controller (Here, we use ZMC408CE EtherCAT Motion Controller)
B. Operation System Environment
Win10_64 Bit
C. Development Environment:
Python & Qt:
[Python: python-3.10.10-amd64.exe]
[Pycharm: pycharm-community-2024.1.3.exe]
For “Configure Development & Parser” and “Motion Control Development”, please refer to PART ONE. Among that, it still needs to add library file and Python library function
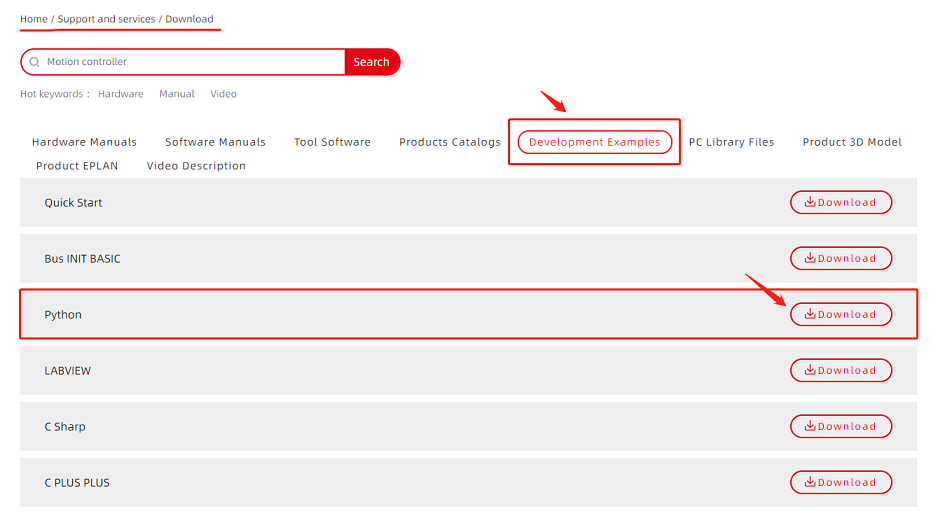
a. get corresponding Python library file and examples from here or contact us directly.
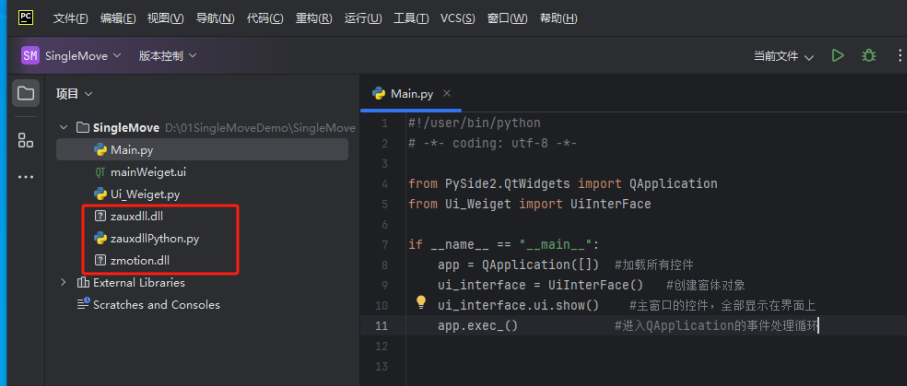
b. paste them into your project.
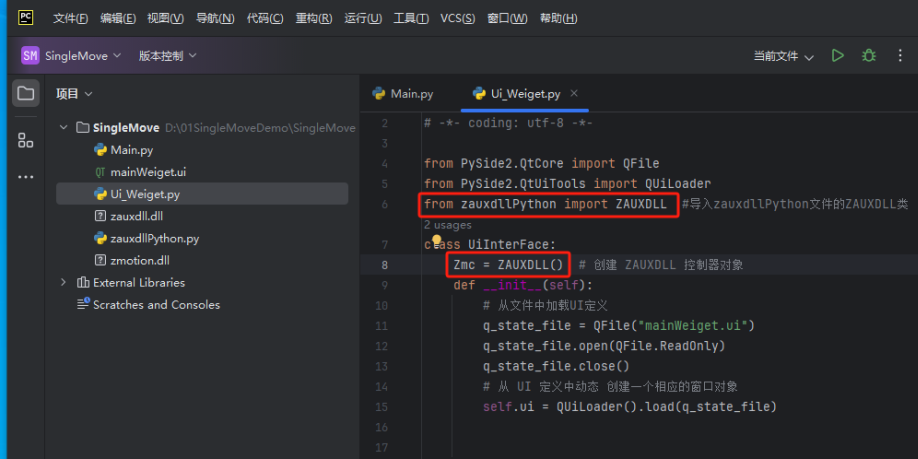
c. in ui python file, import ZAUXDLL type of zauxdllPython file at the beginning of file, and create ZAUXDLL object in the interface.
d. needed commands
All commands can be referred from here.
--connect to controller--
“ZAux_OpenEth”: connect to controller through ethernet
It only needs filling in IN parameter “Ipaddr” (IP address) to do connection, then when connected, it will output one parameter “Phandle”, the value should be 0, which means success, if it is not 0, please refer to error code. More details, please go to PC manual.
--set origin IO--
“ZAux_Direct_SetDatumIn”: set axis mapping origin IN, cancel it by setting as -1
It needs filling in IN parameters “handle” (connection handle), “iaxis” (axis No.), and “iValue” (IO No., -1 means cancel). Please note ZMC and ECI controllers are with different operations. After setting the origin switch, for ZMC controllers, when IN is OFF, which means there is one signal input. If you need opposite effect, use INVERT_IN to achieve it. Then for ECI controllers, opposite to ZMC.
--set homing creep speed--
“ZAux_Direct_SetCreep”: set homing creep speed that is for origin searching, the unit is units/s.
It needs filling in IN parameters “handle” (connection handle), “iaxis” (axis No.), and “pfValue” (creep value).
--make single-axis homing motion--
“ZAux_Direct_Single_Datum”: achieve single-axis homing motion.
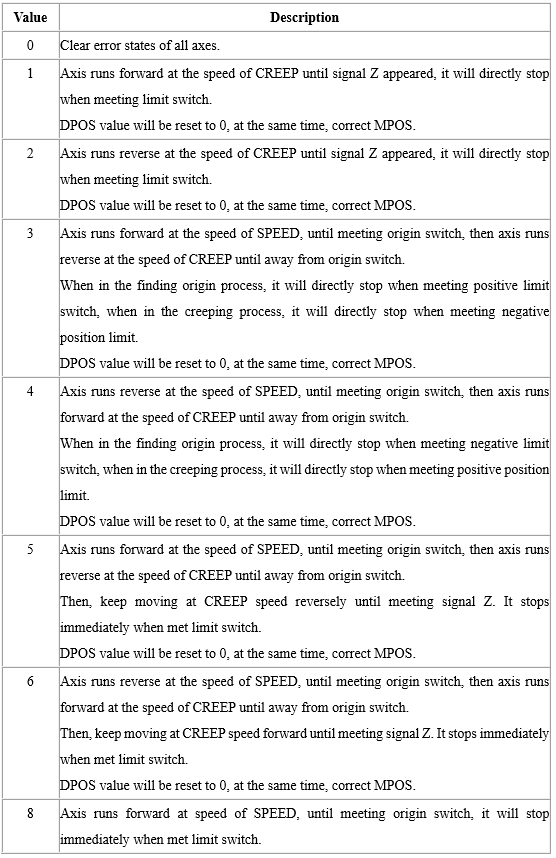
Also, there are 3 IN parameters, they are “handle” (connection handle), “iaxis” (axis No.), and “imode” (origin finding mode, please refer to command for details).
--read current axis state--
“ZAux_Direct_GetIfIdle”: check whether the current axis is in motion or not.
2 IN parameters (“handle” (connection handle) & “iaxis” (axis No.)) should be filled, then read the state from the OUT parameter “pfValue”, when it is 0, which means the axis is moving, when it is -1, which means no motion now.
Note: for robotic arm, when in CONNFRAME inverse state, joint-axis will return to 0 all the time, when in CONNREFRAME forward state, then virtual-axis will return to 0 always.
--set pulse amount--
“ZAux_Direct_SetUnits”: set pulse amount
When it is 1, which means the unit is 1 pulse. There are 3 IN parameters need filling, “handle” (connection handle), “iaxis” (axis No.), and “fValue” (the pulse amount that is set). More details and examples, please go to PC manual.
--set motion speed--
“ZAux_Direct_SetSpeed”: set axis speed, the unit is units/s.
Also, there are 3 IN parameters, they are “handle” (connection handle), “iaxis” (axis No.), and “fValue” (the speed that is set). For multi-axis motion and speed modification, please go to PC manual.
--single-axis stop motion--
“ZAux_Direct_Single_Cancel”: cancel single-axis
Same, 3 IN parameters, “handle” (connection handle), “iaxis” (axis No.), and “imode” (cancel mode, there are 4 modes, 0-4, 0 is the default mode, please refer to PC manual command details)
Next, as usual, let's see one example of homing motion.
(1) How to Build the Connection
#connect to controller, controller default IP is 192.168.0.11, here uses IP that is input in comboBox
def on_btn_open_clicked(self):
strtemp = self.ui.comboBox.currentText()
print("now ip: ", strtemp)
if self.Zmc.handle.value is not None:
self.Zmc.ZAux_Close()
self.time1.stop()
self.ui.setWindowTitle("Single-Axis Motion")
iresult = self.Zmc.ZAux_OpenEth(strtemp)#connect to controller
if 0 != iresult:
QMessageBox.warning(self.ui, "hint", "Connect Failed")
else:
QMessageBox.warning(self.ui, "hint", "Connect Succeeded")
str_title = self.ui.windowTitle() + strtemp
self.ui.setWindowTitle(str_title)
self.Up_State() #refresh function
self.time1.start(100)#open timer
(2) How to do Axis Homing Motion
#axis homing motion
def on_btn_run_clicked(self):
#check connection situation
if self.Zmc.handle.value is None:
QMessageBox.warning(self.ui, "Warn", "No Connected")
return # check axis motion state
ifidle = self.Zmc.ZAux_Direct_GetIfIdle(self.axis_Num)[1].value
ifidle = int(ifidle)
if 0 == ifidle:
QMessageBox.warning(self.ui, "Hint", "No Stop")
return
# set axis type, 7 – pulse axis type + encoder Z signal, if no need EZ homing, also can set it as 1
self.Zmc.ZAux_Direct_SetAtype(self.axis_Num, 7 if self.mode < 3 else 1)
# set pulse mode and logic direction (pulse + direction)
self.Zmc.ZAux_Direct_SetInvertStep(self.axis_Num, 0)
# set pulse amount
str_tmp = self.ui.edit_Units.text()
float_tmp = float(str_tmp)
self.Zmc.ZAux_Direct_SetUnits(self.axis_Num, float_tmp)
# set creep speed
str_tmp = self.ui.edit_CLSpeed.text()
float_tmp = float(str_tmp)
self.Zmc.ZAux_Direct_SetCreep(self.axis_Num, float_tmp)
# set running speed
str_tmp = self.ui.edit_Speed.text()
float_tmp = float(str_tmp)
self.Zmc.ZAux_Direct_SetSpeed(self.axis_Num, float_tmp)
# set acceleration
str_tmp = self.ui.edit_Accel.text()
float_tmp = float(str_tmp)
self.Zmc.ZAux_Direct_SetAccel(self.axis_Num, float_tmp)
# set deceleration
str_tmp = self.ui.edit_Decel.text()
float_tmp = float(str_tmp)
self.Zmc.ZAux_Direct_SetDecel(self.axis_Num, float_tmp)
# set origin switch
str_tmp = self.ui.edit_zeroIO.text()
float_tmp = int(str_tmp)
self.Zmc.ZAux_Direct_SetDatumIn(self.axis_Num, float_tmp)
# for ZMC controllers, when IN is OFF, which means it meets the origin signal (commonly-off), if it is commonly-on sensor, it needs to invert IN. for ECI controllers, no need to invert.
self.Zmc.ZAux_Direct_SetInvertIn(float_tmp, 1)
# homing motion
self.Zmc.ZAux_Direct_Single_Datum(self.axis_Num, self.mode)
(3) How to Stop Axis Motion
#stop axis motion
def on_btn_Stop_clicked(self):
if self.Zmc.handle.value is None:
QMessageBox.warning(self.ui, "alarm", "No Controller Connected")
return
#get axis motion state, 0 -- running , -1 -- not to run
isidle=self.Zmc.ZAux_Direct_GetIfIdle(self.axis_Num)[1].value
if isidle:
QMessageBox.warning(self.ui, "alarm", "stopped")
return
#stop single-axis motion
self.Zmc.ZAux_Direct_Single_Cancel(self.axis_Num, 2)
(4) Check Running Effect
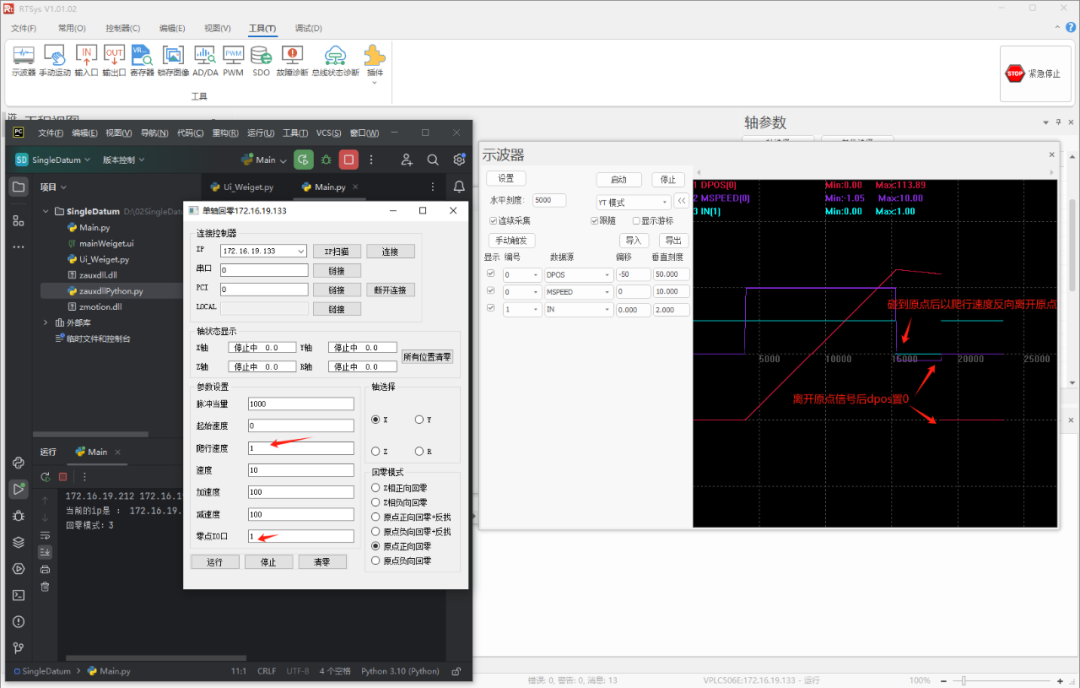
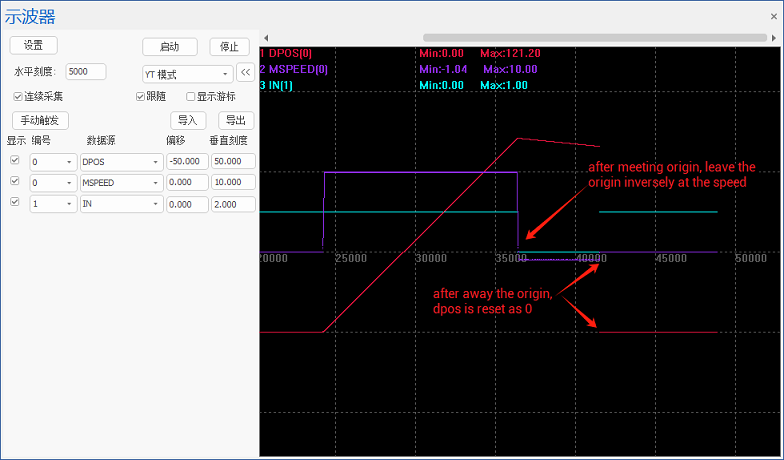
Run the python program, then watch the situation in ZDevelop software at the same time.
ABOUT ZMOTION
That's all, thank you for your reading --Python + Qt Develops EtherCAT Motion Controller (1): Connection & Single-Axis Motion
Hope to meet you, talk with you and be friends with you. Welcome!
This article is edited by ZMOTION, here, share with you, let's learn together.
Note: Copyright belongs to Zmotion Technology, if there is reproduction, please indicate article source. Thank you.
Zmotion Technology provides motion control card, motion controller, vision motion controller, expansion module and HMI. ( more keywords for Zmotion: EtherCAT motion control card, EtherCAT motion controller, motion control system, vision controller, motion control PLC, robot controller, vision positioning...)
Have a good day, best wishes, see you next time.