


Here, Zmotion Technology starts one theme "How to Develop EtherCAT Motion Controller by Python & Qt", and will show whole information, from beginning connection, simple motion, to complex motion.
Today, Part One
--How to Build Connection--
--How to Achieve Single-Axis Motion--
What We Need:
A. Motion Controller
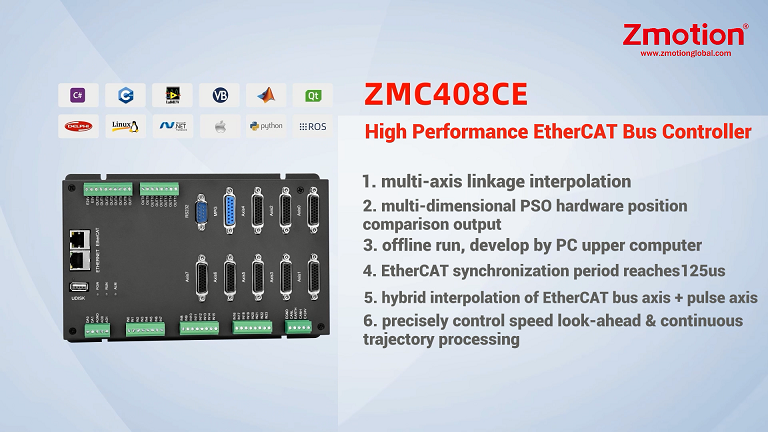
One EtherCAT Motion Controller (Here, we use ZMC408CE EtherCAT Motion Controller)
B. Operation System Environment
Win_64 Bit
C. Development Environment:
Python & Qt:
[Python: python-3.10.10-amd64.exe]
[Pycharm: pycharm-community-2024.1.3.exe]
Before Development: Configure Development & Parser
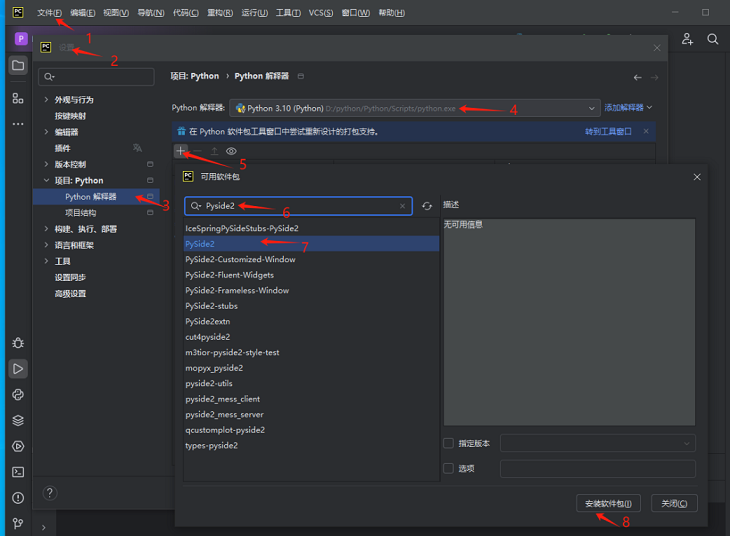
Step 1:Install Pyside2 Software Package (QT Library)*
File→ Settings→ Project pythonProject
Step 2: Set Custom Control
File→ Settings→ Tools→ External Tools→ +→ Fill in -- OK
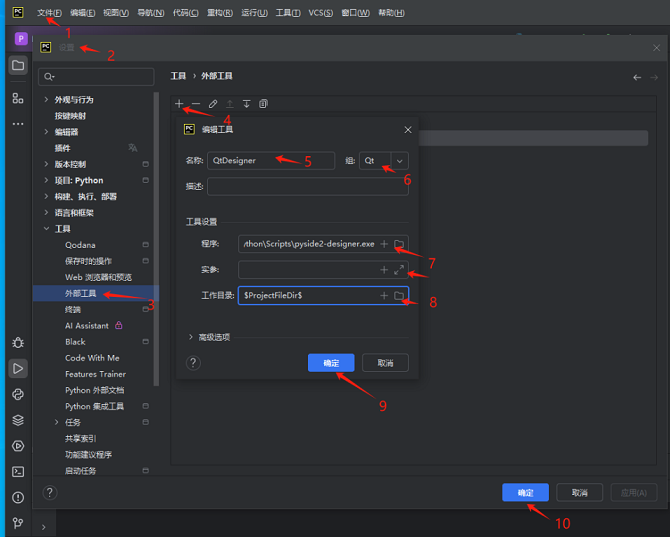
*custom QtDesinger*
Target: used to generate .ui file
Name: QtDesigner
Group: Qt
Program: designer.exe in the PySide2
For Example: C:\Python\Python39\Scripts\pyside2-designer.exe
Working directory: $ProjectFileDir$
*custom Pyside2-uic*
Target: convert made .ui file to .py file
Name: Pyside2-uic
Group: Qt
Program: Scripts\pyside2-uic.exe under Python
For Example: C:\Python\Python39\Scripts\pyside2-uic.exe
Arguments: $FileName$ -o $FileNameWithoutExtension$.py
Working directory: $FileDir$
*custom Pyside2-rcc*
Target: convert image to .py file
Name: Pyside2-rcc
Group: Qt
Program: Scripts\pyside2-rcc.exe under Python
For Example: C:\Python\Python39\Scripts\pyside2-rcc.exe
Arguments: $FileName$ -o $FileNameWithoutExtension$_rc.py
Working directory: $FileDir$
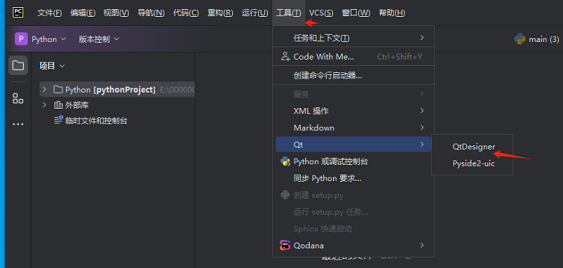
After configured, it can be used in pycharm menu directly.
It is time to do Motion Control!
(1) Build New Project
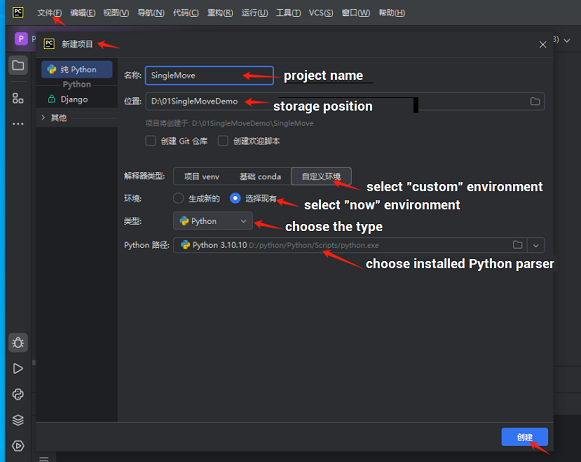
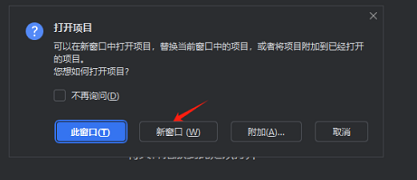
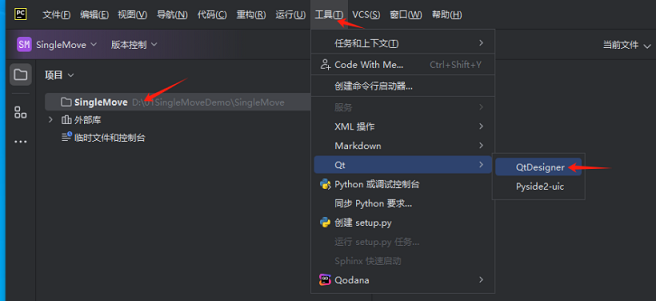
(2) Set UI Interface
a. tool -- Qt -- QtDesigner
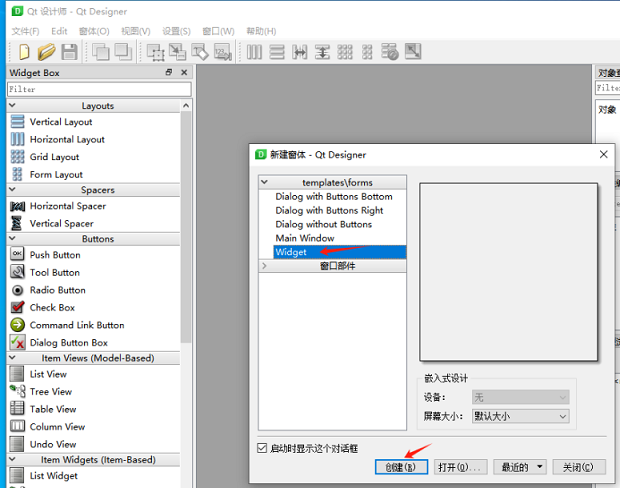
b. set project Ui: drag control to interface, the do ui setting
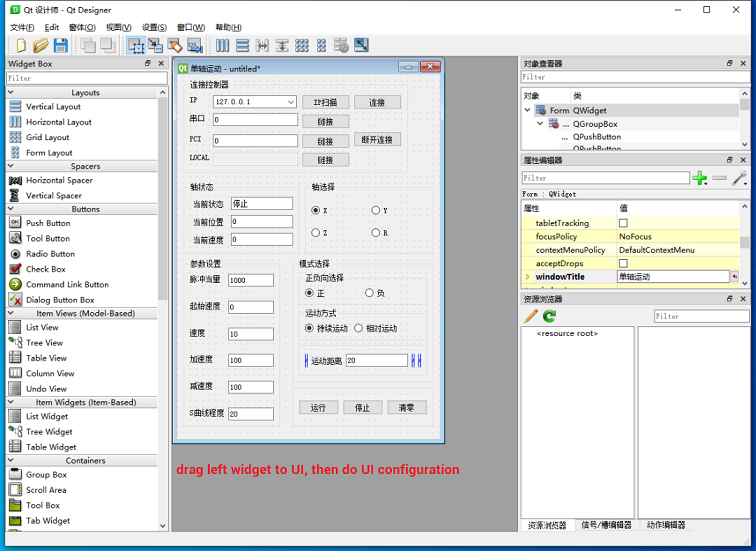
c. after setting, save the file
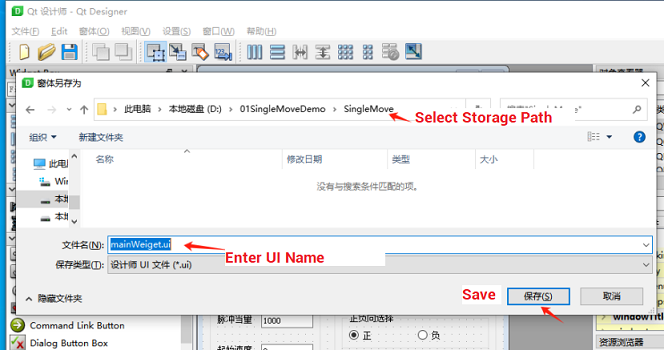
(3) Run UI in Python
a. add "python" file, right click, New -- Python File
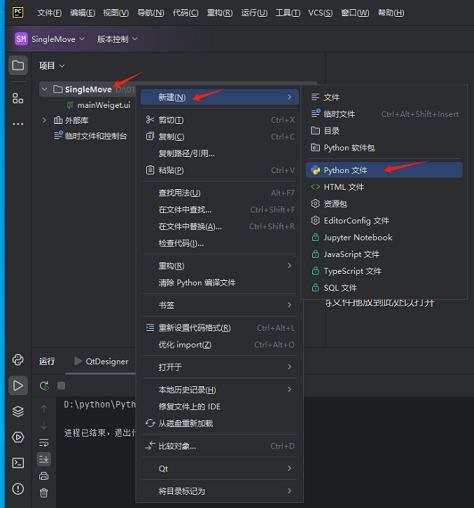
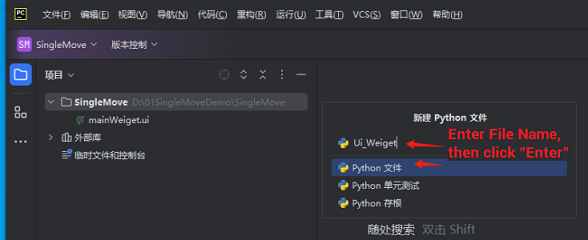
b. in Ui_Weiget file, add UI processing type
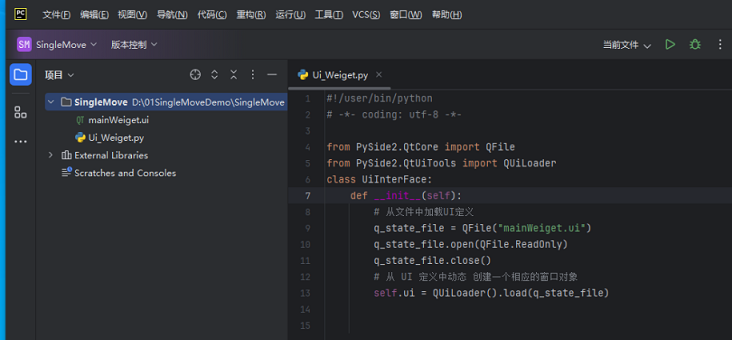
from PySide2.QtCore import QFilefrom PySide2.QtUiTools import QUiLoader
class UiInterFace:
def __init__(self):
# load UI definition from file
q_state_file = QFile("mainWeiget.ui")
q_state_file.open(QFile.ReadOnly)
q_state_file.close()
# dynamically create one corresponding window object from UI definition
self.ui = QUiLoader().load(q_state_file)
c. same as "a", add main operation file "Main", and add main entry running function
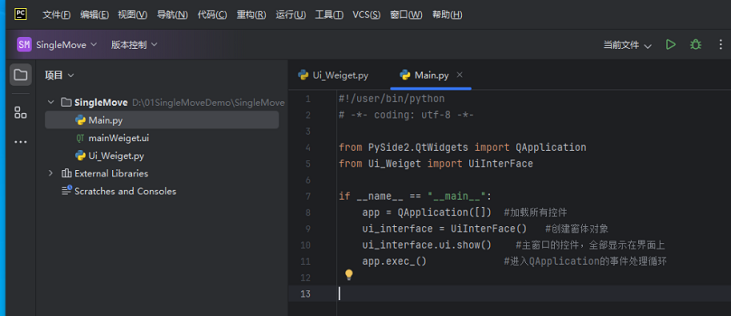
from PySide2.QtWidgets import QApplication
from Ui_Weiget import UiInterFace
if __name__ == "__main__":
app = QApplication([]) #load all controls
ui_interface = UiInterFace() #create window object
ui_interface.ui.show() #control of main window, all are shown in the interface
app.exec_() #enter QApplication event
d. at this time, in Main file, click "RUN" button, then it can operate program.
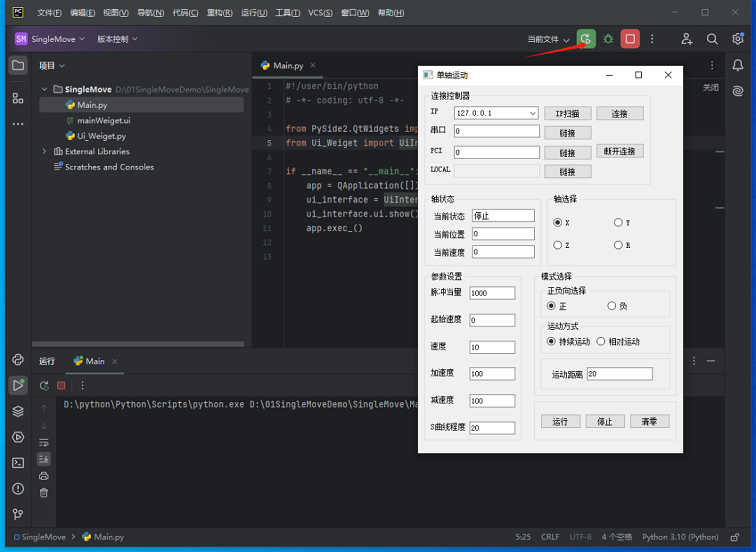
(4) Add Library File & Python Library Function
a. get corresponding Python library file and examples from here or contact us directly.
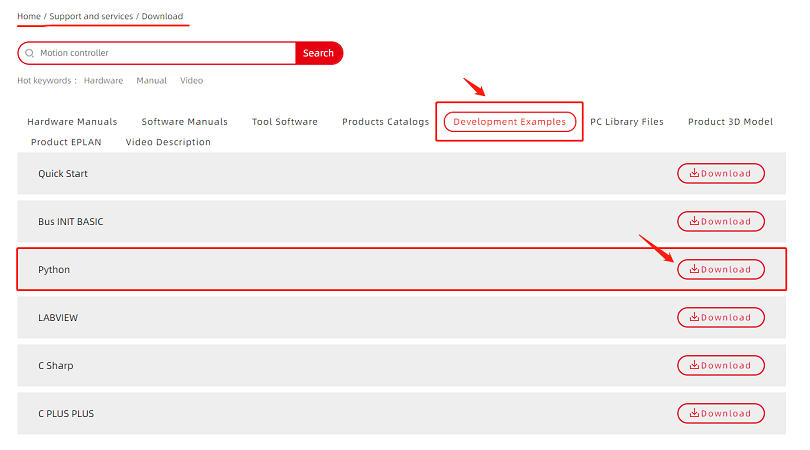
b. paste them into your project.
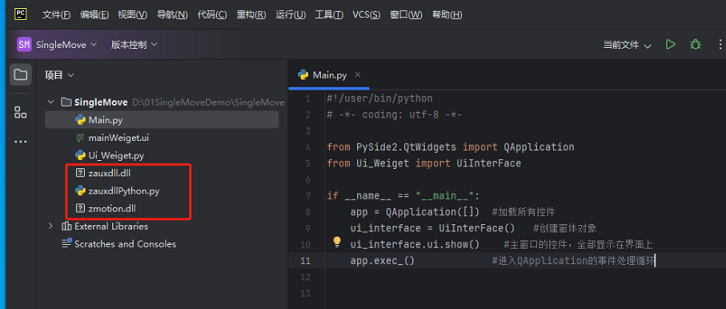
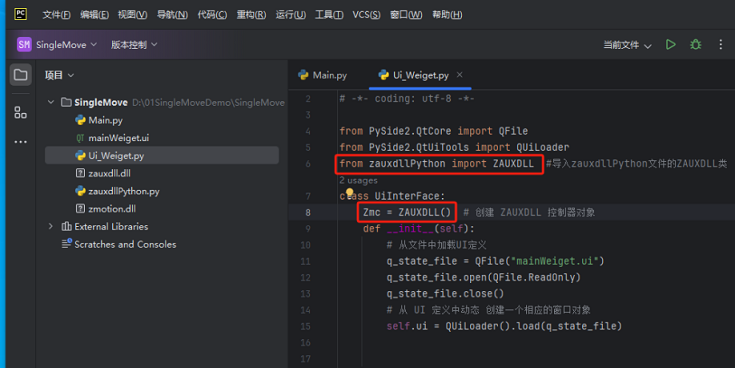
c. in ui python file, import ZAUXDLL type of zauxdllPython file at the beginning of file, and create ZAUXDLL object in the interface.
d. needed commands
All commands can be referred from here.
--connect to controller--
“ZAux_OpenEth”: connect to controller through ethernet
It only needs filling in IN parameter “Ipaddr” (IP address) to do connection, then when connected, it will output one parameter “Phandle”, the value should be 0, which means success, if it is not 0, please refer to error code. More details, please go to PC manual.
--see whether current motion is in motion or not--
“ZAux_Direct_GetIfIdle”: read whether current motion is in the motion.
It needs filling in IN parameters “handle” (connection handle) and “iaxis” (axis No.). Also, it will return one parameter “pfValue”, then you could know the state, 0 means in motion, -1 means no motion. For robotic arm, the situation is different. More details, please go to PC manual.
--set pulse amount--
“ZAux_Direct_SetUnits”: set pulse amount
When it is 1, which means the unit is 1 pulse. There are 3 IN parameters need filling, “handle” (connection handle), “iaxis” (axis No.), and “fValue” (the pulse amount that is set). More details and examples, please go to PC manual.
--set motion speed--
“ZAux_Direct_SetSpeed”: set axis speed, the unit is units/s.
Also, there are 3 IN parameters, they are “handle” (connection handle), “iaxis” (axis No.), and “fValue” (the speed that is set). For multi-axis motion and speed modification, please go to PC manual.
--single-axis continuous motion--
“ZAux_Direct_Single_Vmove”: make single-axis move in one directly continuously.
3 IN parameters “handle” (connection handle), “iaxis” (axis No.), and “idir” (the direction, -1 means negative, 1 means positive). Please note when former VMOVE doesn’t finish, now VMOVE will replace former one directly, that is, no need to CANCEL it.
--single-axis absolute motion--
“ZAux_Direct_Single_MoveAbs”: make single-axis do absolute motion
3 IN parameters “handle” (connection handle), “iaxis” (axis No.), and “fdistance” (absolute distance). Please note it is absolute motion.
--single-axis stop motion--
“ZAux_Direct_Single_Cancel”: cancel single-axis
Same, 3 IN parameters, “handle” (connection handle), “iaxis” (axis No.), and “imode” (cancel mode, there are 4 modes, 0-4, 0 is the default mode, please refer to PC manual command details)
Example of Connection & Single-Axis Motion
(1) How to Build the Connection
#connect to controller, controll default IP is 192.168.0.11, here uses IP that is input in comboBox
def on_btn_open_clicked(self):
strtemp = self.ui.comboBox.currentText()
print("now ip: ", strtemp)
if self.Zmc.handle.value is not None:
self.Zmc.ZAux_Close()
self.time1.stop()
self.ui.setWindowTitle("Single-Axis Motion")
iresult = self.Zmc.ZAux_OpenEth(strtemp)#connect to controller
if 0 != iresult:
QMessageBox.warning(self.ui, "hint", "Connect Failed")
else:
QMessageBox.warning(self.ui, "hint", "Connect Succeeded")
str_title = self.ui.windowTitle() + strtemp
self.ui.setWindowTitle(str_title)
self.Up_State() #refresh function
self.time1.start(100)#open timer
(2) How to do Axis Motion
#axis operation function
def on_btn_Run_clicked(self):
if self.Zmc.handle.value is None:
QMessageBox.warning(self.ui, "alarm", "No Controller Connected")
return
# get axis motion state, 0 -- running,-1 -- not to run
isidle=self.Zmc.ZAux_Direct_GetIfIdle(self.axis_Num)[1].value
isidle=int(isidle)
if self.mode == 1 and not isidle:
QMessageBox.warning(self.ui, "alarm", "not stopped")
return
# set pulse amount
str_tmp = self.ui.edit_Units.text()
float_tmp = float(str_tmp)
self.Zmc.ZAux_Direct_SetUnits(self.axis_Num, float_tmp)#set pulse amount
# set motion speed
str_tmp = self.ui.edit_Speed.text()
float_tmp = float(str_tmp)
self.Zmc.ZAux_Direct_SetSpeed(self.axis_Num, float_tmp)#set motion speed
# set acceleration
str_tmp = self.ui.edit_Accel.text()
float_tmp = float(str_tmp)
self.Zmc.ZAux_Direct_SetAccel(self.axis_Num, float_tmp)#set acceleration
# set deceleration
str_tmp = self.ui.edit_Decel.text()
float_tmp = float(str_tmp)
self.Zmc.ZAux_Direct_SetDecel(self.axis_Num, float_tmp)#set deceleration
# set S curve
str_tmp = self.ui.edit_Sramp.text()
float_tmp = float(str_tmp)
self.Zmc.ZAux_Direct_SetSramp(self.axis_Num, float_tmp)# set S curve
if 0 == self.mode:
# single-axis continuous motion
self.Zmc.ZAux_Direct_Single_Vmove(self.axis_Num, self.direction)
elif 1 == self.mode:
str_tmp = self.ui.edit_Distance.text()
float_tmp = float(str_tmp)
# single-axis relative motion
self.Zmc.ZAux_Direct_Single_Move(self.axis_Num, -float_tmp if self.direction == -1 else float_tmp)
(3) How to Stop Axis Motion
#stop axis motion
def on_btn_Stop_clicked(self):
if self.Zmc.handle.value is None:
QMessageBox.warning(self.ui, "alarm", "No Controller Connected")
return
#get axis motion state, 0 -- running,-1 -- not to run
isidle=self.Zmc.ZAux_Direct_GetIfIdle(self.axis_Num)[1].value
if isidle:
QMessageBox.warning(self.ui, "alarm", "stopped")
return
#stop single-axis motion
self.Zmc.ZAux_Direct_Single_Cancel(self.axis_Num, 2)
(4) Video Tutorial
IMAGE
Video Showing