Review:
Delta Parallel Robotic Arm by C# | How to Do Kinematic and Manual
Delta Parallel Robotic Arm by C# | How to Do Camera Calibration & Shape Matching
Now
Delta Parallel Robotic Arm by C# | How to Do Synchronous SortingToday, Zmotion shares "how to do synchronous sorting in assemble line through C# for Delta robotic arm".
Also, we combine our "vision motion controller" with C# to achieve that.
"Vision Motion Controller" -- "VPLCXXX" -- "VPLC711"
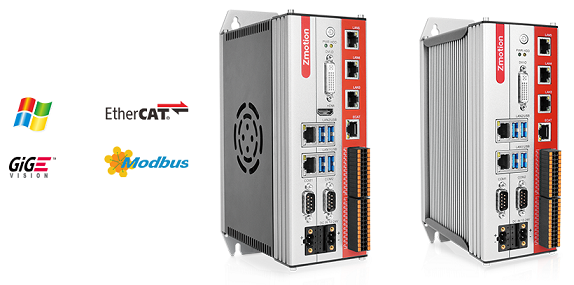
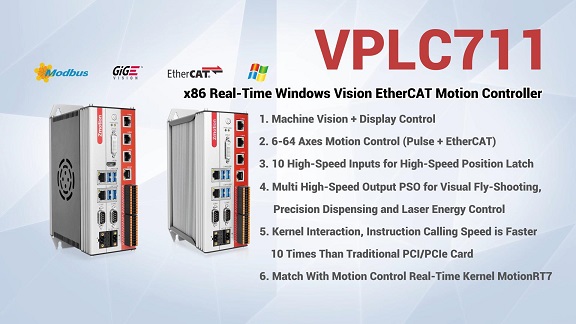
VPLC711 is one Windows high-performance machine vision EtherCAT motion controller based on x86 platform. It is not powerful, but also is flexible, like, multi-channel high-speed hardware IN and multi-channel high-speed PSO OUT, these two kinds of functions can achieve multi-axis synchronous motion precisely, and do multi-protocol high-speed communication with external devices.
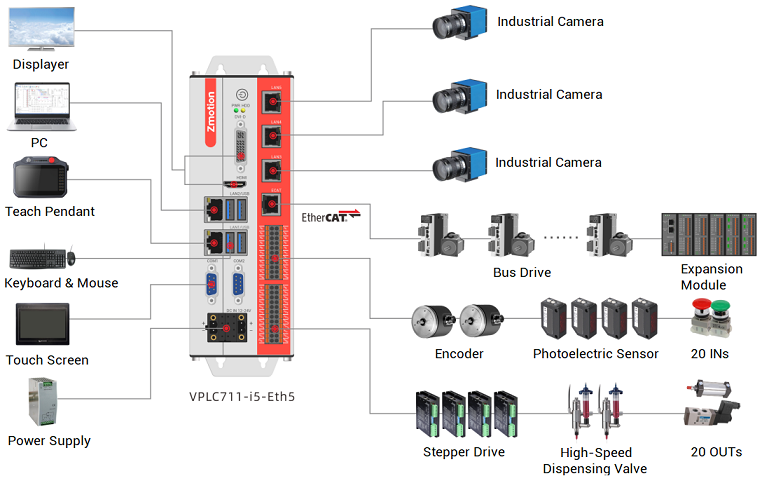
VPLC711 EtherCAT vision motion controller has many kinds of hardware interfaces and communication protocols, which means it is easy to connect and integrate with other devices. And it supports vision processing function, specifically, it can real-time process image data, then achieve vision detection, vision measurement, vision positioning, etc.
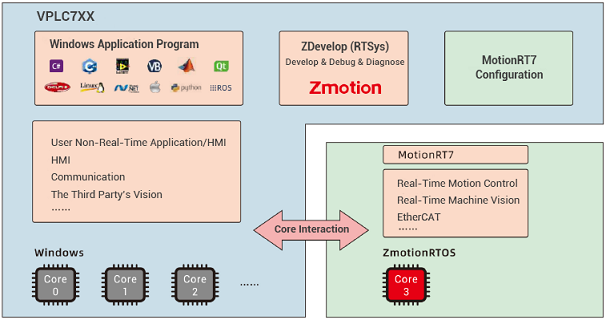
What's more, there is one motion control real-time kernel MotionRT7 built in VPLC711, which can provide one flexible integrated motion control + vision control solution.
For more information, like, specific resources, hardware wiring, please check corresponding manual -- VPLC711 EtherCAT Vision Motion Controller User Manual.
Here, use VS2010.
Step 1: Build One Project
--click "File" - "New" - "Project"--
--select "Visual C#", .Net Framework 4 and Windows program--
Step 2: Obtain Zmotion C# Library
--method 1: find corresponding library in Zmotion website "download", then download by yourself--
--method 2: contact us, send the corresponding library to you--
Step 3: Develop by Zmotion C# Library File
Note: the downloaded library is "motion control library", if you need vision function, please obtain vision library from us.
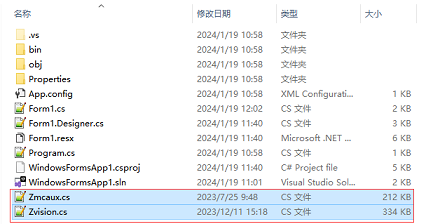
--copy "Zmcaux.cs" (motion library) and "Zvision.cs" (vision library) files into new built project--
--put zauxdll.dll, zmotion.dll, and zvision.dll files into folder of bin\debug--
--open the file, and click "show all files" in the "solution resource manager", and right click "Zmcaux.cs" and "Zvision.cs" files, then click "include in project".
Step 4: Edit
--double click "Form 1" of "Form 1.cs"--
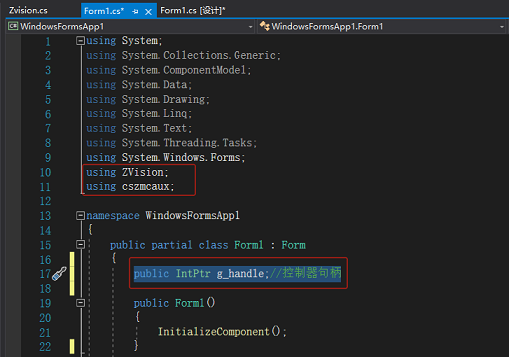
--edit "using cszmcaux" and "using ZVision" at the beginning--
--state controller handle "g_handle"--
In "PC Function Library Programming Manual”, you can check all encapsulated commands. It can be downloaded here or contact us directly.
Here, it will show Delta related commands.
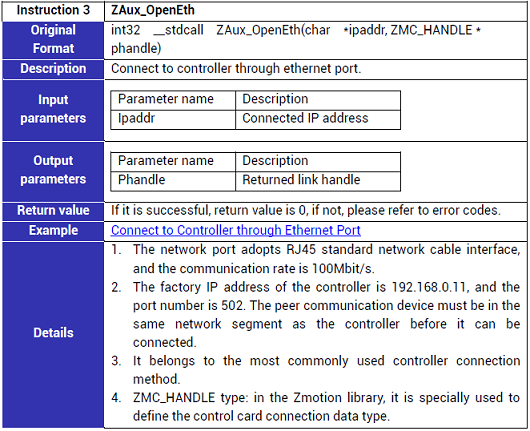
(1) Connect to Controller -- ZAux_OpenEth
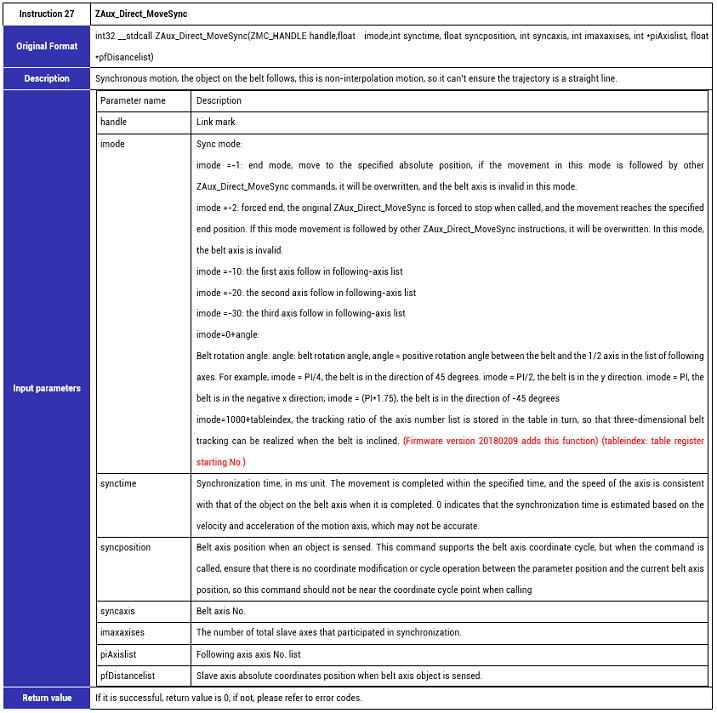
(2) Synchronize -- ZAux_Direct_MoveSync
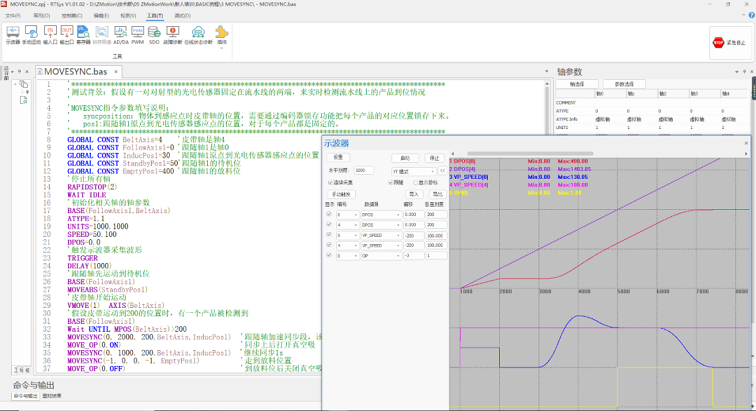
(1) Edit Basic to Test MoveSync Usage
'**************************************************************************************
'if there are one pair of “through-beam photoelectric sensor” fixed at two sides of assemble line to real-time detect the product position on the assemble line.
'how to fill in MOVESYNC command parameters:
'syncposition: the belt axis position when the object arrived at induction position, it needs to record product position through encoder latching.
'pos1: the position from following axis 1 origin to photoelectric sensor induction position is fixed for each product.
'**************************************************************************************
GLOBAL CONST BeltAxis=4 'belt axis is axis 4
GLOBAL CONST FollowAxis1=0 'following axis 1 is axis 0
GLOBAL CONST InducPos1=30 'the position from following axis 1 origin to photoelectric sensor induction point
GLOBAL CONST StandbyPos1=50'following axis 1’ standby position
GLOBAL CONST EmptyPos1=400 'following axis 1’s unloading position
'stop all axes
RAPIDSTOP(2)
WAIT IDLE
'initialize axis parameters of corresponding axes
BASE(FollowAxis1, BeltAxis)
ATYPE = 1,1
UNITS = 1000,1000
SPEED = 50,100
DPOS = 0,0
'trigger SCOPE to capture data waveform
TRIGGER
DELAY(1000)
'following axis moves to standby at first
BASE(FollowAxis1)
MOVEABS(StandbyPos1)
'belt axis starts to move
VMOVE(1) AXIS(BeltAxis)
'if there is one product detected when belt moved at 200
BASE(FollowAxis1)
Wait UNTIL MPOS(BeltAxis)> 200
MOVESYNC(0, 2000, 200, BeltAxis, InducPos1) 'when the command (following axis accelerates to synchronize) executed, it will synchronize with the product
MOVE_OP(0, ON) 'synchronized, ON vacuum suction
MOVESYNC(0, 1000, 200, BeltAxis, InducPos1) 'keep synchronizing 1s
MOVESYNC(-1, 0, 0, -1, EmptyPos1) 'move to unloading position
MOVE_OP(0, OFF) 'arrive unloading position, off vacuum suction
(2) Check Data Waveform
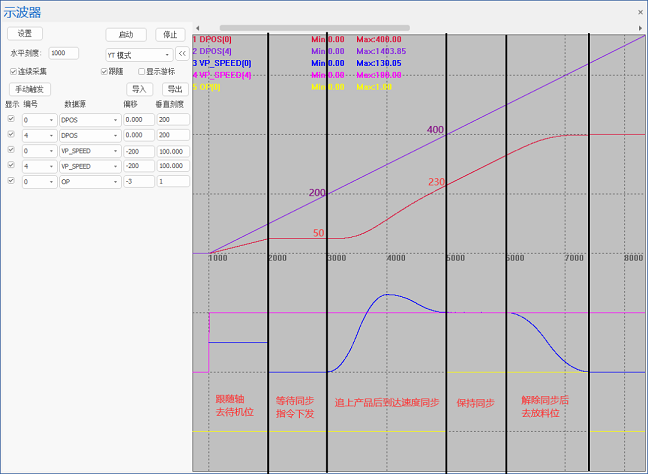
Obtain corresponding waveform through RTSys (ZDevelop) -- SCOPE, then analyze synchronization process.
According above scope data we can know:
a. when product is detected, the belt position is 200, following axis position is 50.
b. following axis follows with the product, and keeps the same speed, when it synchronized with belt axis, belt position is 400, following axis 1 position is 230.
c. it can be know the product moves forward 200 (400-200) while synchronizing from "a" and "b".
d. the data from following axis 1 origin to photoelectric sensor's sense point position "InducPos1" is 30, so when axis 1 is parallel with belt, belt makes product move forward 200, then now the real distance becomes 230 (200+30).
e. therefore, the result of "d" is consistent with following axis 1 real position after synchronized, that is, assemble synchronous command is OK.
One Routine: How C# Do Vision Synchronous Sorting in Assemble Line
(1) Belt Synchronized Command Key Parameters
ZAux_Direct_MoveSync(ZMC_HANDLE handle,float imode,int synctime, float syncposition, int syncaxis, int imaxaxises, int *piAxislist, float *pfDisancelist)
--imode--
Select synchronized mode.
imode=0+angle: synchronous mode, if belt and axis X are parallel, fill in 0.
imode =-1: end mode, move to the specified absolute position, it is usually used at the unloading position after synchronized and captured the material.
--synctime--
Synchronization time, in ms unit. The movement is completed within the specified time. When completed, axis speed and object speed (on the belt axis) keep same. 0 indicates that the synchronization time is estimated according to motion axis' speed and acceleration.
--syncposition--
When vision or sensor sensed product on the belt, now belt position is MPOS (measurement position).
--pfDistancelist--
If locates the product by vision, this parameter is "world coordinate" of the product when vision recoginized the product.
If it uses photoelectric sensor to detect the product, this parameter is fixed, when the sensor feels the product, product current position absolute coordinate. Now, it can move slave axis manually to positioning the product to get the position.
(2) Vision Synchronous Sorting Steps
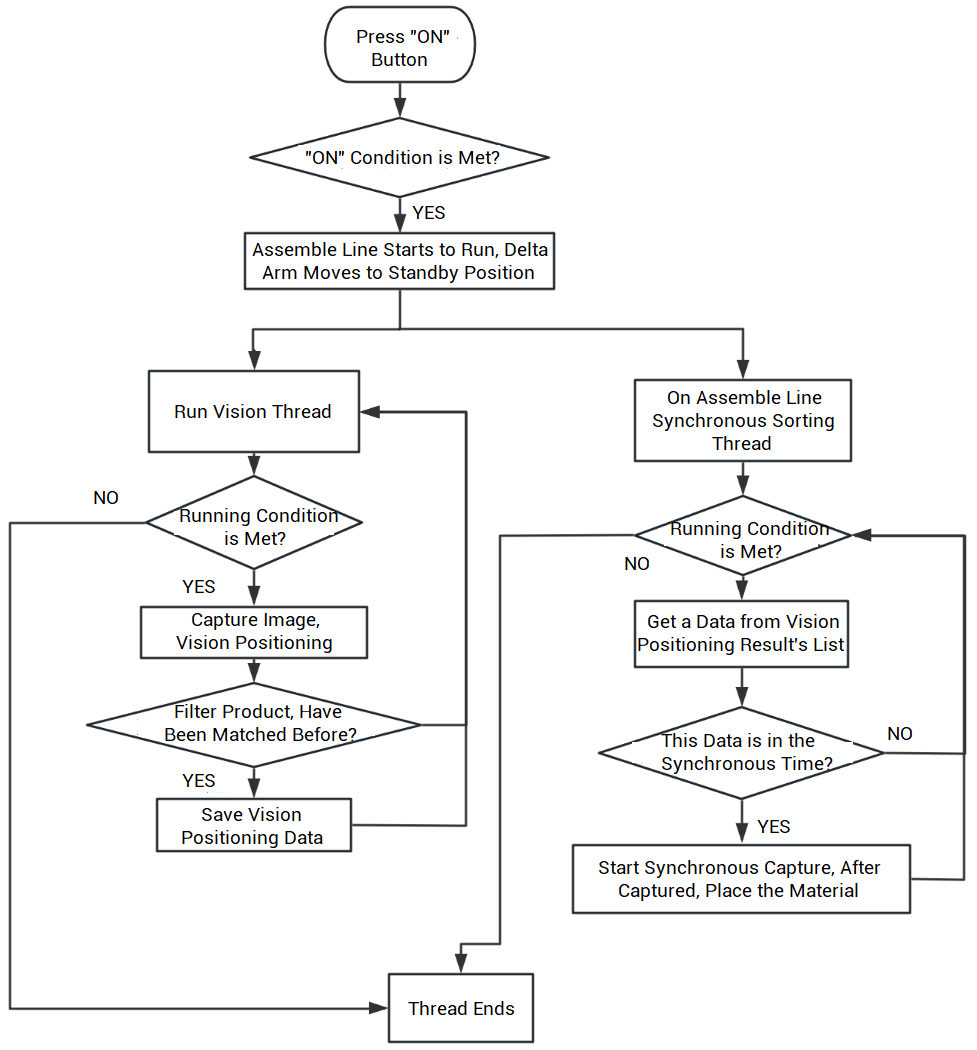
A. Codes Details of Vision Matching & Positioning
/************************************************************************************
'Task No.: /
'Function of this function: vision positioning
'Input: /
'Output: /
'returned value: sub thread – do vision positioning
**************************************************************************************/
public void RunSubTaskVisua()
{
int TempArrid = 0;
float TempVar = 0;
WriteLog("Vision Function ON");
while (SysRunFlag > 0)
{
//when pause button is not pressed
while (SysRunFlag == 1)
{
//capture the image
VisuaOper.CameAcquisition();
//do template matching
RTDisplay.Image = VisuaOper.ShapeFind();
if (MainWindows.BeltMpos != 0)//if gets the belt encoder position normally when capturing the image
{
//operate MoveSyncBuff data, please lock at first
while (true)
{
if (MainWindows.SetMoveSyncFlag == 0)
{
MainWindows.SetMoveSyncFlag = 1;
break;
}
}
//find array starting subscript that can save data
int ArrId = 0;
for (int i = 0; i < 50; i++)
{
if (MainWindows.MoveSyncBuff[i, 0] == 0)
{
ArrId = i;
break;
}
}
//start to save the data, 10 results can be matched at most
TempArrid = ArrId;
for (int i = 0; i < 10; i++)
{
//if the score is OK
if (MainWindows.VisionRst[i, 0] >= MainWindows.VisionScore)
{
int j;
//if there is repeated target, delete repeated one
for (j = 0; j < TempArrid; j++)
{
TempVar = MainWindows.VisionRst[i, 1] - MainWindows.BeltMpos - MainWindows.MoveSyncBuff[j, 1] + MainWindows.MoveSyncBuff[j, 4];
if (((TempVar) <= tempvar="">= -10))
{
j = -10;
break;
}
}
if (j >= 0)
{
MainWindows.MoveSyncBuff[ArrId, 0] = 1;
MainWindows.MoveSyncBuff[ArrId, 1] = MainWindows.VisionRst[i, 1]; //save matched X coordinate
MainWindows.MoveSyncBuff[ArrId, 2] = MainWindows.VisionRst[i, 2]; //save matched Y coordinate
MainWindows.MoveSyncBuff[ArrId, 3] = MainWindows.VisionRst[i, 3]; //save matched angle offset
MainWindows.MoveSyncBuff[ArrId, 4] = MainWindows.BeltMpos; //save belt position when product is matched
ArrId = ArrId + 1;
IdentiNum.Text = (Convert.ToInt32(IdentiNum.Text) + 1).ToString();
WriteLog("Vision Target:" + "(" + MainWindows.VisionRst[i, 1].ToString("0,0") + "," + MainWindows.VisionRst[i, 2].ToString("0,0") + ")");
}
}
//clear scores
MainWindows.VisionRst[i, 0] = 0;
}
//unlock
MainWindows.SetMoveSyncFlag = 0;
}
}
Thread.Sleep(100);
}
}
B. Codes Details of Vision Sorting in Assemble Line
/************************************************************************************
'Task No.: /
'Function of this function: assemble line synchronous sorting
'Input: /
'Output: /
'returned value: /
**************************************************************************************/
public void RunSubTaskMotion()
{
float[] MoveSyncTemp = new float[5];
float TempMpos = 0;
while (SysRunFlag > 0)
{
while (SysRunFlag == 1)
{
if (MainWindows.MoveSyncBuff[0, 0] == 1)
{
MainWindows.ZauxErr = zmcaux.ZAux_Direct_GetMpos(MainWindows.g_Handle, MainWindows.ConveyorAxisId, ref TempMpos);
//if gets the encoder position correctly
if (0 == MainWindows.ZauxErr)
{
//how far the encoder moves forward
TempMpos = TempMpos - MainWindows.MoveSyncBuff[0, 4];
...... More, Please Contact Us.