

Here, we take ZMC406R-V2 EtherCAT Motion Controller to build forward or inverse kinematics for Delta through C#. In addition, how to manually control it.
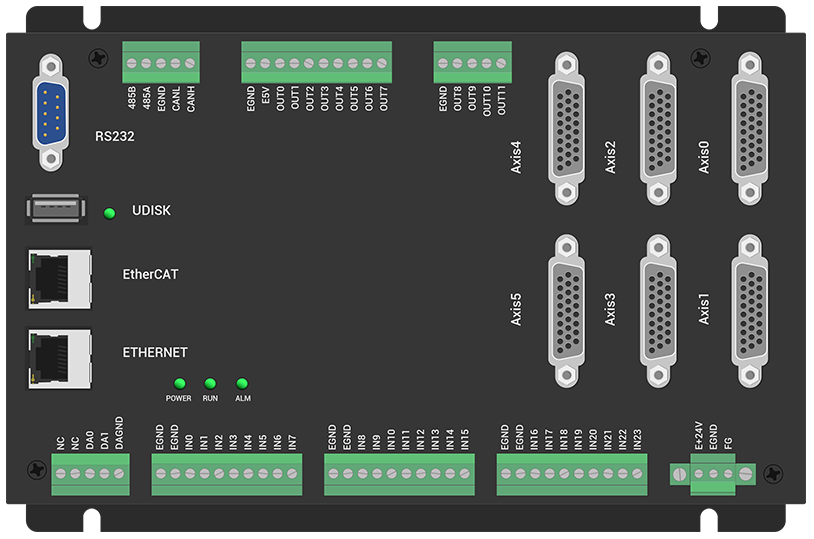
Above shows the hardware, ZMC406R-V2.
It is a 6-axis EtherCAT motion controller, R means it supports Delta, 6-joint, and other custom robot types. If you need more resources, like, axis, IO, analog, which all can be achieved by expansion modules because it has many communication interfaces, especially EtherCAT, CAN, EtherNET, RS232, etc.
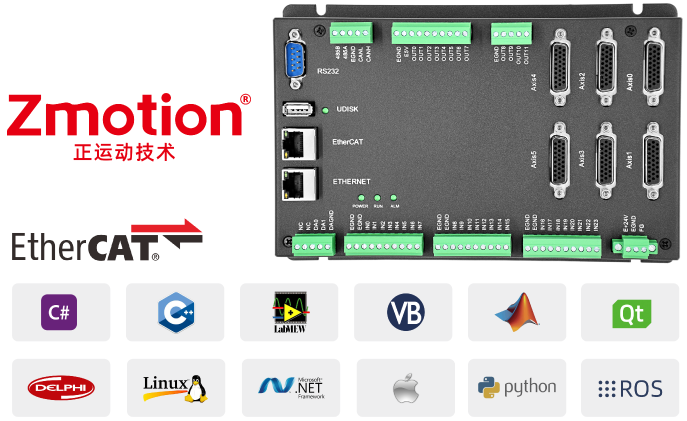
ZMC406R-V2 can download edited program into controller without PC (offline), and can edit needed motion trajectory through HMI. Another way, call API function to control, above languages are OK, C#, C++, Labview, Python, and it is very convenient because Zmotion provides one general encapsulated function library.
For more information, like, specific resources, hardware wiring, please check corresponding manual -- ZMC406 EtherCAT Motion Controller User Manual.
Next, let's enter our learning part.
Here, use VS2010.
Step 1: Build One Project
--click "File" - "New" - "Project"--
--select "Visual C#", .Net Framework 4 and Windows program--
Step 2: Obtain Zmotion Library
--method 1: find corresponding library in Zmotion website "download", then download by yourself--
--method 3: contact us, send the corresponding library to you--
Step 3: Develop by Zmotion C# Library File
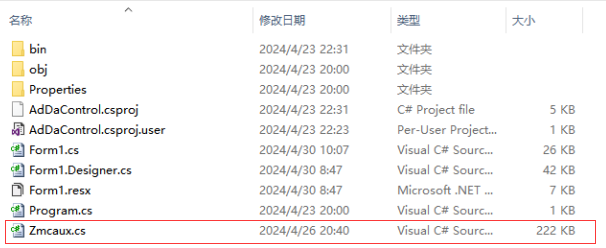
--copy downloaded C# library file and corresponding file into new built project--
*copy "zmcaux.cs" into new built project*
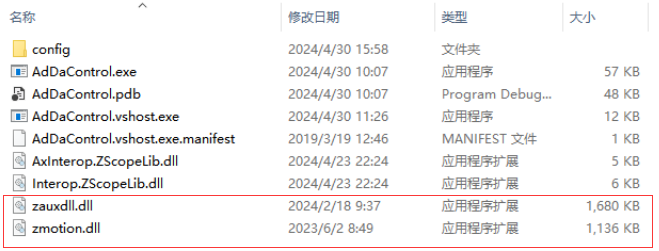
*copy "zaux.dll" and "zmotion.dll" into bin\debug folder*
--open new created file--
*open the file, and click "show all files" in the "solution resource manager", and right click "zmcaux.cs" file, then click "include in project".
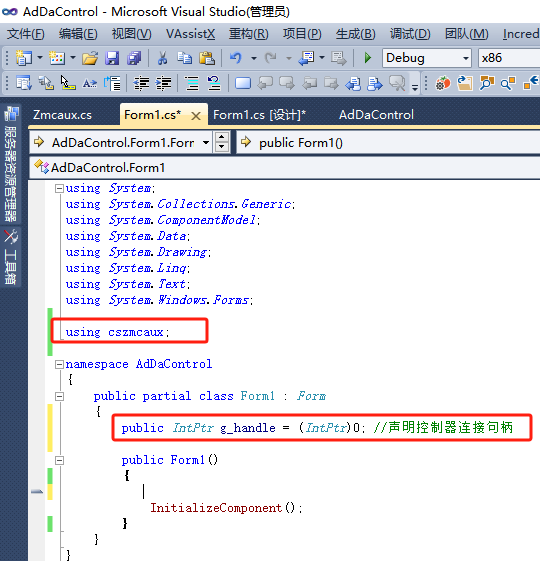
--edit--
*double click "Form 1" of "Form 1.cs"*
*edit "using cszmcaux" at the beginning*
*state controller handle "g_handle".
In "PC Function Library Programming Manual" , you can check all encapsulated commands. It can be downloaded here or contact us directly.
Here, it will show Delta related commands.
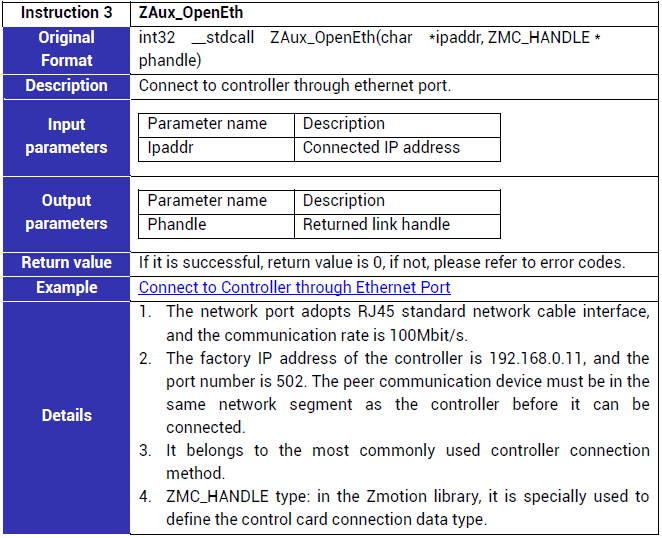
(1) Connection Command -- ZAux_OpenEth
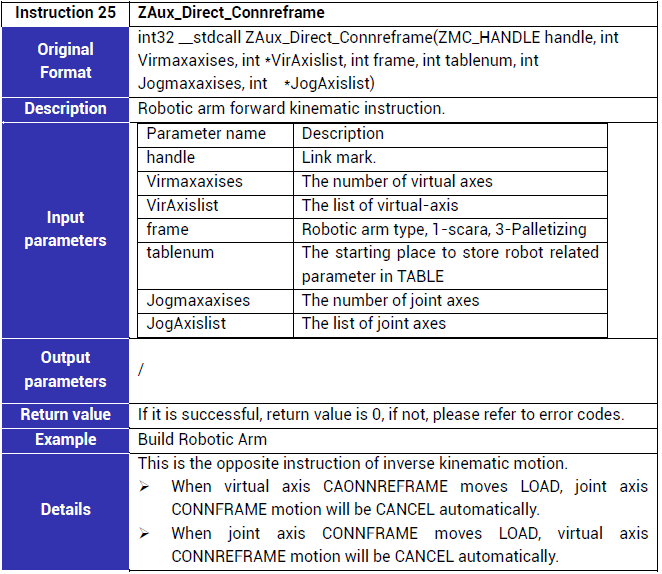
(2) Forward Connection -- ZAux_Direct_Connreframe
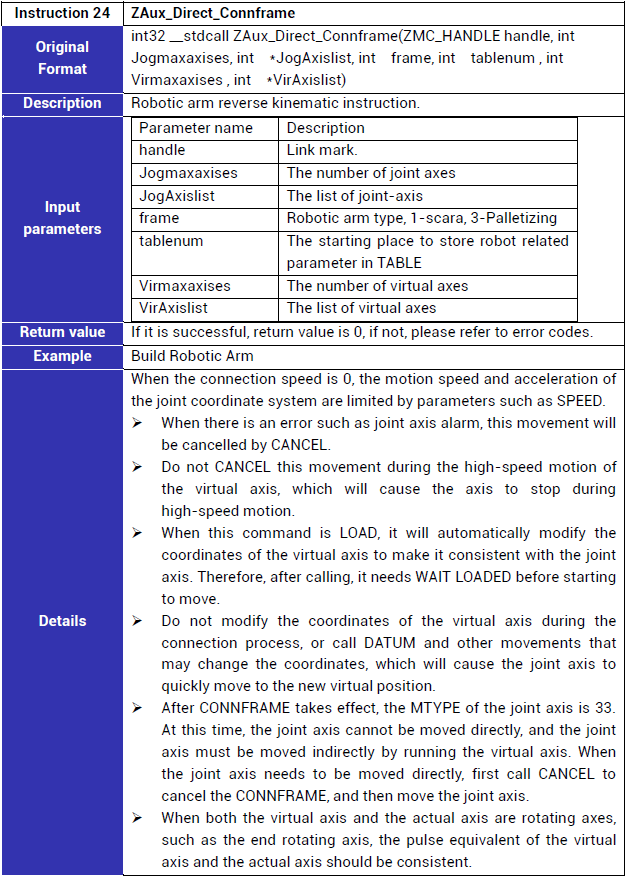
(3) Inverse Connection -- ZAux_Direct_Connframe
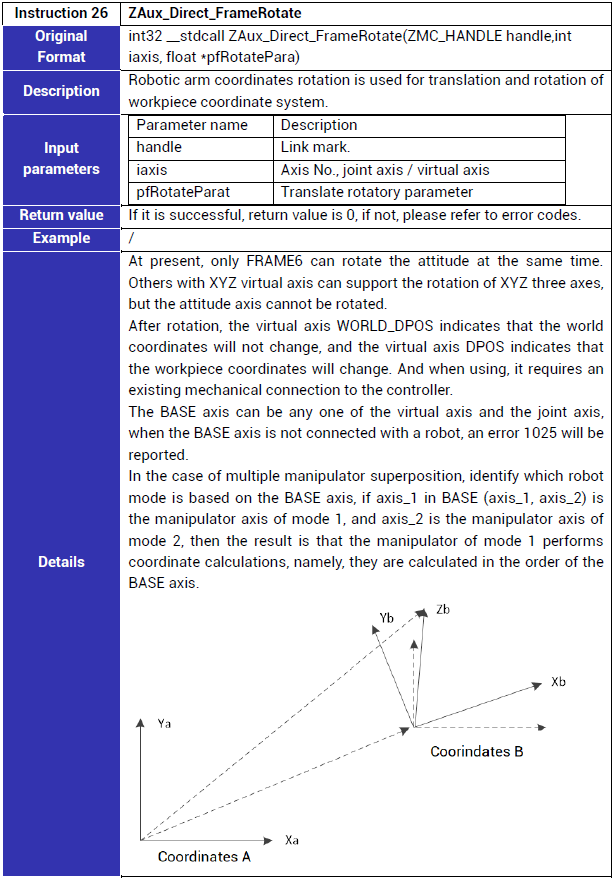
(4) Rotate robotic arm coordinate system to get user coordinate system
--Theory--
(1) Check Axis Direction
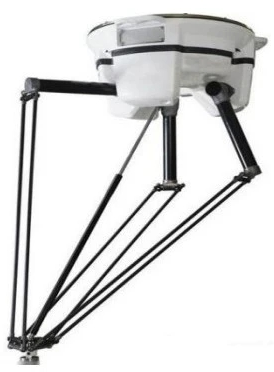
Use Zmotion Delta parallel robotic arm model, the direction of 3 joint axes must be forward when they rotate downside, and the direction of end rotary axis also should be forward when it rotates anticlockwise (looking down).
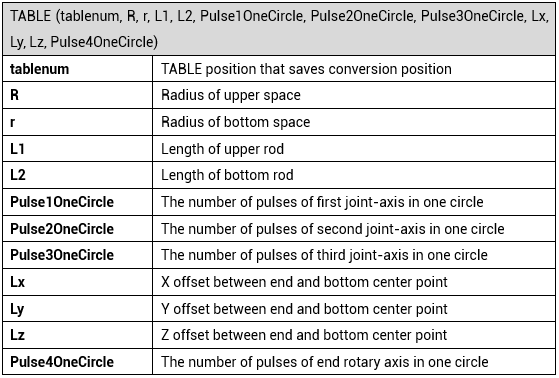
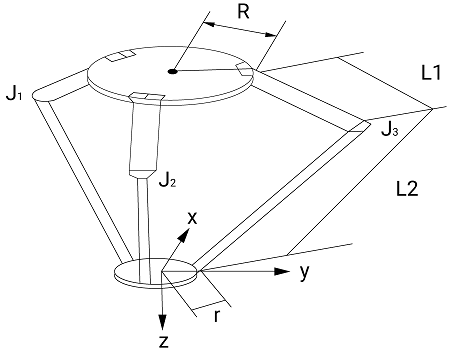
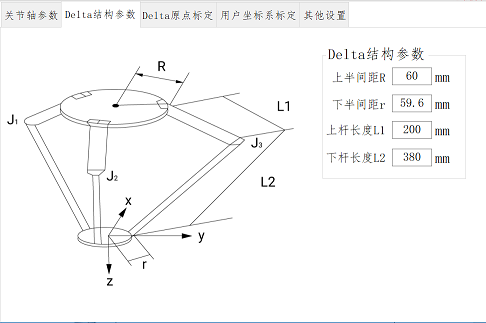
(2) Save Structural Parameters
Please obtain structural parameters from your robot body manufacturer.
Then write corresponding parameters into our controller TABLE register, next, it can call the interface to build forward or inverse kinematics.
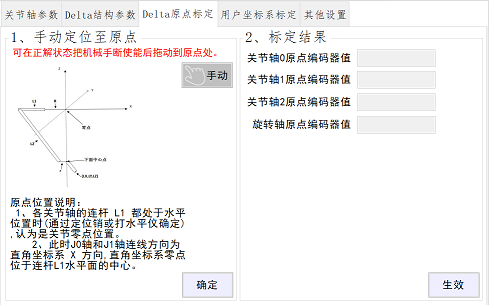
(3) Define Origin
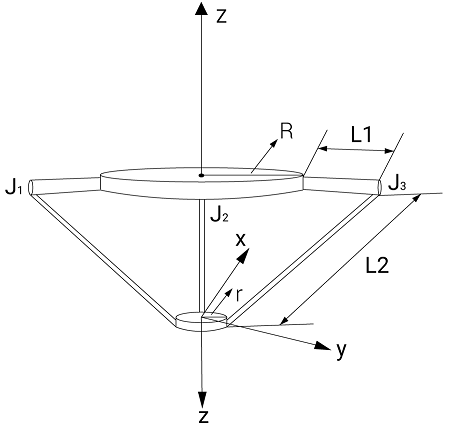
A. when each joint-axis' connection rod L1 is in the horizontal position, it is considered as the joint origin position (generally, robot body will provide positioning pin, if no, it can use "gradienter" to make sure L1 in the horizontal when it is at origin.
B. at this time, axis 0 and axis 1' connection direction is X direction of Cartesian Coordinate System, and system's origin is located at the center of the horizontal plane of connecting rod L1.
(4) Set Joint-Axis & Virtual-Axis
The joint-axis is an actual motor axis. For Delta, it has joint-axis 0, joint-axis 1, joint-axis 2 and end rotation axis. And these joint axes' pulse amounts must be set as needed pulses in one circle (Units = motor pulses in one circle * reduction ratio / 360).
The virtual-axis is a virtual axis for Cartesian Coordinate System, it has system virtual axis X, axis Y, axis Z, and one rotation axis RZ. For X,Y,Z, their UNITS (pulse amount) are recommended as 1000. For RZ, UNITS should be set as needed pulses in one circle.
--Example--
(1) Connect to Controller
Connect to controller, get the handle, then PC uses the obtained handle to control controller.
//connect to controller, default IP is 192.168.0.11
ZauxErr = zmcaux.ZAux_OpenEth("192.168.0.11", out g_Handle);
if (0 != ZauxErr)
{
AlmInifFile.Write(DateTime.Now.ToString("F"), "ZAux_OpenEth Execute Error, Error Code:" + ZauxErr.ToString(), "Error Code Info");
}
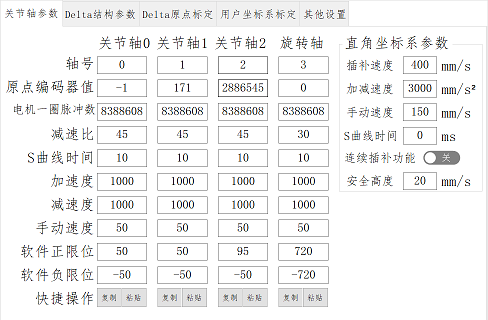
(2) Set Delta Parallel Robotic Arm Parameters
(3) Build Forward Kinematic
/************************************************************************************
'Task No.: /
'Function of this function: build robotic arm forward or inverse connection
'Input: Mode=0—disconnect, 1—inverse connection, 2—forward connection
'Output: /
'Returned Value: 0—success, 1--failure
'Notes:
‘ *only controller with R is valid
' *when in forward, virtual axis MTYPE = 34
‘ *when in inverse, joint axis MTYPE = 34
‘ *when in inverse, keep enable.
**************************************************************************************/
public int ScaraEstab(int Mode)
{
//update UI interface’s Delta parameters
ScaraParaWindows.DeltaParaSave();
//set robotic arm parameters
SetControPara();
//save Delta parameters into Ini file
WriteIniFile();
//clear controller alarms
ZauxErr = zmcaux.ZAux_Direct_Single_Datum(g_Handle, 0, 0);
//update axis list, the axis sequence is J1, J2, Ju, Jz(joint-axis), Vx, Vy, Vr, Vz (virtual-axis)
int[] mJScaraAxisList = new int[4]; //joint-axis list
int[] mVScaraAxisList = new int[4]; //virtual-axis list
for (int i = 0; i < 4; i++)
{
mJScaraAxisList[i] = gDeltaAxisList[i];
mVScaraAxisList[i] = gVAxisList[i];
}
//check whether robotic arm parameters are correct
if ((DeltaR <= 0) || (Deltar <= 0) || (DeltaL1 <= 0) || (DeltaL2 <= 0))
{
MessageBox.Show("Delta Robot has Problem, Please Confirm! ");
return -1;
}
//first to save robotic arm structural parameters into controller TABLE register, then it can build robotic arm connection
//update robotic arm parameters into controller TABLE register
float[] ScaraParaList = new float[11] { DeltaR, Deltar, DeltaL1, DeltaL2, gMotorPulNum[0] * gReducRatio[0], gMotorPulNum[1] * gReducRatio[1], gMotorPulNum[2] * gReducRatio[2], 0, 0, 0, gMotorPulNum[3] * gReducRatio[3] };
ZauxErr = zmcaux.ZAux_Direct_SetTable(g_Handle, TableStaraId, 11, ScaraParaList);
if (0 != ZauxErr)
{
return -1;
}
if ((1 == Mode) && (0 == ZauxErr)) //build inverse solution for the robot (when the robot parameters are updated successfully)
{
//build Scara inverse
ZauxErr = zmcaux.ZAux_Direct_Connframe(g_Handle, 4, mJScaraAxisList, 14, TableStaraId, 4, mVScaraAxisList);
if (0 != ZauxErr)
{
ProceWindows.WriteLog("Fail to Switch Inverse");
return -1;
}
ProceWindows.WriteLog("Switch to Inverse");
}
else if ((2 == Mode) && (0 == ZauxErr)) //build forward solution for the robot (when the robot parameters are updated successfully)
{
//build Scara forward
ZauxErr = zmcaux.ZAux_Direct_Connreframe(g_Handle, 4, mVScaraAxisList, 14, TableStaraId, 4, mJScaraAxisList);
if (0 != ZauxErr)
{
ProceWindows.WriteLog("Fail to Switch Forward");
return -1;
}
ProceWindows.WriteLog("Switch to Forward");
}
}
return 0;
}
Note: for forward, virtual-axis MTYPE will be 34, for inverse, joint-axis MTYPE will be 33. For more, please check former article "EtherCAT Motion Controller in Delta Robotic Arm".
(4) Operate Manual Motion
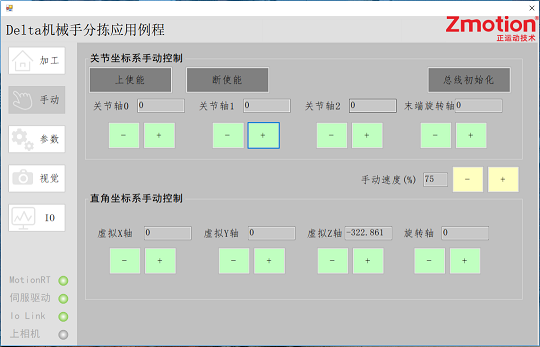
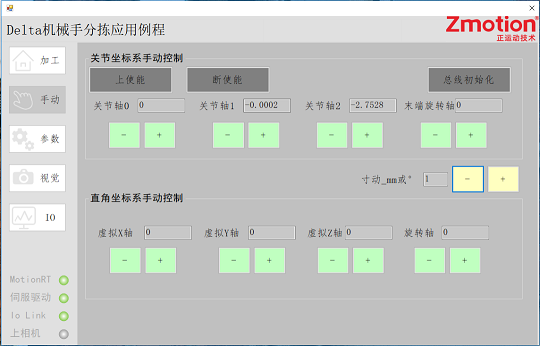
Below shows routine's manual motion interface.
Press the "Manual" button of "Joint Coordinate System Manual Control", it will automatically build forward connection.
Press the "Manual" button of "Cartesian Coordinate System Manual Control", it will automatically build inverse connection.
When the manual speed decreases to a certain value, it will automatically switch to the inching mode.
A. Joint-Axis Manual Motion
/************************************************************************************
'Task No.: /
'Function of this “function”: joint-axis manual inverse motion, press “-“ to call
'Input: /
'Output: /
'Returned Value: /
'Note: /
**************************************************************************************/
private void JHandDirRev0_MouseDown(object sender, MouseEventArgs e)
{
//whether locks it or not, after locked, then it can move
int EnableState = 0;
cszmcaux.zmcaux.ZAux_Direct_GetAxisEnable(MainWindows.g_Handle, MainWindows.gDeltaAxisList[0], ref EnableState);
//if enabled
if ((1 == EnableState) || (MainWindows.IsDebug))
{
int Vmtype = 0;//virtual axis MTYPE
cszmcaux.zmcaux.ZAux_Direct_GetMtype(MainWindows.g_Handle, MainWindows.gVAxisList[0], ref Vmtype);
//if it is not forward state
if (Vmtype != 34)
{
//build robotic arm forward connection
if (0 != MainWindows.ScaraEstab(2))
{
//Fail to build the robot connection
return;
}
}
//which button to be pressed
int Id = 0;
for (int i = 0; i < 4; i++)
{
if (((Button)sender).Name == ("JHandDirRev" + i))
{
Id = i;
}
}
int TempAxis = 0;
TempAxis = MainWindows.gDeltaAxisList[Id];
//if manual speed is less than 5, it is inching mode
if (5 <= MainWindows.HnadSpeedPerc)
{
//set point motion speed
cszmcaux.zmcaux.ZAux_Direct_SetSpeed(MainWindows.g_Handle, TempAxis, MainWindows.HnadSpeedPerc * MainWindows.gAxisHandSpeed[Id] / 100);
//send “inverse” motion command
cszmcaux.zmcaux.ZAux_Direct_Single_Vmove(MainWindows.g_Handle, TempAxis, -1);
}
else
{
//set inching speed
cszmcaux.zmcaux.ZAux_Direct_SetSpeed(MainWindows.g_Handle, TempAxis, MainWindows.gAxisHandSpeed[Id] / 10);
//send inching motion command
cszmcaux.zmcaux.ZAux_Direct_Single_Move(MainWindows.g_Handle, TempAxis, -1 * MainWindows.HnadSpeedPerc);
}
}
}
/************************************************************************************
'Task No.: /
'Function of this “function”: joint-axis manual forward motion, press “+“ to call
'Input: /
'Output: /
'Returned Value: /
'Note: /
**************************************************************************************/
private void JHandDirFwd0_MouseDown(object sender, MouseEventArgs e)
{
//whether locks it or not, after locked, then it can move
int EnableState = 0;
cszmcaux.zmcaux.ZAux_Direct_GetAxisEnable(MainWindows.g_Handle, MainWindows.gDeltaAxisList[0], ref EnableState);
//if enabled
if ((1 == EnableState) || (MainWindows.IsDebug))
{
int Vmtype = 0;//virtual axis MTYPE
cszmcaux.zmcaux.ZAux_Direct_GetMtype(MainWindows.g_Handle, MainWindows.gVAxisList[0], ref Vmtype);
//if it is not forward state
if (Vmtype != 34)
{
//build robotic arm forward kinematic
if (0 != MainWindows.ScaraEstab(2))
{
//Fail to build the robot connection
return;
}
}
//which button to be pressed
int Id = 0;
for (int i = 0; i < 4; i++)
{
if (((Button)sender).Name == ("JHandDirFwd" + i))
{
Id = i;
}
}
int TempAxis = 0;
TempAxis = MainWindows.gDeltaAxisList[Id];
//if manual speed is less than 5, it is inching mode
if (5 <= MainWindows.HnadSpeedPerc)
{
//set point motion speed
cszmcaux.zmcaux.ZAux_Direct_SetSpeed(MainWindows.g_Handle, TempAxis, MainWindows.HnadSpeedPerc * MainWindows.gAxisHandSpeed[Id] / 100);
//send “forward” motion command
cszmcaux.zmcaux.ZAux_Direct_Single_Vmove(MainWindows.g_Handle, TempAxis, 1);
}
else
{
//set inching speed
cszmcaux.zmcaux.ZAux_Direct_SetSpeed(MainWindows.g_Handle, TempAxis, MainWindows.gAxisHandSpeed[Id] / 10);
//send inching motion command
cszmcaux.zmcaux.ZAux_Direct_Single_Move(MainWindows.g_Handle, TempAxis, 1 * MainWindows.HnadSpeedPerc);
}
}
}
/************************************************************************************
'Task No.: /
'Function of this “function”: joint-axis stop manual motion, call when point button is released
'Input: /
'Output: /
'Returned Value: /
'Note: /
**************************************************************************************/
private void JHandDirRev0_MouseUp(object sender, MouseEventArgs e)
{
//which button to be pressed
int Id = 0;
for (int i = 0; i < 4; i++)
{
if (((Button)sender).Name == ("JHandDirRev" + i))
{
Id = i;
}
}
int TempAxis = 0;
TempAxis = MainWindows.gDeltaAxisList[Id];
//if manual speed is less than 5, it is inching mode
if (5 <= MainWindows.HnadSpeedPerc)
{
MainWindows.ZauxErr = cszmcaux.zmcaux.ZAux_Direct_Single_Cancel(MainWindows.g_Handle, TempAxis, 2);
}
}
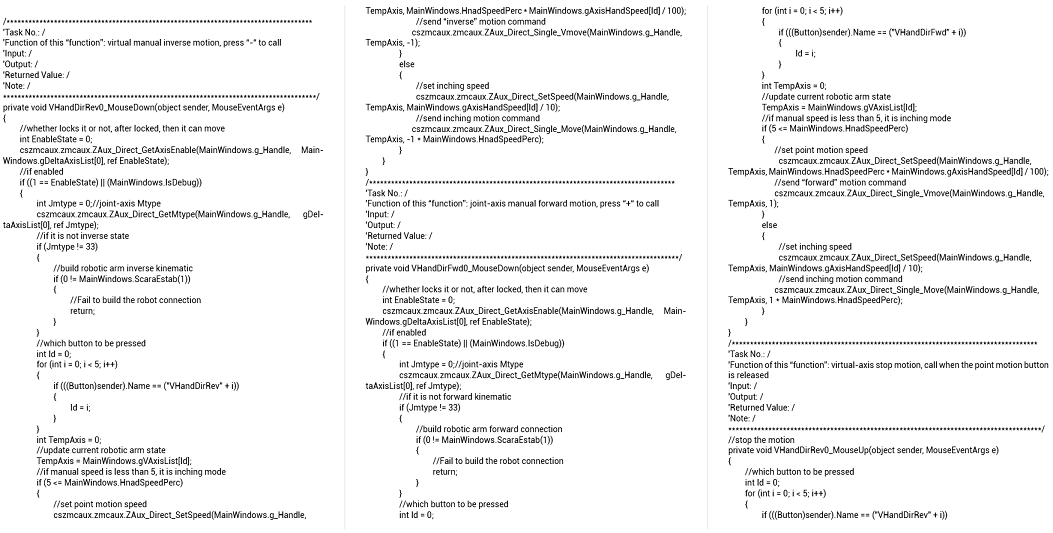
B. Virtual-Axis Manual Motion
(5) Use Robotic Arm Simulator Tool
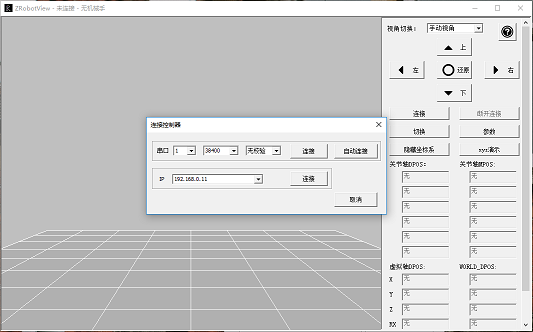
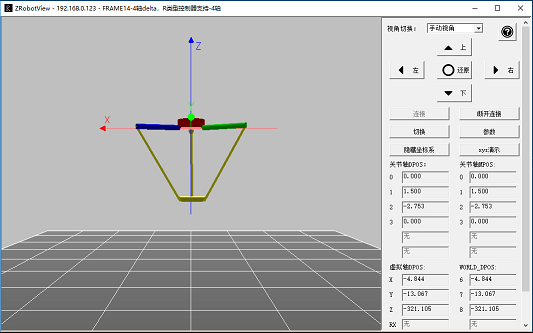
Open "ZRobotView" software, enter controller IP (default IP: 192.168.0.11), then click "connect". After connected, click "switch", it can 3D simulate robotic arm operation.
